Category: Feature Article

QR Codes–a useful tool for promoting your organisation

What are QR Codes

QR code used in a newspaper to link to its mobile site

QR code used in a newspaper to link to its mobile site

A QR Codes is a two-dimensional monochrome barcode that is designed to house a long text string. This may represent contact details or Wi-Fi network parameters but is commonly used to provide a link to a Web-hosted resource. These barcodes may be printed on a newspaper, business card or flyer; or even shown on a Website; the latter method being used to show links to software for the Android platform.

Typically, a person who has a mobile phone equipped with a QR-code reader app can then just point the phone’s camera to the barcode and “take a picture” of that barcode. This then leads to the contact details being put in their contact list or the user being taken to the Web site or Web-hosted resource. This function has even been extended to supplying GPS coordinates to a device for navigation (think of geocaching) or, in the case of Android phones, supplying Wi-Fi service parameters to these phones as part of provisioning hotspot service.

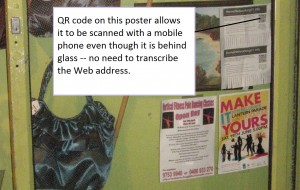
QR Code used on a poster

A QR code as used on a poster to advertise this site

They are popular in Europe especially with cafes and restaurants but are slowing increasing in popularity in other countries. As well, some commentators have described the QR code as a way of providing a machine-readable hyperlink in the field. It is also worth having a look at various QR-code blogs like this one so you can know what the trend is about.

Infact, when I promote HomeNetworking01.info using posters or business cards, I make sure there is a QR code pointing to the site so that people can use their phones to head to the site.

Why QR codes for your organisation

One major benefit that QR codes have for your print-based campaigns is that you can insert a direct link to your Webpage or a resource on that Webpage. Your audience then can visit that resource without having to memorise a URL or transcribe the URL in to the phone using a small touchscreen keyboard or SMS-style with the phone keypad.

The QR code is better than using Bluetooth transmitters to provide content. This is because the user isn’t likely to be annoyed with “accept this” Bluetooth responses from these transmitters when they come in to range of the transmitters. As well, the user doesn’t have to remember how to enable or disable Bluetooth discovery mode on their device. As well you don’t need to make sure there is a transmitter at the advertisement and make sure there is power to the transmitter, which can make the QR code acceptable even for posters on that noticeboard or shop door.

It is also better than using any of the proposed “near-field communication” technology for linking to Web resources because you don’t need to buy and integrate near-field transmitters in your promotional materials for the technology to work.

Direct Link to deep Web resources

You may want to provide a sound clip, video or PDF file to your mobile users. As well, you may want to link the user to a particular Web page about a product or promotion. But mobile users may find these resources difficult to gain access to on your site because of being required to enter a long URL into that numeric or small alphabetic keypad.

The QR code can provide the direct link to your campaign page, PDF file or audiovisual resource in a manner that is ready to download “there and then”. If the resource is a YouTube video, you can provide the link to the video clip as it appears on YouTube and the site or local YouTube client can open when the QR code is scanned.

Appropriate for the Social Web

Here, the QR code can augment your Social Web campaign because most active Social-Web users tend to work their Facebook or Twitter presence more from their smartphones. This is especially as I have noticed a lot of small businesses promote their Facebook presence online through posters and flyers that have the “Like us on Facebook” slogan.

What a simplified way of doing this by pointing the latest ultra-cool iPhone to the QR code on the poster attached to the trendy cafe’s espresso machine or refrigerated display cabinet in order to “like” that cafe on Facebook. It certainly makes it certain that you are seen with that iPhone.

Reading QR Codes

Some mobile-phone carriers and manufacturers will supply a QR-code reader with their Internet-enabled camera phones. But iPhone, Android, Blackberry and Windows Phone 7 users can come across many free QR-code readers at their platform’s app store. One example that comes to mind is the free i-Nigma which started becoming available for the iOS platform but lately became available for the Android and Blackberry platform. There are others like Barcode Scanner for the Android platform, BeeTag for the Blackberry platform and ScanLife for most of the platforms.

A main difference that may sort the “sheep from the goats” as far as QR-code reader programs go is whether they can read a light-coloured QR code that is printed on a dark surface. Similarly, there may be differences in how well a difficult-to-read code like a double-sided sign that is backlit can be understood.

At the moment, most QR-code readers are pitched at handheld mobile phones for immediate viewing of the resources on these devices. But it could be feasible to provide “capture-store-sync” transfer of Web URLs or downloaded resources to desktop operating systems or tablet computers as a feature of a QR-code reader. This could then allow a person to view the Web site on their laptop computer using their favourite Web browser at a later time.  It would also be of importance with QR codes being used for presenting Wi-Fi network parameters to Android phones, where the same parameters can be passed up to a laptop and integrated in to the Wi-Fi networks list for that computer.

Preparing QR codes

There are many QR-code generator sites and programs, most of which are free to use. Typically these sites may allow you to provide a URL to a resource as the input text or prepare contact details. A good resource to start from is this blog’s list of the top 10 free QR-code generating sites. As well, i-Nigma also offer a free QR-code generating page as well as their QR-code reader. Yet another resource is the QReateBUZZ Webpage which I have used for the QR codes for promoting this site.

These codes can be yielded as a small, medium or large size. Here, you could use a small size code for business cards and flyers here you don’t have much room or just want a discreet code on the corner of the poster. You could then use the larger sizes if you want people to notice that there is a QR code in the signage’s artwork or need to be far from the artwork to scan it.

Most sites will yield high-resolution PNG or JPEG bitmaps but some may yield EPS Postscript files or PDFs that are vector-images of the QR codes. You typically will then copy-and-paste or import the mage in to your artwork. As well, a lot of the sites will generate a JPEG image that you copy from the site using Ctrl-C / Command-C and paste to your artwork using Ctrl-V / Command-V.

Of course, there are some desktop QR-code generator programs which will run on a regular computer but most of these are Windows-only and a lot of them are offered at “large-business” prices.

It is still good practice to work with dark-graphics-against-light codes because most QR-code readers cannot work effectively with light-graphics-against-dark at the moment. If you are setting a QR code on a dark background, you could use the dark graphic on a light background and have a distinct light-background margin around that barcode.

Conclusion

Once you explore the creation and use of QR codes as part of your online and offline marketing strategy especially where you have online resources

Twitter–who see what and when

Another increasingly-popular social network service is Twitter. This was intended as a “microblogging” service but some people have been implementing it as another social network.

Like the similar Facebook article that I have written for Facebook novices, this will list who will see which information you post when you use Twitter. Here, I would recommend this as a bookmark or favourite or as something to print out and keep near the computer or have available on the business intranet.

Twitter lexicon

Tweet A public Twitter post. Also to leave a public post on Twitter
Follow To subscribe to a Twitter user’s Tweets (public comments)
Follower A person who subscribes to a user’s Tweets. Is also capable of receiving direct messages from the users they follow.
Hashtag A reference tag that is preceded by a # (hash) symbol and is used for filtering Tweets on a topic. Used primarily in front of cities, TV shows, brands, etc.
Mention or Reply A Tweet that features a Twitter user with that user’s name preceded by an @ symbol.

Who sees what

What you do Who sees this  
When you post a Tweet All your Twitter Followers  
When you Retweet someone’s else’s Tweet All your Twitter Followers Your followers will see the original Tweet suffixed by “Retweeted by <your_user_name>”
When you reply to someone else’s Tweet or mention another user in your Tweet All your Twitter Followers The Tweet will have the other person’s username preceded by the @ symbol and the user will be able to see the mentions or replies in the “reply / mention” filter
When you send a direct message to a Follower Only that specific Follower that you address Your Follower has to be following you to be able to be contacted by a Direct Message

What to do where on Twitter

General comment or broadcast message Post a Tweet Be careful what you write as all followers or potential followers can see what you write.
Reply to someone else’s Tweet or mention a Twitter user where confidentiality isn’t required Post the tweet using the Reply or Mention tools Again, be careful what you say when you write these posts.

This can be good for congratulating the user or offering some sympathy on an event they Tweeted about.

Direct private message to a Follower Post a Direct Message  


If someone follows you on your Twitter account, it may be a good idea to check that person out when you receive the notification by email. Here, you could then consider following that person and being able to use direct messaging as appropriately.

It is also worth noting that a lot of social Twitter users use “textspeak” (abbreviations and acronyms for common expressions used when sending SMS messages) when they send out Tweets. So you may have to use resources like the Urban Dictionary to help you understand some of this lingo.

Feature Article – Basic information about provisioning public Wi-Fi hotspot service

Introduction

You might be considering setting up that complimentary hotspot for your guests to use but there are certain risks to be aware of concerning the security of your business and your guests’ data and identity.

Risks that have been highlighted include confidential-data and identity theft performed against customers as they work this data from their portable devices; as well as clandestine computer activity like the downloading or serving of illegal content; or the distribution of spam email, performed using computers connected to public Internet networks like wireless hotspots.

As well, there may be other imperatives required of people who provide Internet access to the public. These imperatives, asked for by various local, state / regional or national governments may include requirement like keeping a log of whom you provide Internet access to or requirement for session tracking. Therefore I am not therefore in a position to explain how to satisfy these needs and it is best to seek local advice on this topic.

Therefore, your business should know who is using the hotspot service and be able to make sure that the people who benefit are the business’s customers or guests. This means that the customers or guests are actually going to be operating the network device that they use when connecting to the service and also operate it on your premises. As well, your customers know that they are going to actually benefit from your hotspot service when they log in to this service.

The cafe or bar as a “second office”

This is more important for the cafe as an increasing number of businesspeople use these places as “second offices” where they can work without unnecessary office-borne distraction or as places where they meet their colleagues or business partners. Here, these people will be working on workplace-confidential data and most of these workplaces place high value on the security of this data as it travels between the laptop and the workplace’s main computer systems.

In fact, the reason I have decided to publish this article was because a cafe that I regularly visit in Camberwell (Melbourne, Australia) had just started to offer free public Wi-Fi access but I had wanted them to provide a free Wi-Fi service that is safe for their customers. Here, they had an ordinary wireless router as the Internet service but they needed help in getting this service working properly and safely. They also wanted to make sure that this resource was available just to their customers as part of their customer service.

Your equipment

When you start out with your complimentary-use hotspot service, you may use a wireless router hooked up to a separate Internet service or use one with a “guest-access” or hotspot function and is connected to your common Internet service.

This should be set up to cover your public area such as the bar areas in your bar or the dining room in your cafe. In some situations, you may need to use an additional access point to cover larger areas or get your signal past thick walls. This is something I have covered in this site as a separate article.

As well, if your equipment works on 802.11n technology, it should be set to work in compatibility mode where it can work with 802.11g and 802.11n devices. This is to cater for the fact that most devices that are in circulation, especially smartphones, are likely to work with 802.11g technology and people may operate battery-operated 802,11n-capable devices in 802.11g mode in order to conserve battery runtime.

Dual-band setups

It may be an asset to consider a dual-band setup for your wireless hotspot. This will use a radio presence on the 2.4GHz band as well as the newer 5GHz band and is supported by an increasing number of newer laptops, tablets and smartphones. The new waveband comes in to its own for multimedia applications like video conferencing or photo and video uploads to social media as well as taking some pressure off the 2.4GHz band for legacy equipment to use.

This can be achieved with a router / gateway or access point that implements simultaneous dual-band operation or you can add a 5GHz access point or a dual-band access point set up for 5GHz operation to your existing network.

Here, you need to make sure you still have your network set up for 802.11b/g/n operation for the 2.4GHz band and 802.11n operation for the 5GHz band. If your equipment supports 802.11ac Wi-Fi, you may have to make sure that the 5GHz aspect works in a compatibility mode for both 802.11n and 802.11ac equipment. As for the SSID (Network Name) which is talked about below, you can use the same SSID for both bands and the clients’ computer equipment switches between the bands automatically.

Your SSID or Network Name

The SSID or network name is very important to your hotspot’s identity. Here, it should reflect your business’s name and have a reference to public or guest Wi-Fi service. An example that I used for a basic complimentary-use Wi-Fi hotspot that I set up at a coffee lounge just recently was MORAVIA-PUBLIC-WIFI. Here this reflected the coffee lounge’s name (MORAVIA) as well as stating that the service was a public Wi-Fi hotspot service hosted by this business. Therefore, you can then identify any “evil-twin” or “fake-hotspot” devices left on or near the premises that exist to capture customers’ sensitive data.

This SSID must be used in all signage advertising your hotspot and the signage must reflect your company’s identity. This means that it either has your company logo and name or be in your company’s styling. In this case, the signage about the hotspot should at least exist beside the cash-register and the door, preferably at eye-level or near the main handle or pull.

Hotspot security

Basic security

Your hotspot network should be secured with a WPA-PSK passcode which your staff should give out to customers who want to use hotspot service. As well, the network should have wireless-client isolation enabled, so that customers who are using the hotspot cannot browse on to each others’ computers.

Previously, there wasn’t any wisdom in implementing link security on a public-use wireless network but now that most computers and handheld devices support WPA-based link security for wireless networks, adding this function to WPA-level is still worth it for achieving some control and security in a public-use wireless network.

It is still important to change the WPA-PSK passphrase regularly such as at least twice a month. Some environments may require the passphrase to the changed every week. This is so that it becomes hard to set up a “fake hotspot” using your service’s credentials or keep a computer logged in to the hotspot service without you knowing.

People who use “open-frame” computing devices based on recent versions of Android or Windows may find that this job may be simplified. One method, which works with both the operating systems, is to use WPS push-button setup on consumer routers that are suitably equipped and are serving as dedicated hotspot devices. But another method is to make a QR code representing the SSID and WPA passcode as a machine-readable form and print this out on to a card that you hand to your customer. Then they scan this code with their Android or Windows 10 device with the appropriate reader software.

As well, your hotspot should properly support VPN pass-through for all protocols so that business users can log in to their workplace VPNs  without any headache.

Special hotspot-gateway devices

It may be worth knowing that if you want greater control over your public Internet service, it may be worth implementing a “docket-printer-based” wireless hotspot gateway like the Netcomm HS-1100, Solwise WAS-105R or Zyxel N4100.

Here, these devices direct users to a login page where they have to key in a session login and password that they transcribe from a paper docket that is printed from a docket printer attached to the hotspot gateway. If you intend to offer a paid service, these devices put you in a position to use the payment methods and paths that you use to accept payment for your goods and services.

This is unlike some other hotspot gateway setups that require the potential user to pay another company directly using their credit card or an account maintained by that other company using a payment form hosted by that hotspot. Typically, a lot of these setups are managed in a manner where you don’t have much control over how the service in provided and the service may be provided in a manner not dissimilar to how most vending and amusement machines are provided where you don’t own the equipment, representatives visit the premises to maintain the equipment and you get a small “cut” from the takings.

As well, the session login parameters that your users type in from these dockets exist only for a particular time limit. This is also important for people who run a paid service, but can be useful for managing complimentary service so you can be sure that the people who are using your service are your customers or guests who are in your public areas.

If you do run one of these dedicated hotspot gateway devices, such as a “docket-printer-based” device, the wireless network that these devices operate should still have WPA-PSK security with the passphrase changed regularly. The “docket-based” devices will list the WPA-PSK passphrase on that same docket so your customers can still log in to your hotspot from their device.

Hotspot 2.0 / Wi-Fi Passpoint functionality

Hotspot-gateway devices that supports Hotspot 2.0 or Wi-Fi Passpoint operation, including firmware updates that bring this functionality to existing equipment, is also worth its salt. This provides for improved login experiences including the ability to have your venue described in the list of available Wi-Fi networks when your customers use compatible along with a simplified signup or login procedure. It also supports link-level security between the user’s computer or phone and the access point.

When you enable Hotspot 2.0 or Passpoint functionality on your hotspot gateway device, make sure that your establishment’s details are properly entered when you fill out the setup form for this function. Here, if your users have equipment that supports this technology to the letter, they can identify your establishment in a more qualified manner so they are sure that the Wi-Fi service they are connecting to is the one you are providing at your business.

Of course those of us who use devices that don’t support this functionality can still benefit from Wi-Fi hotspot service on these services as long as “universal” authentication is enabled on the gateway device.

Branding options

If you do implement these devices, make sure that you know how to brand the customer-facing user interfaces.

Most of these devices can allow you to upload a graphic and integrate it in to the login interface or they can allow you to upload customised login screens or point to a Web server for the login interface graphics. The latter option may appeal to you if you have a good hand with creating basic HTML Web pages.

Here, make sure that you have your business name and logo and, if you can do it, set the colour scheme to your business’s colour scheme. As well, make sure that your business name appears on the access dockets that your hotspot gateway prints out.

Power outlets

With a hotspot, always expect that some of your customers will use the power outlets on your premises to power their laptops or smartphones from AC power to avoid compromising battery runtime. This is more so with customers are operating older equipment that has batteries that are “on their last legs” or are working VPN sessions in order to “pick up” files from work and want to be sure this is done properly.

Here, a few double outlets near the tables can work wonders here and if an outlet is used for powering a device like a lamp, the device could be connected to the outlet via a multi-socket power-board with extra outlet space for a few appliances.

Conclusion

Once you know how to choose and set up your public-use wireless network properly, you can make sure that this is a service that your customers and guests will benefit from fully. This may even put your business “on the map” as far as customer-service extras are concerned.

UPDATES

I have done some revisions to this article which was originally published in August 2011 to reflect the arrival of newer technologies like 802.11ac dual-band Wi-Fi wireless technology, Wi-Fi network credentials via QR codes, and Wi-Fi Passpoint technology.

Special Report – A Celebration of the 50th Internationaler Funkaustellung

This year is a very special year as far as one of the two annual “pillar” trade shows for consumer electronics is concerned. It is going to mark the 50th time the Internationaler Funkaustellung, the premier trade show for consumer-electronics in Europe, has been hosted. Miss IFA 2010 with 50th IFA logo

What is the Internationaler Funkaustellung?

The Internationaler Funkaustellung, also known as the IFA, is a German trade show which was primarily centred on consumer entertainment electronics but is now also focusing on major and small appliances intended for personal or domestic use. It was initially a way for Germany to show its radio technology prowess when the medium was just to become a commercial reality.

This used to be an event held between August and September of every second year but is now held annually between the same months. It had existed since 1924 but was suspended through World War II as Germany focused its efforts on the war. It was initially hosted in Berlin but was hosted in different larger cities around Germany including West Berlin even when the nation and that city was divided.

Initially, this was used by German consumer-electronics manufacturers to promote their wares and Loewe, one of the German names associated with luxurious TV sets, has been with this show ever since it started.  As the consumer-electronics scene became more international, this trade fair became more international and also became larger.

An important step in the presentation of new technology

I have seen this show in the same league as the Consumer Electronics Show in the USA as being one to watch when it came to consumer electronics. Typically, this show would be where consumer-entertainment technologies that were relevant to Europe, Australia or New Zealand were premiered or commercialised.

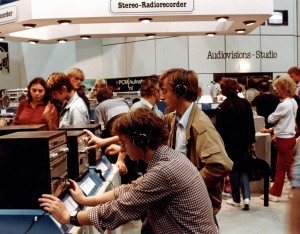
Micro Hi-Fi component systems at IFA 1981

Micro Hi-Fi component systems

Radio – TV – Tape Recording – Hi-Fi – Stereo Sound – FM stereo – Microgroove (LP / 45) records – Cassettes – Colour TV – Dolby NR – Teletext – Enhanced Radio Technologies (ARI traffic information priority, RDS with textual display of station metadata) Home Video – Compact Discs –Stereo TV, Hi-Fi Video and Home Theatre –  MiniDisc –  DVD – Digital Radio – Digital TV – Satellite Navigation – HDTV – 3DTV

You name it, it was either premiered or had its European commercial launch here

Teletext display at IFA 1979

Teletext - a predecessor to interactive TV

Of course, this show gave other countries like the USA a look-see in to the consumer-electronics and broadcasting technologies that were in “full swing” in Germany but weren’t being launched or given a commercial chance in the home country. One example was Teletext which allowed TV stations to transmit textual information alongside their video signal, with the end-user being able to call up the information on to the screen of a suitably-equipped TV set using its remote control. Another example was the ARI traffic-information-priority technology where a suitably-equipped car radio could be set to play traffic announcements at a louder volume than the rest of the programme material or tune for only those stations that run the announcements regularly.

Now including domestic appliances and personal care

Since 2008, the organisers had decided to make the IFA show encompass domestic appliances as well as consumer electronics. It was initially a small area of the show but this class of goods increased in its share of the show’s floor space. This even led towards the effective amalgamation of a European home-appliance trade fair with this one in 2009 with this fair become the European universe of all consumer electronic and electrical devices. This trend hasn’t been reflected in the Consumer Electronics Show in the USA, mainly because of a trade-specific fair that covers this class of goods sold in that market or other market-specific reasons.

This was symbolic of a new trend with such appliances being not just a functional element in one’s life but a stronger part of one’s lifestyle. It also included the desire for consumers to buy the major appliances that are more resource efficient, especially as governments are using tax breaks, “scrappage” / “cash-for-clunkers” schemes and similar programs like to assist in this goal.

As well, the last financial crisis has encouraged an increase in “at-home” time and the industry is taking advantage of the fact by integrating small appliances like espresso machines as a way of mimicking the environment of being “out-and-about”.

Relevance to the home and small-business IT world

Over the last ten years, the home network has become an integral part of the consumer lifestyle, especially as “always-on” broadband Internet has become commonplace and the number of multiple-computer households increases. The IFA show has then become a showground for manufacturers to exhibit devices like broadband routers and network-infrastructure equipment as well as desktop and laptop home computers.

Infact, the Wi-Fi-equipped laptop computer and the Wi-Fi wireless home network has become more important over these years thanks in part to the Intel Centrino campaign which emphasised the laptop computer being part of one’s lifestyle. Similarly, mobile phones have become Internet-enabled multi-function devices that can work either with the cellular telephony infrastructure or with a Wi-Fi network. This concept has been spurred on by the recent crop of Nokia phones and the Apple iPhone.

As well, the arrival of file-based media playback, spurred on my MP3 digital audio players, has integrated the computer and the home network as an integral part of the home entertainment system. This functionality was initially in the form of separate devices but has ended up becoming another function of regular audio and video playback hardware and has been enhanced by the use of standards-based technologies like DLNA. Therefore most consumer-electronics firms are using this show to launch or exhibit product models or ranges that feature this ability. Similarly most computer companies are exhibiting network-attached-storage devices that can hold multimedia files and share them around the house.

This concept has extended in to the realm of Internet-based broadcasting where radio or TV content can be obtained live or on-demand from a content-provider’s Website. This has made consumer electronics companies and others work out ways to bring this content forward to TV sets and hi-fi systems without an intimidating and unwieldy device or user interface.

An interesting comparison

  Exhibitors Floor Space (square metres) Visitors
1924 242 3,300 180,000
2010 1.423 134,400 230,000


Conclusion

IFA Logo

This is a way of celebrating how this show has become a “pillar” trade fair as far as consumer electronics and technology in the European market is concerned.

All press photos and logos are copyright of Messe Berlin GmBH.

Special Report – Windows 95 now 15 years old and a major change to the PC computing platform

During mid-1995, the Intel-based “IBM-PC” desktop computing platform had been given a major improvement with the arrival of a new operating system from Microsoft. This operating system, initially known as “Chicago” and was to be known as “Windows 4” and “MS-DOS 7” but became known as Windows 95 had yielded many improvements to this platform that it was made increasingly legitimate as an “all-round” general-purpose computing platform that was ready for the Internet.

This operating system was launched with a huge campaign which revolved around the new “Start” button on the desktop and this was enforced with the use of the Rolling Stones smash-hit song “Start Me Up”. The visual element that was also used was the clouds in the sky symbolising a new operating environment for your computer.

How did Windows 95 improve the Intel-based “IBM PC platform”

Computer-Management Improvements

Integration of Windows graphical user interface with MS-DOS operating system

Previously, a computer that worked on the “IBM PC platform” required the use of Microsoft’s MS-DOS operating system or a similar operating system like Digital Research’s DR-DOS as its base operating system. These operating systems didn’t come with a graphical shell unless you paid extra for one and ran the shell as a distinct program.

This typically required users either to run a third-party menu program or graphical user-interface “shell” like Automenu, Microsoft Windows or one that was supplied with network software like Novell; or, if they had MS-DOS 4 or 5, start a DOSSHELL graphical user interface. IBM typically pushed their OS/2 graphical shell as one that was suitable for any of their PS/2 series computers.

Now, Windows 95 integrated the graphical user interface with the MS-DOS operating system and had this running as a default setup. It had led to avoiding the need to remember to run particular programs to use a graphical-user interface.

A lot less to run to add functionality to the computer.

Previously, if you wanted to run sound, advanced graphics or other multimedia, use peripherals like a mouse or a CD-ROM drive or use communications or computer networks, you had to make sure that you ran particular drivers or memory-resident programs. This typically required you to work with the CONFIG.SYS or AUTOEXEC.BAT files to make sure these programs start.

If you wanted to increase memory for particular programs, you had to know how to stop a particular memory-resident program to free up the memory space. In the case of communications, you had to use communications programs which were effectively “terminal emulators” to work with bulletin boards and these programs were the only ones that could control the modem. Similarly, if you ran a network, you would need to run networking software to allow the computer to benefit from the network. Some of these situations even required the location to have a resident “geek” called a system administrator to set up these computers. Even the Internet on a Windows machine behind a dialup modem needed the user to run programs like Trumpet Winsock to establish the connection.

This improvement alone allowed a small organisation to share files or printers between computers that are connected on a network with minimal configuration effort and has opened up the path towards the home network.

With Windows 95, most of these functions were simply handled by the operating system rather than by extra software that had to be started.  This had taken away all of the extra requirements that the user needed to think of to run a highly-capable computer and do what they wanted to do.

Ready for the Internet

1995 was the year that the Internet came to the mainstream. Cyber-cafes had sprung up around town and new businesses called “Internet Service Providers” came on the scene. It was considered the “in thing” to have an email address where you could receive Internet-based email and you also had to know how to surf the Web. The old order of bulletin boards and online services with their “controlled media” had fallen away for this new “uncontrolled media” order that the Internet offered.

Windows 95 was capable of working with the Internet “out of the box” whether through a network or a dial-up service. This was because the operating system had an integrated TCP/IP stack with support for PPP-based dial-up protocols. There was even a basic email client provided with the operating system.

User-interface improvements

The Start Menu

This was a new take on the previous DOSSHELL programs, Windows Program Manager and the third-party menu programs as being a place to find and start programs. Here, the user clicked on the Start button at the bottom left of the screen and found a tree of program names which would represent to software found on their system.

It had been considered easier for most users to start working on whatever they wanted to work on and has become a standard motif for all of the Microsoft operating environments since this operating system.

Windows Explorer and the object-driven view

The file-management functionality was handed over to Windows Explorer which provided for a new way of managing files and objects. It allowed for programmatic views like a “My Computer” view that provided for a simplified shell or an “Explorer” view with a directory tree in a pane as well as an object-driven file view.

This collection-viewing concept had extended to the Control Panel and other operating-system components that used collections as they were introduced in to the Windows platform.

Larger file names

Previously in MS-DOS, you were limited to an 8-character file name with a 3-character extension that was used for defining the file type. Now, since Windows 95, you could create a meaningful file name of up to 32 characters long which allowed you then to identify your files more easily. Thee was a special truncated 8-character version of the file name for use with older programs that didn’t support the new file-name convention.

It became more important as digital cameras became popular because people could name their photos in a way that reflects the content of the picture and also was important as file-based audio storage came on to the scene.

The Registry configuration-data store

Microsoft introduced the Registry configuration-data store as a way of avoiding the need to maintain multiple configuration files across the system. Here, this store allowed for a centralised point of reference for holding this data that the operating system and applications needed for configuration-reference information that had to be persistent across sessions.

Under-the-hood improvements

Integration with the 32-bit computing world

This operating system was built from the ground up to be a true 32-bit operating system that was tuned to work with the 32-bit processors that emerged since the Intel 80386DX processor. This would then allow software developers to compile their programs to run their best in a 32-bit computing environment.

This was in contrast to programs like Microsoft Word 6.0 which were compiled for Intel-architecture 32-bit processors but in a manner that was to be compatible with 16-bit processors of the same architecture. As well, most of the MS-DOS operating systems were also compiled for use with the 8-bit “PC/XT” environments and/or the 16-bit “PC/AT” environments. The operating-system limitation then didn’t allow these programs to work at their best even if run on a computer with a 32-bit processor.

This had allowed for a variety of optimised computing setups like true multitasking and multithreading that these newer processors could cater for.

It is like Windows 7 where the operating system has been tuned for a 64-bit computing world and optimised for the newer multicore processors that are part of the Intel-based processor architecture.

Readiness for newer computing designs

Windows 95 had also catered for newer computing design principles such as the “soft-off” principle that was part of portable laptop computers and was to be part of the up-and-coming ATX desktop-computer design standard.  This principle catered for “one-touch” power-off and modem-based / network-based power-on practices which allowed for improved system management for example.

The operating system also allowed for support of various forms of extensability through use of standards, class drivers and similar practices that avoid the need to overload Windows with drivers.

Conclusion

Windows 95 wasn’t just an “ugly duckling” of an operating system but a major turning point for the evolution of the Windows platform. Happy Birthday Windows 95!

Feature Article – Wiring a house for Ethernet

Introduction

There may be a question that may come up when you build your new home or do renovations on an existing home. This question is whether to wire you premises for Ethernet or not and how to go about it?

What is involved when you wire for Ethernet

When you wire a house for Ethernet, you are providing a high-speed data backbone for your premises. This is achieved by laying Category 5 or Category 6 wiring from most rooms to a central location where there is a “switch” that moves data around the network at the appropriate speeds for the network devices.

The reason that it makes sense to consider the home-network issue, especially wired-in Ethernet, is because an increasing number of households are using two or more computers. Infact, there is an increasing trend for households to have more computers than TV sets. As well, computers can and have now become entertainment centres for bedrooms and other small areas thanks to DVD drives, sound-card setups and radio and TV-tuner kits that install in or connect to PCs. There is also an increasing common practice to copy CDs to the computer’s hard drive so that these computers double as personal jukeboxes, which is an asset with small areas. This means that there is a desire to have access to resources like the Internet and printers from all the computers that are in the house.

Similarly, there is new interest in the so-called “home theatre PC” where a computer is being used as a primary media center for the household. This is being achieved through the computer being housed in a case that is optimised for living-room use by having reduced operating-noise output and looking like a piece of home-entertainment equipment. These computers run an operating system that is optimised for viewing from a distance and optimised to do home-entertainment duties, plus being hooked up to the main living-room TV and sound system. This concept permits activities like the use of network media receivers as “media extenders” where one can “take” audio or video content to be viewed or listened to in other rooms.

If you have networked your computer equipment by using a “no-new-wires” method like wireless or HomePlug powerline; you may be dealing with a network that isn’t working at its best. This is because the “no-new-wires” technologies work on having the “no-new-wires” segment’s bandwidth shared by all the devices that connect to the segment. This is exemplified by poor response time during a network multiplayer game hosted across the “no-new-wires” segment or slow transfer speed whenever a file is being transferred between two nodes on the same segment.

Typically, when you implement a “no-new-wires” network, you would use a broadband router that connects to an Ethernet segment and the “no-new-wires” segment on the LAN side, like one of the many wireless Internet gateway devices. Also, if you decide to add on extra network devices, you would have to buy extra network bridges so these devices can work as part of the network.The possibility of high-speed Ethernet being available for home-computer users is made real through high-performance Ethernet network-connectivity devices being made affordable and ubiquitous for most users.

For example, there are Ethernet adaptors available for installation in PCI or ISA-based computers, or for quick connection to “sealed-box” computers via the USB port, or the PCMCIA or CompactFlash card slot. As well, allof the game consoles that are capable of online gaming have an Ethernet socket either built-in or as an extra-cost user-installed system accessory. Let’s not forget that most devices that connect to a network for some part of their functionality would have an Ethernet connector on board or on a supplied network adaptor module. Also, most newer computers are being supplied with built-in Ethernet connection abilities as a standard feature and people who build their own computers are now able to base their projects on Ethernet-equipped motherboards.

As well, the switches that are required as part of an Ethernet network are now available at very cheap prices. This all ends up with the Category 5 Ethernet medium being considered as a lowest-common-denominator for network connectivity.

Why wire a house for Ethernet?

You will benefit from the high data throughput that Ethernet provides in its current form – 100 Mbps, with 1 Gbps (1000 Mbps) being available now at a slight premium for new and existing small Ethernet networks. This will benefit applications like Internet gaming, network media streaming such as Internet radio; as well as graphics-rich printing.

You also gain the advantage of reliable network behaviour because you are not regularly sharing data transports that are prone to interference. This is due to the way the common Ethernet network switches provide dedicated bandwidth to each port on them. They also scale data throughput to the highest speed available between the client and the network switch that the client is connected to. If different clients are moving data at different speeds, the switch implements a buffer so slower clients can benefit from the data while the data is off the faster clients’ minds very quickly.

As you may have known before when you have worked with the computer network at work, or with your Internet experience, the Ethernet infrastructure can carry lots of different data.

This wiring practice will get the best out of the killer applications for these home networks i.e.

  • Internet access from everywhere in the house;
  • PC or console-based network / Internet gaming;
  • Streamed media around the house using DLNA-compliant network-media equipment
  • Voice-over-Internet-Protocol telephony which is either being provided as part of a “triple-play” service or an alternative low-cost telephony service

amongst other activities as outlined below.

IP-TV / Video-on-demand and the “Triple-Play” goal

There is increased interest in delivering video content over the Internet and being able to view it on the large-screen lounge-room TV.

This is being facilitated on two different grounds – one being to provide content complementary to or an extension of what is offered by broadcast TV providers and the other is for telecommunications companies and Internet providers to distribute multi-channel pay-TV via the same Internet “pipe” as the telephone service and broadband Internet service.

The first situation is to provide “over-the-top” video service where the Internet “pipe” is used by another operator to distribute streamed or downloaded video content independent of the broadcasters. It manifests in the form of “download-to-view” video-content services like Netflix, CASPA and Hulu or “complementary cable services” which provide channel groups that may not interest the main cable-TV providers, such as wholesome family entertainment or overseas / expat content in the US.  Increasingly, network-enabled video products like games consoles, TVs and BD-Live Blu-Ray players are now using apps or extensions that support broadcaster “catch-up TV”, complementary-TV or video-on-demand platforms.

The second situation comes to  “IP-TV” where TV signals are transmitted via an IP-based Internet-capable network. This method is being pitched as a way of using DSL or fibre-optic-based next-generation-broadband to distribute Pay-TV signals to subscribers. This has become more so with the ISPs and telcos moving towards offering “single-pipe triple-play” services with regular telephony, Internet service and multi-channel pay-TV from the same entry point. It involves the provision of a set-top box (STB) or personal video recorder which plugs in to the router via an Ethernet cable.

As far as this application is concerned, a house that is wired for Ethernet is at an advantage for the “IP-TV” service. It benefits security of the conditional-access system because it is harder to unnoticeably “sniff” out conditional-access key values before they reach the STB; and there is high quality of service due to the nature of “switched Ethernet” where high bandwidth and low-latency is assured for full-screen video. Also there is the ability to extend the service either through a “portable” setup where the STB is relocated at will or through having extra STBs connected to secondary TV sets, this being a feature increasingly offered as a value-added option.

Extending or improving the wireless network
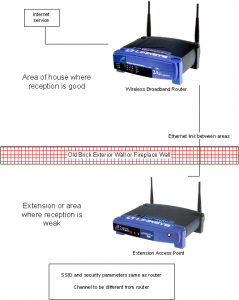
Two access points used to extend wireless-network coverage in older house

Improving wireless-network coverage in older house

By wiring your house for Ethernet, you are also laying an infrastructure that can definitely work “hand-in-glove” with wireless networking.

This is whether you have your home network based on a wireless backbone provisioned by a wireless router or you are starting from scratch with a wired backbone. If you were on an existing wireless network, you could set up your “fixed” nodes like desktop PCs to work on the Ethernet system.

This then leads to the wireless network being primarily of benefit to those devices that gain the most benefit from it i.e. portable or transportable nodes like laptops, PDAs and Web tablets.

You are also in a better position to improve your wireless network’s performance by implementing a practice that is performed in corporate, education or public wireless networks. This is to install one or more extra access points in areas where it is not possible to gain optimum reception from your primary wireless access point or wireless router using your existing portable nodes. All these access points are connected to the one wired-Ethernet infrastructure and set to similar network parameters so that the wireless client devices can seamlessly move between these access points depending on which one has the best signal strength. This is illustrated in the diagram above this text and discussed further in my article on improving your wireless network’s coverage.

This situation would mainly affect most pre-1950s brick houses with thick brick walls because such walls can easily attenuate the short-wavelength radio signal that wireless networks use. In some of these houses that have been recently extended, the wall that joins the extension to the main house is often a very thick one because it used to be the outside wall, and therefore becomes the point of attenuation for the short-wavelength wireless-network radio signals. The same situation can affect houses with chimneys that are on interior walls that adjoin rooms. In these houses, especially where there is a fireplace or the remnants thereof in both adjoining rooms, these walls are noticeably thick in order to accommodate the chimney and this situation can lead to poor wireless-network performance. It can also affect buildings that are insulated with foil-reflective

This practice of using two or more access points would also permit optimum coverage of large houses by allowing one to deploy an access point close to each end of the house.

In the same manner, you can use HomePlug powerline  networking to complement the Ethernet network by catering to those devices that can only use this technology. This is done using a HomePlug-Ethernet bridge. This functionality may be built in to those routers that support HomePlug, as well as Ethernet and/or wireless as a LAN medium.

The reason this is going to be necessary in the long term because some manufacturers may decide to make network-capable devices that use an “existing-connection” method of providing network connectivity in order to save on design and manufacture costs. This is because they don’t have to add extra sockets on the device’s PCB for Ethernet or write in Ethernet-adaptor support into the device’s firmware. As far as the user or installer is concerned, there is no need to worry about making sure that there is an Ethernet connection accessible to the device or even connect another cable to that device.

Whether you have one computer or many on your premises; or whether you have broadband Internet or dial-up, the improvement brought about by wiring for Ethernet will be seen as enhancing capital value for your premises. This may certainly pay dividends whenever you sell the house or rent it out at a later date, because of the concept of pervasive broadband Internet becoming a reality. This brings with it a desire to wire up multiple computers to a network in order to share the high-speed Internet connection.

The Ethernet infrastructure has now existed on the same feature level as an intruder-alarm system as far as most customers are concerned when considering their next home.

The best time to wire for Ethernet

The best time to do this kind of work is whenever you are doing works that are involving the house’s electrical system. This would involve rebuilding; refurbishing or extending the building or rewiring the building to comply with modern electrical-safety codes.

This will mean that you may prefer to employ electrical contractors who are competent with telecom and data wiring. These tradesmen will advertise their competence by listing job types like telephones, networks, security and similar work in their advertisements and on their vehicles.

If you have a regular maintenance “sparkie” who does your repairs or other ad-hoc work, he may be able to do this kind of work or know of tradesmen who can do this kind of work on an ad-hoc basis.The reason is that this wiring can be done at the same time as the electrical wiring that is involved in the project.

It comes in to its own if there is “rough-wiring” being done before the walls are plastered or panelled; which is common during building work. Then you just need to have any fitting-off of sockets done when the walls have been covered and decorated.

If the job is essentially a re-wire job, the same electricians who do that job can pull the Ethernet cable through the walls while they lay the new AC wiring. By having the work done at the same time as any other major electrical work, you are in a position to gain maximum value out of your tradesmen who charge by the man-hour.

If you are installing an alarm system or doing similar work where new electrical infrastructure is being laid, you could have the Ethernet wiring laid at this point. This works best if the tradesman that you engage is competent at all facets of infrastructure work and will do this as part of the job.How to go about it

Central location

You will need to choose a location for the network switch, which is where all the data that passes the network goes through. It should be out of the way but easily accessible and shouldn’t be too hot.

The places that would come to mind are any built-in storage cupboards like the broom cupboard, the linen press or a built-in wardrobe in one of the bedrooms. You may use a place like the attic or basement. As I have seen for an alarm-system installation, you may use the wall hidden by the laundry door when it is open as a central location for the network switch. Ideally you shouldn’t use a room which is used for any heat-generating systems like hot water tanks, boilers or furnaces.
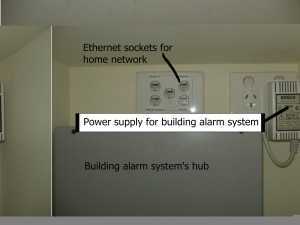
Tight central location layout for Ethernet switch

What to avoid when working out the Ethernet-switch location

If you are wiring an existing house for Ethernet and the premises is equipped with a security system, it is a good idea to locate this switch in the same area as this system’s central box. This means that if you decide to upgrade the alarm system to a more sophisticated security / home-automation “hub” that has a network interface, you can connect this unit to the home network cheaply and easily. In most cases, this kind of upgrade can be done with the same system peripherals (PIR and other sensors, siren, strobe light) all intact and able to work with the new system. You may also have to be sure that you have enough space near the system’s central box and room at the power outlet to plug in another “wall-wart” power supply so you can install the Ethernet switch without reliability problems for the network and the alarm system.

It also allows you to establish an installation point for any devices that provide “back-end” functionality for the home like network-attached-storage devices. It then means that you can service all these devices by going to one location.

The network switch

As for the switch, you should purchase a dual-speed (10/100 Mbps) unit with more ports than there are rooms to wire. This allows you to add extra network points at a later date or connect network devices like Ethernet-powerline bridges, wireless access points, network-attached storage or home-automation equipment directly to the switch.

There are many three-speed Gigabit Ethernet switches that are being sold at an extra per-port premium over the common 10/100 Ethernet switches. These would mainly appeal to those users who intend to work with high-bandwidth video or similar applications. They also have to work with network adaptors that are capable of working at the Gigabit speed, some of which are now under the $100 mark for a basic PCI unit. They are still worth considering if you want to have a future-proof high-speed Ethernet infrastructure.

It is also worth being aware of and considering switches that work as Power-Over-Ethernet power sources. These units use the Ethernet wiring to provide power to suitably equipped network devices thus eliminating the need to run a power wire to these devices. This feature would be a boon for wireless access points and network CCTV cameras because it removes the need to make sure that there is a power outlet near these devices or risk them being “down” due to accidental power disconnection.

Rooms to wire

When wiring up for Ethernet, it is a good idea to provide a point in each bedroom as well as the kitchen, living room, dining room / family room and the study or home office. This means that you have covered every primary activity area in your home, thus permitting you to install network devices in each of these areas.

You may not think of wiring the living room for Ethernet but this room is where you will end up using networked entertainment equipment. Such equipment could range from network media clients that either are connected to or are part of the TV and stereo to present digital photos, digital video clips and music files through these devices; through the popular online-ready games consoles like the PlayStation 3 and the Xbox 360, to dedicated media servers that present media that is stored on them over the home network. As mentioned earlier, an increasing number of affordably-priced desktop computers that are being sold by main-street computer stores are being designed to look like and behave like home-entertainment equipment, in order to be considered acceptable in rooms other than the study or kid’s bedroom. For example, you could easily think that a few of the newer home computers like the MSI MegaPC systems (Figure 2) resemble some of those bookshelf music systems that are sold at department stores and discount electrical stores.

Another reason would be that one may want to use a laptop computer in the living room during winter if there is an open fire, pot-belly stove or a radiant-style heater. This is because when these heat sources are in use, they become the focal point of the house.

If you use an open-plan shared-purpose room like the kitchen / family room or living room / dining room, it may be a good idea to have a network point in each logical “room”. This will avoid the untidy look and safety hazard (to person, machine and irreplaceable items) of running long cords across the floor of these rooms.

When choosing the socket type for the room sockets, it is best practice to use a standard wall-mount socket for each of these sockets. You may be tempted to use a side-entry socket, which is similar to some TV aerial points that are commonly used in Australia or the older Telecom Australia telephone connector. The problem with using a side-entry socket is that you may experience difficulty plugging and unplugging the device from the socket especially if the cable has the cheaper crimped-on connector.

If the job is aesthetically sensitive, you may be able to find outlet plates that work with the aesthetics of the room where the sockets are installed. This is easy due to the use of standard wall fitting designs that permit manufacturers to supply a large variety of trim-plates or socket modules. This can be of importance to anyone who owns a period home and wants to keep the fittings in tune with the home’s period.

Broadband Internet

You will usually the network-Internet “edge” router, whether it is an ADSL router or a broadband router connected to a cable modem or similar broadband-technology device, either in the study, the home office or the main lounge area and will most likely have Ethernet-enabled devices located close to it. Here, you would connect one of the router’s Ethernet ports to the Ethernet installation while having the other sockets available for the other Ethernet-enabled devices like a games console, network-attached storage or network printer.

Multiple Points in one room

In some rooms like the kitchen or home office, you will need to be able to have more than one point in that room. This is because you will often end up with multiple devices in that same room.

Extra ports on the main switch

This method involves running extra wires from that room to where the main switch is located and using one of the vacant ports on that main switch. This may allow direct bandwidth being provided to the device that is connected to the port; and can therefore yield better performance for that device. This method also certainly comes in handy when the devices are spread around the room because the room has multiple activity locations such as open-plan living areas.

It would be more fault-tolerant due to the removal of another Ethernet switch that could be a point of failure for the network devices in that room.

Regional switch

This method requires all the network devices to be plugged in to a switch, which is uplinked to the network point that is in that room. This mainly works better for any setups where the devices exist in a cluster; such as a home entertainment centre or a home office / study room.

The only main problem is that if the switch is powered down, those devices lose network connectivity. This can be worsened by the way that “wall-wart” power supplies are often used for powering most switches, routers and other network-infrastructure devices. What this means is that these bulky power supplies can easily fall out of most power boards which have outlets that are spaced wide enough for ordinary plugs rather than these “wall-warts”.

This can be alleviated if there is use of Power Over Ethernet, which uses the same Ethernet cables to run low-voltage DC power to network devices. This avoids the need for power outlets to exist near Ethernet ports for devices like access points. The power is placed into the network via a powered switch or a midspan power injector and devices take the power off the network cables either via their own sockets or through a power splitter which connects to the device’s Ethernet socket and power socket.

The Power-Over-Ethernet setup has been assisted via the use of the IEEE 802.3af standard, which now means interoperability between different device manufacturers. As far as switches are concerned, this could mean that you could have a network-powered 5-port switch with “power forwarding”. This means that the switch can be powered via a network port from a Power Over Ethernet infrastructure rather than a “wall-wart”; and feeds power through at least one of its ports to a network device that is powered over the network.

It can also be alleviated if the switch is powered off its own outlet, which would be the case if it is hidden in a built-in cupboard. This also avoids the temptation for one to unplug the switch in order to run other appliances, which can lead to that part of the network being unexplainably down.

Expandable solution for built-in devices
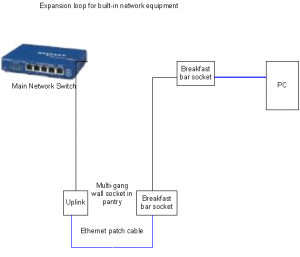
Expansion loop - current situation

Expansion loop - current needs

One way to assure expandability for future network needs while saving costs on the current project is to create an “expansion loop” in areas where you may want to install built-in network devices. This could be easily done for an Ethernet point that covers the kitchen where you want to be able to install a built-in Internet terminal like the IceBox FlipScreen kitchen entertainment centre at a later date; while catering for existing needs. At the moment, these devices are equipped with an Ethernet socket as their broadband / network connection method. The same practice can also be done for rooms like the master bedroom or the living room where you think that you may add extra built-in network devices or network points at a later date.

By installing two Ethernet sockets in a cupboard such as the pantry or built-in wardrobe, you would achieve this ability to cater for this situation. One of the sockets is wired to a point that is in the main area, such as at the breakfast bar. The other is wired to the main Ethernet switch for the home network.

These sockets could be installed in a “three-gang” or “four-gang” faceplate with blanking panels on the unused panels. Then, in the meantime, a straight-through Ethernet patch cable is plugged into both sockets. This then means that you are able to connect any computers or other network devices to this socket that is in the main area.

When the time comes to add a built-in Internet terminal or similar network device, or add extra network sockets; you or an installer, runs a short run of Ethernet cable from the new device’s or new socket’s location to where the two Ethernet sockets are. Then, a socket is installed at the device’s location and another Ethernet socket is inserted in to the abovementioned multi-gang faceplate and these sockets are connected to the Ethernet cable run. You then use a 5-port switch to connect this device and the existing network socket to the existing network backbone. Here, the switch is uplinked to the main Ethernet switch while the existing Ethernet point and the new device are connected to other ports on the switch.
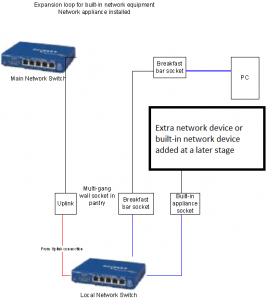
Expansion loop - satisfying a future networking need

Expansion loop - satisfying a future networking need

This solution, which is illustrated in the two images here can also permit other “back-end” network devices such as security and home-automation “hubs” to be installed in this cupboard. As well, other network devices such as network hard drives and Ethernet-“no-new-wires” bridges can he installed in this location. It could even allow one to run extra Ethernet points in this same area at a later date.

Conclusion

Once you consider the idea of wiring for Ethernet, you would certainly have prepared your house for the connected home future. As mentioned before, this act of wiring for Ethernet will be even considered as a capital improvement, which may add value to your house in the Internet age.

You will also avoid the need to think about extra wiring chores should you think of implementing network-based home automation in the future, especially when most “connected-home” equipment will use a standard Ethernet connection on it.


Feature Article – Moving your closed-circuit TV surveillance to IP technology

WARNING THESE PREMISES ARE PROTECTED BY VIDEO-SURVEILLANCE

The typical video-surveillance system

You have established a video-surveillance system in your business premises and have had it going well for many years. It would be based on four to nine analogue cameras located through the business premises and all of these cameras are connected to a multiplexer, commonly known as a “quad”. This device, which presents video images from the cameras in a sequence and / or as a matrix of four images on the one screen, is then connected to a VHS time-lapse video recorder that is recording whatever is going on in the premises. You are able to see the output of the cameras through one or two monitors, whether dedicated video monitors or a spare TV that is pressed in to service as a monitor.

If you are lucky enough to do so, you may have used a dedicated digital video recorder instead of the VHS time-lapse video recorder as the system’s video recorder. These units would have a built-in hard disk and may copy images or video segments that are needed for reference to a DVD using an integrated DVD burner. There is also an increased likelihood of these units being able to work with multiple cameras without the need to use a “quad”.

But now you have heard talk from people in the IT or security industry, such as your system’s installer, about the concept of network-based video surveillance and perhaps seen other businesses and government sites being equipped with this technology. What with the ability to have the increased expandability and flexibility that it provides at all points of the equation.

What benefits does the new IP technology provide?

For example, you could have the recording functionality located away from the premises so employees can’t handle the recording media or to permit security firms to offer offsite video monitoring as another service. In some cases, an IP-based video-surveillance system can make it easier for business partner groups such as police officers or your landlord’s security team to easily “patch in” to your cameras as needed and upon you agreeing without upsetting your existing system’s setup.  As well, you may want to benefit from advanced handling of the video feed which can lead to functions like video motion detection, automatic vehicle number-plate (license-plate) recognition or people-counting being part of your system, whether integrated in to the cameras or as part of extra software in other system devices. These systems may also offer the ability to use high-resolution cameras which may appeal to you in certain security scenarios like fraud detection.

The technology is becoming available at a cost that most small business users can afford. One of the reasons is because most of the infrastructure may already exist due to the data network being laid down for Internet access and computer networking. Similarly, you may benefit from your network-attached storage device or business server being able to work as a DVR device simply by you adding cheap or free software to that device. On the other hand, there are some DVR devices that work with network cameras and offer a lot more video-surveillance functionality and integration in the long run, with some of them offering a Web-based system dashboard available over the network. As well, your regular desktop or laptop PCs can work as cost-effective system-control and monitoring terminals through the addition of cheap or free software or the computers’ Web browsers being pointed to the cameras’ Web sites. This may then make you think that your closed-circuit TV system is simply “too old” for today’s requirements. How should you go about moving towards the technology?

The IP network infrastructure

The network infrastructure that is part of your IP-based video surveillance system should be based on Cat5 Ethernet cable, which can be used as your business’s wired data network. This can provide for a reliable system and permit you to move towards “Power Over Ethernet”, which allows a single Cat5 Ethernet cable to carry power to the cameras as well as the data back from the cameras. This is infact a scenario you should look towards deploying, with a multi-port “power midspan” or “powered switch” providing the power-supply needs for the cameras and obtaining its power via a good-quality uninterruptible power supply that has adequate power capacity.

You could use other network media like Wi-Fi or HomePlug powerline for supplementary camera installations such as additional event-specific cameras or test-run cameras that you may use as part of building out your system.

Standards and setup issues

When you choose your equipment, make sure that your equipment works to common standards such as video codecs that are commonly in use or Internet-standard protocols. You may also want to make sure that each camera is accessible by either a known IP address or host name through the logical network at all times so as to make it easy to set up or revise your system.

If you are thinking of remote access, it may be worth using a dynamic-DNS service or fixed IP service; and establish port mapping so you can navigate to the cameras from outside of the network. This is to allow you to use a known IP address or fully-qualified domain name to refer to your system from outside.

The main objective with a proper IP upgrade is that you don’t lose any functionality that your existing system has provided you. Rather, you gain more in the way of functionality, expandability and security from the new setup because of the new features that the IP-based equipment and software will provide.

The upgrade path

Check your DVR for additional network functionality

If your system uses a DVR rather than the VHS time-lapse recorder as its recording device, find out if the DVR offers access to stored footage or live camera streams via industry-standard network setups. It also includes the possibility of the DVR sending images or footage to nominated people by e-mail or MMS in response to an alarm event. As well, the extra functionality could also include the ability to record images or footage from network cameras.

This functionality may be available through hardware and/or software that you may be able to retrofit, whether done by yourself or a competent computer or security technician. The software may be available for a very low price or, in some cases, for free from the manufacturer’s site or a respected third-party developer.

Network video encoders

These devices are used to connect the existing system to your network. They come in one-channel or multi-channel versions. The one-channel version can service one existing camera or the “MONITOR” output of an analogue system’s multiplexer, whereas a multi-channel version can service multiple cameras. The latter solution can come in handy if you want individual access to your legacy system’s camera outputs via your network.

It is also worth noting that some of the high-end network video encoders come in the form of an expandable infrastructure where there are many encoder “blades” that are installed in a rack-mount “master chassis”. This could allow a user to increase the number of channels in the encoder simply by replacing the “blade” which has fewer channels with one that has more channels. These units may appeal more to installations where there are many serviceable analogue cameras.

If any of the cameras in your system use “pan-tilt-zoom” functionality, the network video encoder that you use for these cameras should have a compatible “PTZ” interface so that you don’t lose this functionality. Similarly, if your system uses alarm connectivity for changing how it records the video information, the network video encoder should support this same alarm connectivity.

Recording

The IP-based video-surveillance system has increased recording flexibility compared to the legacy systems. Here, you could have the images captured on a network-attached storage unit that exists within the logical reach of your business network. For example, you could have one of QNAP’s multi-disk “muscle-NAS” units located in your premises AND a D-Link two-disk NAS at home or in another premises under your control set up to record images from the same lot of cameras  You also benefit from the fact that most of these NAS units can be upgraded to higher capacity in the field through the purchase of larger capacity OEM hard disks from independent computer stores.

In some cases, you can set up some of the NAS units like most of the QNAP range to work as network video recorders by installing software applications in these units. This usually allows the cameras and the recordings to be viewed from the NAS’s management Web page.

It may be worth knowing that there are some special NAS units that are optimised for IP-based video-surveillance setups. These will usually have functions like a Web-based dashboard, improved user interface for indexing and, in some cases, video-analysis functionality not available in the cameras. These are worth considering for larger video-surveillance systems.

Alarm integration and POS Exception Monitoring

Your system may be set up so that your video recorder works in real time if, for example, the building’s alarm is triggered or a staff member presses the duress-alarm button during a hold-up. You can make sure you don’t lose this functionality when your system is network-enabled. As well, you may benefit further from this through network cameras sending through pictures to specified e-mail addresses or MMS-enabled phone numbers upon alarm events.

To achieve this, you need to make sure that your cameras that are in the alarm’s scope have alarm-input terminals and that the signalling devices are properly wired to these terminals as specified in the documentation. In some cases, you may need to use a relay or optocoupler as a way of achieving a compatible connection that operates properly. An alarm installer or electronics technician can do this kind of work easily.

If you are a retailer who integrates POS Exception monitoring where certain normal or abnormal transactions cause your closed-circuit TV system to register them as alarm events or overlay transaction data on the video information, you should make sure you can integrate this functionality in your network-enabled system. The network-based system may allow for transaction-searching or exposure of transaction data independent of the video and could work with network-based POS systems.

Scenarios

These scenarios avoid the need to replace any equipment that is in good working order ahead of its time and prefer that the IP-based technology be “bolted on” to a video-surveillance system in a manner to enhance the system without losing any of its functionality.

Simple network enablement

You may simply start out by connecting the monitor output of your existing system to a single-channel network video encoder. This may be of use if your current-term objective is to view the system’s output on your network-connected PC or your mobile phone.

On the other hand, you may use a multi-channel network video encoder to network-enable all the cameras in a small 4-camera system or, for a larger system, a few cameras that you consider important as well as the monitor output. Then you add another multi-channel network video encoder to network-enable more cameras. You then run a video-surveillance manager program on your general-purpose PC so you can easily view the cameras and set up your network-based recording options.

You will still keep your “quad” and VHS time-lapse recorder or DVR going as a “failover recording setup” until that hardware breaks down irreparably.

Additional or replacement cameras

When you “build out” your video-surveillance system with extra cameras or replace any of the existing cameras, the newer cameras that you deploy in this scenario should be network-capable units. As mentioned before, you run a video-surveillance program on your PC to set up the recording and viewing options.  If you have enough room on your existing system’s multiplexer for extra channels or are replacing existing cameras, you have the option to connect these cameras to the multiplexer because they will have video outputs as well as network outputs. This setup will then appeal to those of us who have plenty of mileage left on the older equipment and still want to use that equipment to record the footage; or haven’t yet run Ethernet wiring out to the new cameras.

Moving away from tape or proprietary DVR

Your VHS time-lapse recorder may be just at the end of its service life and you may be thinking of where to go next. Similarly, you may have had enough of that proprietary DVR that cannot be expanded easily and want to look for something better. This could be a time to network-enable your existing video-surveillance system. Here, you could deploy a multi-channel network video encoder and a network-attached storage like a QNAP unit on your network dedicated for the video surveillance system. Then you use video-management software on your PC to direct the cameras to record to the NAS and to make DVDs of footage that you need to provide.

Complete system upgrades

You may be in a position to upgrade your video-surveillance system, such as through new premises, renovations, newer security requirements placed by government, insurance or company needs; or a large number of the components coming to the end of their useful life. Sometimes, the government may financially assist you in improving your system whether through a grant, loan or tax break towards the cost of the equipment as part of a compliance or “safer cities” program.

This upgrade may give you the break to move towards an “all-IP” system with IP-based cameras, one or more recording devices being network-attached storage devices, computers running video management software; and all of them interconnected using the business’s Cat5 Ethernet cabling.

Conclusion

Any business who has the premises protected by a video-surveillance system should be aware of the IP-based video-surveillance setups. As well, they should know when to evolve to the IP-based technology and how to do it without unnecessarily replacing existing equipment.

Facebook – Who sees what I write and where do I write that post

I have been approached by Facebook newbies (novices) about messages that they write or read as part of their Facebook sessions and have thought about publishing this “at-a-glance” guide about who sees what you write. Feel free to print this off and pin it near your computer or keep the permalink as a ready URL on your browser’s Favourites / Bookmarks or intranet page. Nowadays the Facebook Wall is referred to as a Timeline but still serves the same purpose.

When I write here on Facebook, who sees it?

Place Intended Recipient Other readers
My Wall (Timeline), as a Status Update Myself My Facebook Friends
My Facebook Friend’s Wall (Timeline) My Facebook Friend My Facebook Friends, The correspondent’s Facebook Friends
“Send <Facebook Friend’> a message” The Facebook Friend who is receiving the message No-one
A conversation with my Facebook Friend in Facebook Chat The Facebook Friend at the other end of the chat
The Wall (Timeline) of a Group I am a member of All Facebook users who are members of that Group My Facebook Friends
The Wall (Timeline) of a Page I am a Fan of – Just Fans Facebook users who visit the “Just Fans” tab of the Page
Comments that you leave about a Post on the Wall (Timeline) Facebook Friends who can see the Post Your Facebook Friends – reference to comment, details if they click through

Where should I write this in Facebook?

Object of Conversation Where to write Notes
Direct private message to correspondent “Send Correspondent A Message” Arrives in correspondent’s Facebook Inbox
Facebook Chat (if they are online)
Message to correspondent which isn’t intended to be confidential Correspondent’s Wall (Timeline) Appears on my Wall and my Correspondent’s wall
General comment or broadcast message My Wall (Timeline) Think carefully before you write. You may intend it for your Facebook Friends but the wrong comment may be perceived by a Facebook newbie (novice) as embarrassing in front of their Friends.
Comment in response to a Status Update, Photo, Link or whatever you see on Facebook Comments option for the Status Update, etc Think carefully before you leave that comment. As above, it may be intended to the author of the comment, posted photo, etc but the wrong comment may be perceived as embarrassing or hurtful.
Message for a Group or Fans of a Page The Group’s Wall (Timeline) or the “Just Fans” part of a Page

Free PDF file of this information sheet available here to print or copy to your smartphone, tablet or e-reader.

Printing hints: Print each page on separate sheets for attaching to a wall or noticeboard near the computer, or print using your printer’s automatic duplex function for use as a page to keep in a loose-leaf reference folder.

Facebook Tip: Is someone saying things “off the wall” on the (Facebook) Wall about you? Who can read it?

Today (November 26) , a close friend of mine had a very bad experience with Facebook where he was pilloried by one of his Facebook Friends. He had become aware of this through viewing his Homepage and feared that he was going to be embarrassed by the post-writer in front of his other friends who have Facebook presence. This may be the usual reaction of many social-network users, especially Facebook users, when someone else posts something stupid on their Wall or page about the user.

If someone writes a post to their Wall, all of the post-writer’s Facebook Friends can see that post on their Home Pages which they see when they log in, and on the author’s Profile. But this post doesn’t appear on their own Profile. Nor can any of their other Facebook Friends see this post unless they have the post-writer as their Facebook Friend. A different situation may occur if someone writes the remark on someone else’s Wall. This may have it that the friends of both parties may see the remark.

It still is worth checking for mutual friends between the post-writer and yourself, especially if any of the mutual friends have become “sworn enemies” such as through a personal, workplace or business fall-out. A good utility to install on your Profile is the “Friend Wheel”, which allows you to see “who’s got whom” of your Friends in the Friend List. This tool, which I have on my Profile, draws a circle with all your friends as “nodes” and rules lines that indicate Facebook links between your friends. When you click on the “Click to enlarge” option, you will be provided with a dynamic circle where you can highlight a person’s name and it will show just their friends.

Similarly, browsing in the post-writer’s Profile may be of use so you can determine who are their Friends, especially any Mutual Friends. This is especially true where people browse around friends’ profiles to find out if the person they are after is on the social network.

Once you understand this situation, you can reduce the panic that you may feel with yourself in front of your friends if someone says something “off the wall” on their Wall.

Special Report – 10 Years Of the UPnP Forum

Originally posted 9 September 2009, Reposted Tuesday 20 October 2009 in conjunction with the official press release

From The Horse’s Mouth

Official press release from the UPnP Forum – PDF

In the media and blogosphere

UPnP celebrates 10 years of existence | eHomeUpgrade


No need to configure the router every time you want to play a PC-based or console-based online game or use Skype and Windows Live Messenger (MSN Messenger).

You can navigate music, pictures or video held on a computer or network-attached storage device from a network media player device like an Internet radio with the same ease as navigating music on an MP3 player or using the computer’s media-management software.

How has this been brought about? It has been brought about with UPnP, which is a standard for controlling and monitoring devices over an IP-based network. The standard, which is held together by the UPnP Forum, is about a known device network architecture and known device classes that are determined for particular device types.

Microsoft had been one of the founding companies for this standard but the Open-Source software movement had welcomed it with open arms and developed many endpoint programs based on this standard. The only company that has not welcomed UPnP as a technology is Apple who still prefer to keep everything within their own fences.

Now the UPnP Forum are celebrating their 10th anniversary this year. The celebrations were part of their regular Steering Committee meeting at Microsoft’s head office in Redmond, USA.

Achievements – from personal Web research

The UPnP Device Architecture specification has now been taken to Version 2, which allows a device to service 2 networks and prepares UPnP for IPv6 networks. The AV specifications have been taken to version 3 for the MediaServer device so that a UPnP AV-based home media network can support broadcast recording whether immediately or on a scheduled basis, handling of premium content using digital rights management techniques, as well as support for “follow-me” functionality. It has then made the specifications more relevant to TV-based devices like digital TVs and set-top boxes / PVRs.

Most standards concerning the design of consumer network-Internet “edge” devices such as routers like CableHome 1.1, DSLHome TR064 / TR068 and Home Gateway Initiative include UPnP Internet Gateway Device as part of the mandatory set of specifications for these devices. As well, more Internet-based programs like BitTorrent clients, games and instant-messaging / VoIP programs are designed to take advantage of the UPnP Internet Gateway Device standard by being “self-configuring” at the edge. This is infact one of the primary reasons that whenever I buy or specify a router for someone’s home network, I make sure that it does properly support the UPnP Internet Gateway Device specification.

The two main games consoles that just about every teenage boy or young man has or wants to have – the Microsoft XBox360 and the Sony PlayStation 3 – both have inherent support for UPnP-based home networking. This is with automated port-forwarding for online games and now support for media playback from UPnP AV / DLNA media servers.

This leads me to the fact that the Digital Living Network Alliance have pushed forward the UPnP AV specifications and encouraged the development of server, playback and control devices based on these specifications. This development has been supported by the devices having the DLNA branding which will help consumers purchase the right products.

These situations have also been augmented with Windows XP and Vista having integrated UPnP functionality “out of the box”. Even Windows Media Player had the support for UPnP AV sharing “out of the box” since version 10. Windows 7 has taken this concept by working as a UPnP AV Media Control Point “out of the box” with functions like “Play To”.

Some standards have been achieved for the building control and security sector, mainly in the form of lighting and HVAC control, control of powered blinds and setup of network CCTV cameras. Further development will be likely to happen with the impetus of the smart-grid concept and the desire for energy efficiency and environment consciousness. This will be assisted if these standards are part of a known platform used for these applications.

Common standards have also been achieved for managing quality of service, device security and power management by define Device Classes for the applications. These can allow the creation of an application-level functionality for these particular functions.

All in all, the UPnP concept has come a long way since 1999 but there still need to be a lot more work to do to make it pervasive.

Celebrations – from communication with Toby Nixon

People that had established the UPnP Forum such as Karen Stash (original UIC President), Jawad Khaki (original executive sponsor from Microsoft) and Salim AbiEzzi (original UPnP Steering Committee chair) appeared for the celebrations.

Six people had received “Outstanding Contributor Award” – Shivaun Albright of Hewlett-Packard (Chair of Imaging Working Committee & Architecture Committee), John Ritchie of Intel (long time chair of AV Working Committee & Technical Committee),Hans-Joachim Langels of Siemens (co-chair of Home Automation & Security Working Committee), Tom McGee of Philips (second president of UIC), Karen Stash of Microsoft and Toby Nixon of Microsoft. They also gave recognition to Karen Reff of VTM who has left that company in September 2007 and moved on.

As part of the dinner party, they also viewed a slide show of images from past UPnP events and a presentation on the history of the UPnP Forum and various key milestones associated with the technology.

There will be more information “from the horse’s mouth” when the UPnP Forum run the official press release on October 18 which is the actual 10th anniversary date.