Category: Computing Tips

Why is there an audio driver with your computer’s graphics chipset?

The HDMI and DisplayPort outputs make use of the display audio device driver for sound they send to the external display

Some of you may take stock of what device drivers and software exist on your Windows computer and may find two or more audio device drivers on your computer with one being referred to as an “HDMI” or “Display” audio driver. Such a driver will have a reference to the graphics chipsets that are installed in your computer. Why does this driver exist and how could I take advantage of this setup?

The standard audio setup

Most computers are nowadays equipped with an on-board audio infrastructure of some sort. This was initially a sound card but is nowadays an on-board audio chipset like Realtek or Intel HD Audio. Here, it would have its own digital-analogue audio circuitry and would be serving integrated speakers or audio equipment like computer speakers that are connected to the computer’s own audio jacks.

The better implementations would have an SP/DIF audio output which would serve an outboard digital-analogue converter or digital amplifier. In this case, the audio infrastructure would repackage the sound in to an SP/DIF-compliant form either as a PCM stream or a bitstream supporting Dolby Digital.

In this case, the above-mentioned sound infrastructure would work with its own driver software and be listed as a distinct audio device in Windows. With most of the recent laptops that have sound tuning provided typically by a name-of-respect in the professional-audio or hi-fi scene, this driver also has the software component that is part of this tuning.

HDMI and DisplayPort adds a point of confusion

Windows Sound Control Panel

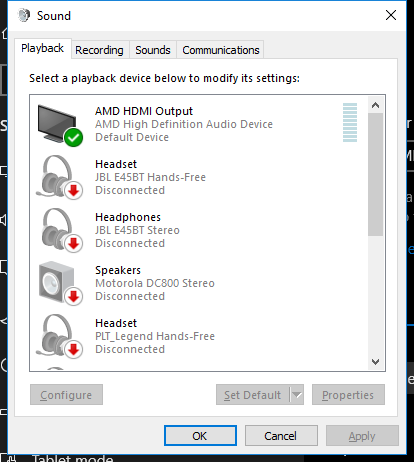
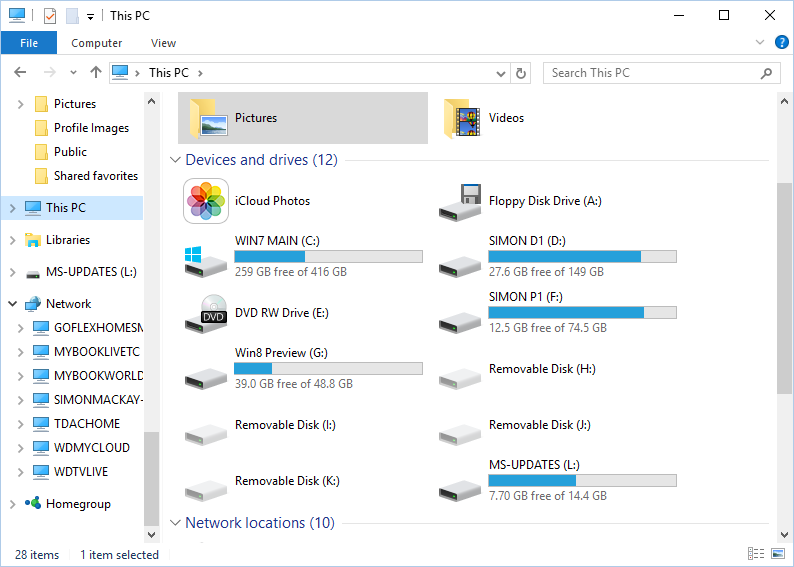
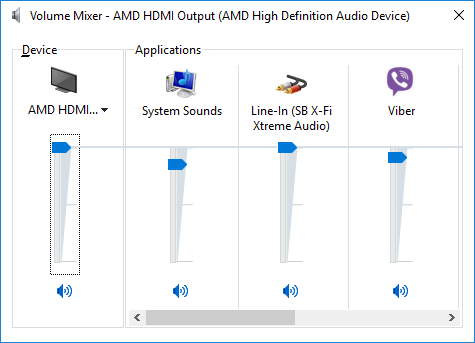
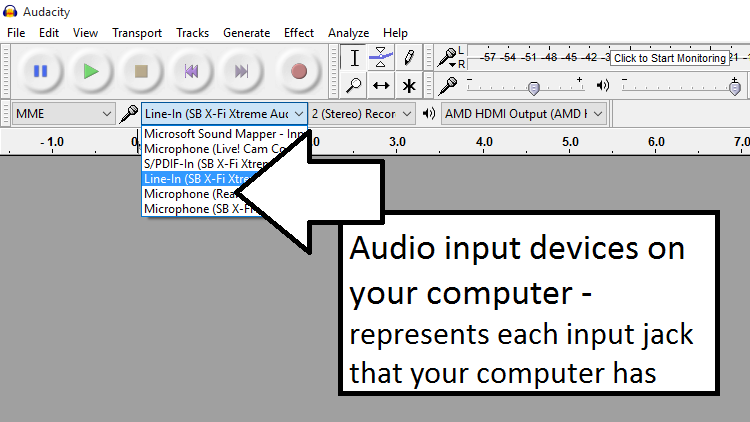
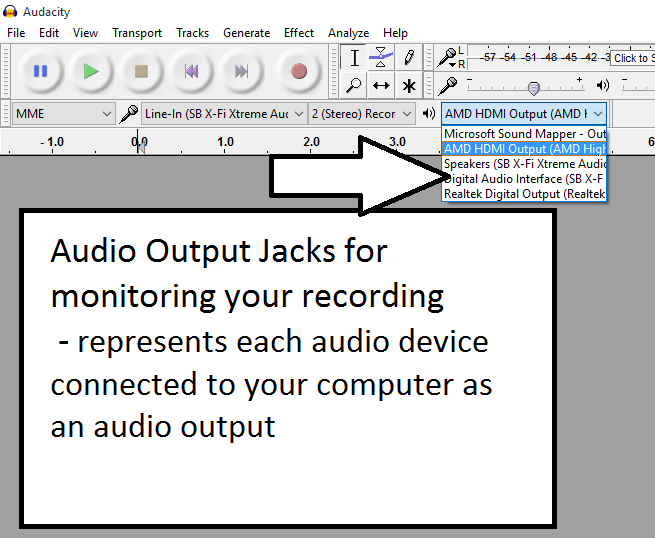
HDMI output for monitor as a unique audio playback device in Windows

HDMI and DisplayPort display connections have the ability to transport a digital audio stream along with the video stream over the same cable. Therefore, display-chipset and graphics card manufacturers have had to support digital-audio transport for host-computer audio through these connections.

In some early setups, it required that the computer’s sound card or audio chipset expose a digital-audio stream via the HDMI or DisplayPort connection. With graphics cards, this typically required a wired connection between an SP/DIF digital output on a sound card or motherboard audio chipset and a digital input on the graphics card.

But recent implementations used a cost-effective digital-audio processor as part of the graphics infrastructure which simply repackages the digital audio stream from the host computer to a form that can be handled by the display or audio device connected via the HDMI or DisplayPort connection. During the initial setup of an HDMI or DisplayPort connection, it will be about determining what audio codecs, bit-depths and sampling frequencies the connected monitor, TV, home-theatre receiver or other audio-equipped device can handle.

Sony STR-DN1060 home theatre receiver press picture courtesy of Sony America

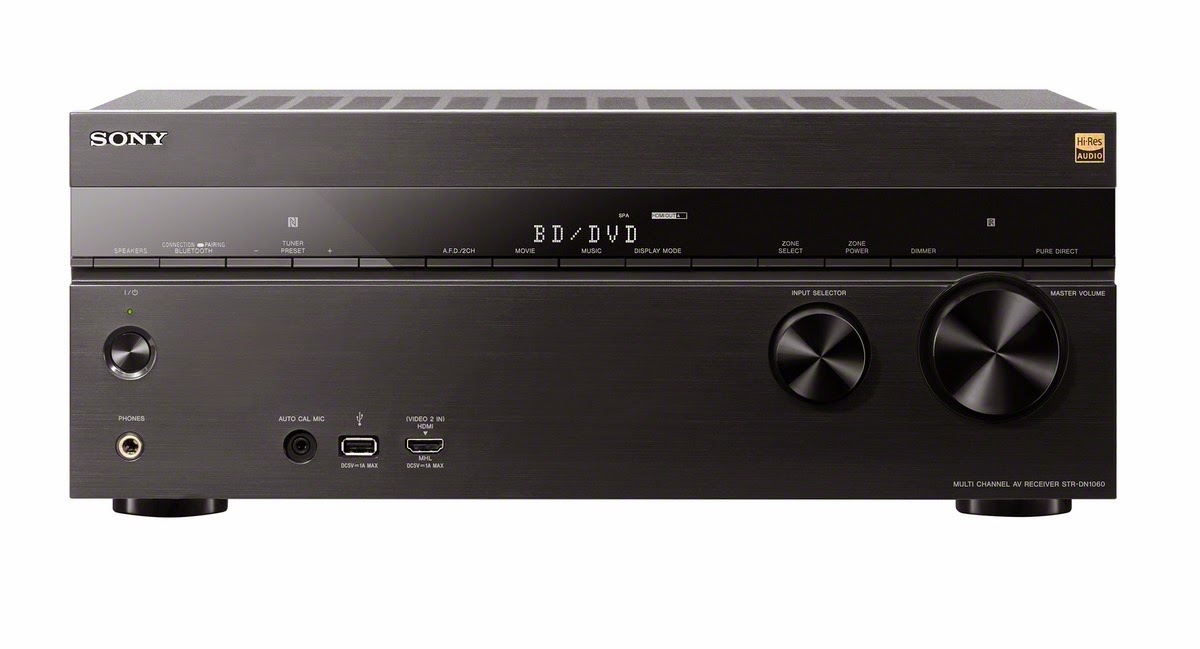
If you connect your computer to your monitor or TV even via the HDMI connections on one of these home-theatre receivers, you will be using the HDMI audio subsystem and display audio driver as outlined here

This also applies to computers and display setups that use the USB-C port as a “DisplayPort alt” connection like some of the laptops that have come my way for product review. But if you are using a USB-C expansion module that has audio connections, you may find that this device may use a USB-based sound chipset to serve those connections. Typically this chipset will use the USB Audio Device class drivers that are part of the operating system rather than the “display audio” drivers.

If you connect your computer to your display via an HDMI audio device like a home-theatre receiver, soundbar or HDMI audio adaptor, you will find that the audio device will be identified as the sound-output device for the “display audio” device.

In this case, you would see another audio device listed in your computer’s audio device list with a name that references your computer’s graphics chipset like Intel Display Audio or AMD HDMI Audio. The only audio-endpoint device that these drivers refer to are whatever audio device is connected to your computer’s HDMI or DisplayPort connection.

In-room AV connection panel

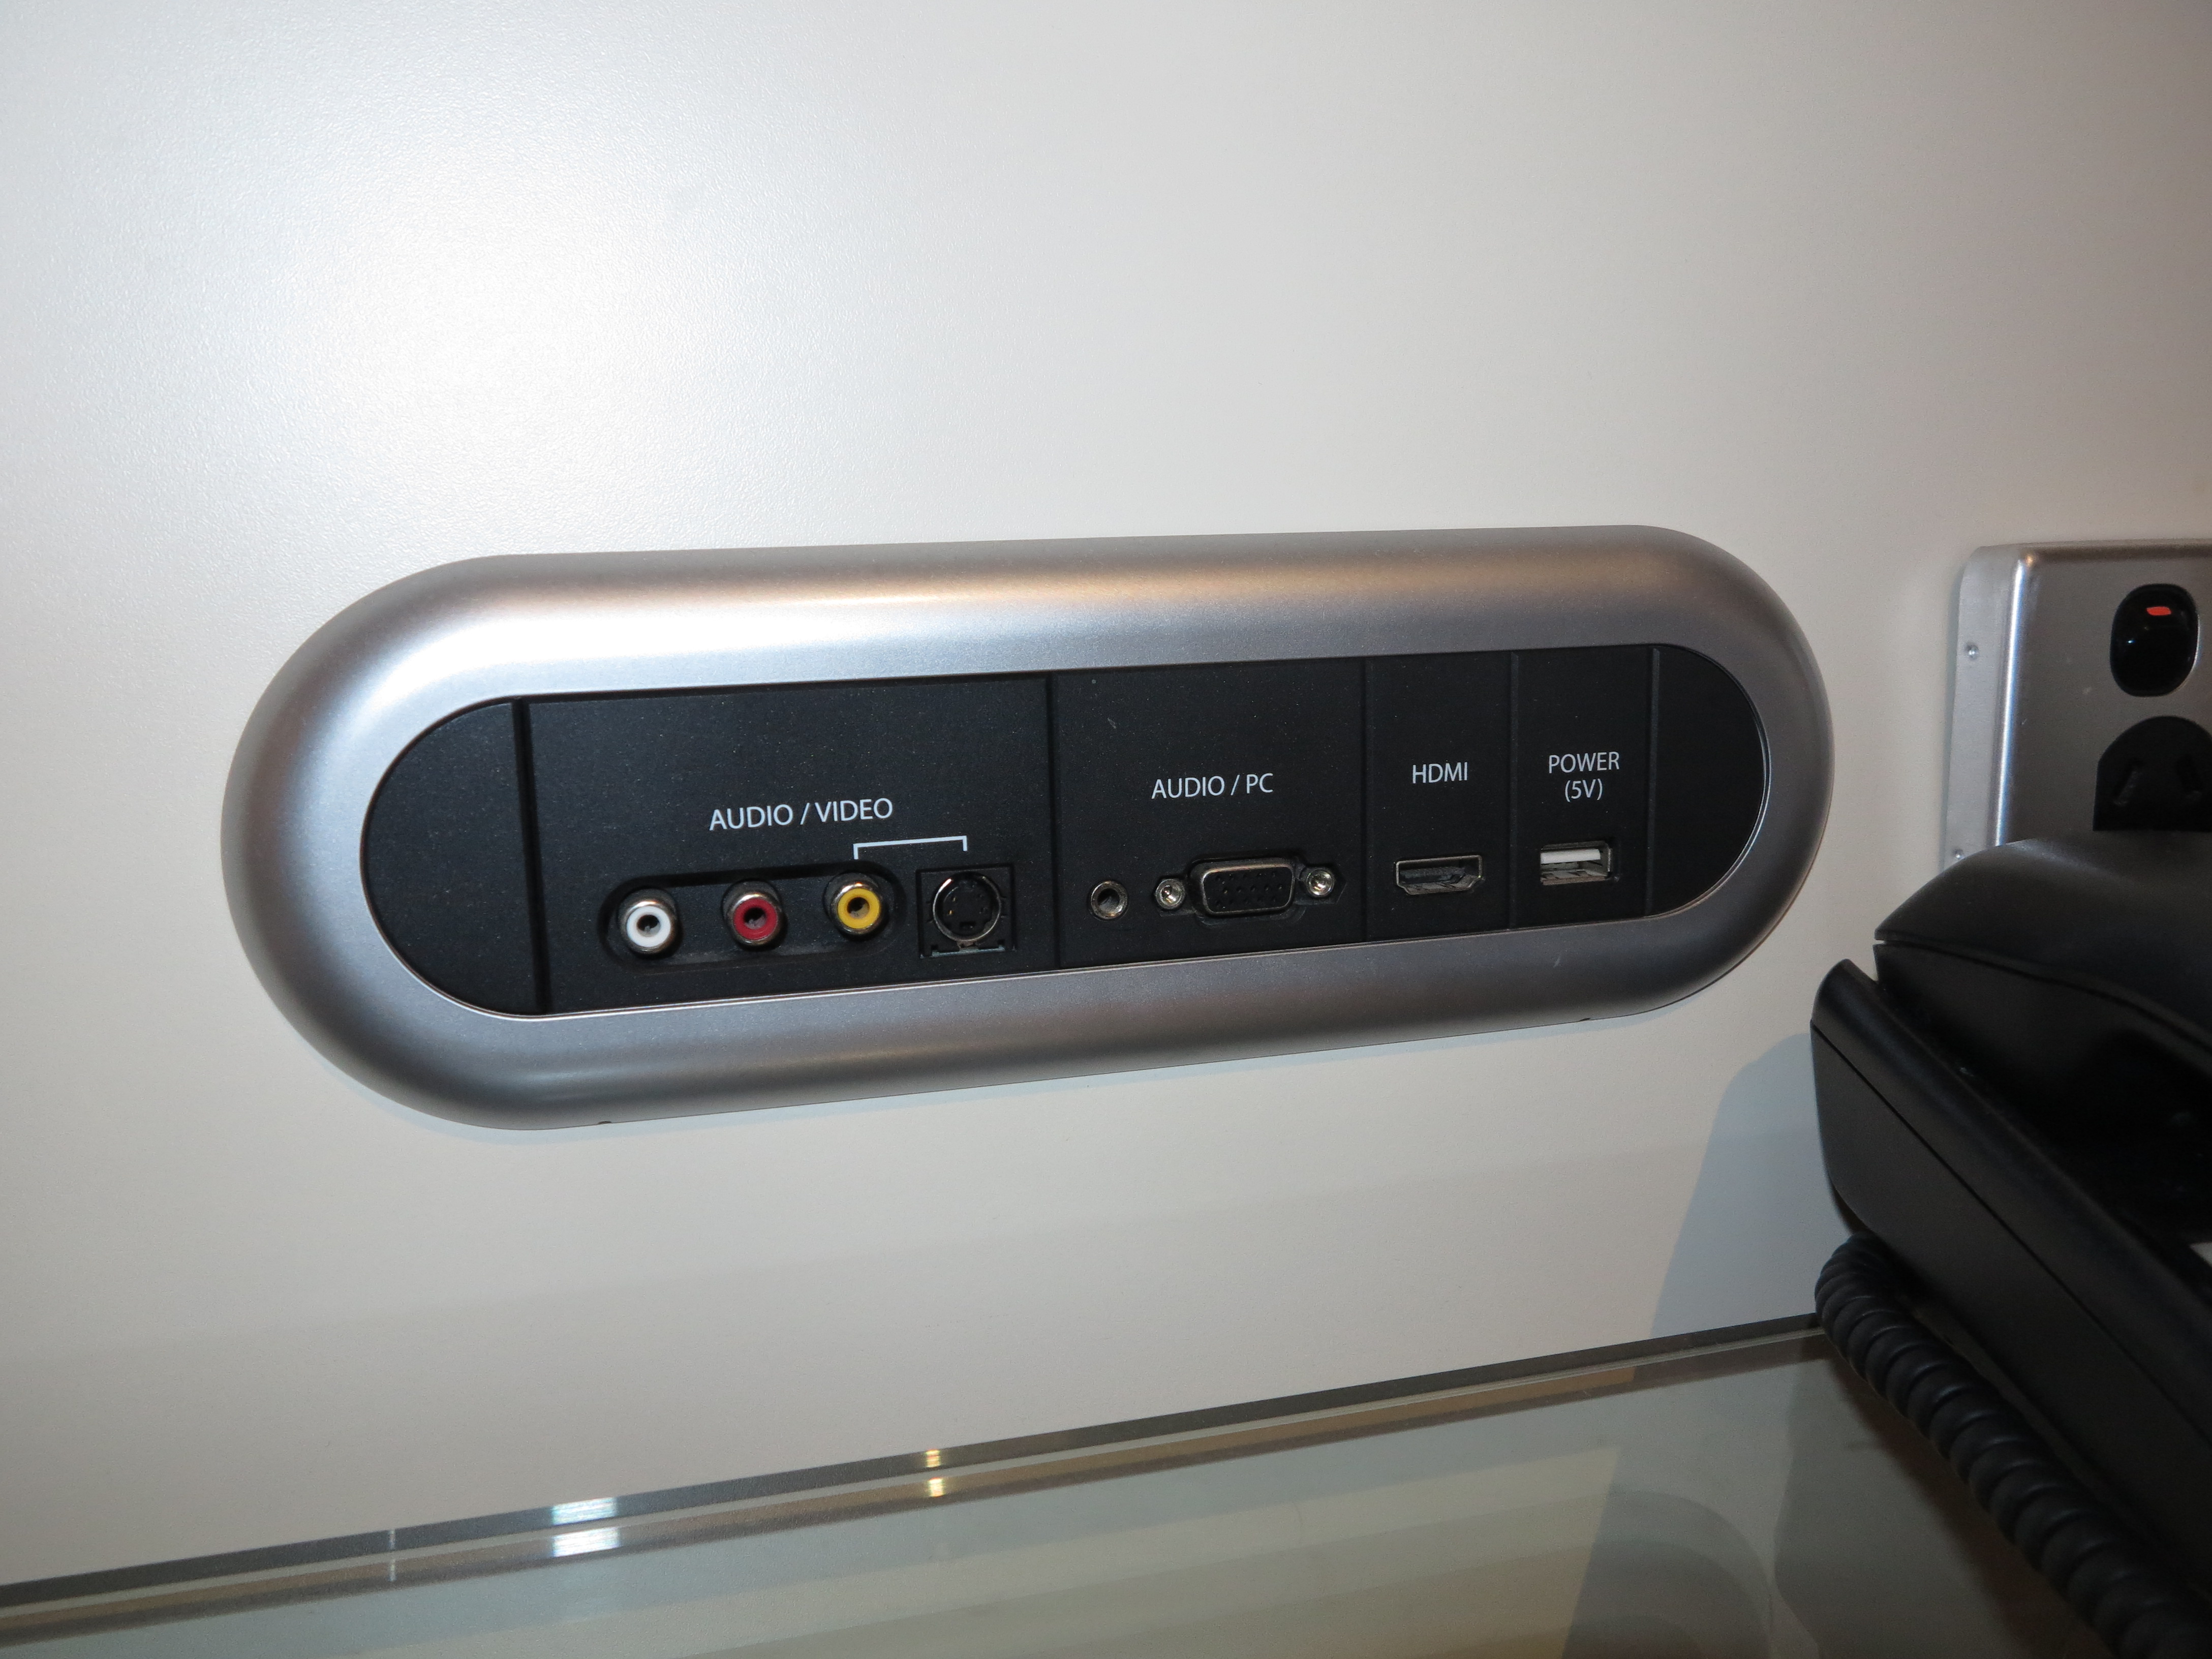
If you use the HDMI input on your in-room AV connection panel like this one at Rydges Melbourne, you would have to use the “display-audio” sound driver for your computer’s sound

Where you connect a computer to a speaker-equipped display or audio device that uses HDMI / DisplayPort alongside a traditional audio input connection like RCA or 3.5mm jack, the “display audio” driver would be used while you use the HDMI or DisplayPort connections. This also applies to the device connection panels you may find in your hotel room and you connect your laptop to the HDMI input on these panels. In this case, you have to use the “display audio” driver when you select the “virtual channel” or source associated with the HDMI input.

What do I do about the existence of these “display audio” drivers?

If you are trying to rationalise the driver software that exists on your computer, don’t remove the “display audio” or “HDMI audio” drivers associated with your computer’s graphics infrastructure. This is because if you connect a TV, monitor with speakers or home-theatre audio device to your computer via the HDMI or DisplayPort connections and you remove the “display audio” driver, the sound won’t play through devices connected via those connections.

Instead, keep these “display audio” drivers up-to-date as part of updating your computer’s graphics-infrastructure software. Here, it will preserve best compatibility for the communications, games and multimedia software and Websites you run on your computer if you are using audio-capable devices connected via HDMI or DisplayPort along with this audio-capable hardware hanging off these ports.

Also remember that if you are using an audio-capable display device connected via the HDMI or DisplayPort connections, you need to use the “diisplay audio” driver to hear your computer’s or application’s sound through that device. This may require you to have it as a “default sound playback device” for software that doesn’t support audio-device switching like Spotify or Web browsers.

Computer systems with multiple graphics chipsets

Computer systems that implement multiple graphics chipsets may also run multiple “display audio” drivers for each chipset. Here, the audio to be sent via the HDMI or DisplayPort output would be processed by the “display audio” chipset for the currently-used chipset.

Some setups may require you to manually select the “display audio” chipset that you are using when you are directing the sound via your audio-equipped display device. This may especially apply to the use of external graphics modules.

But on the other hand, a multiple-graphics-chipset computer may implement a virtual “display audio” or “HDMI audio” driver that automatically steers sound output to the HDMI or DisplayPort device via the currently-used graphics chipset without you needing to intervene. This kind of driver will be relevant with computers that implement NVIDIA Optimus or similar logic to automatically select the appropriate chipset depending on whether you are after high graphics performance or longer battery runtime.

A solution for “steering” Windows sound output towards the devices you want

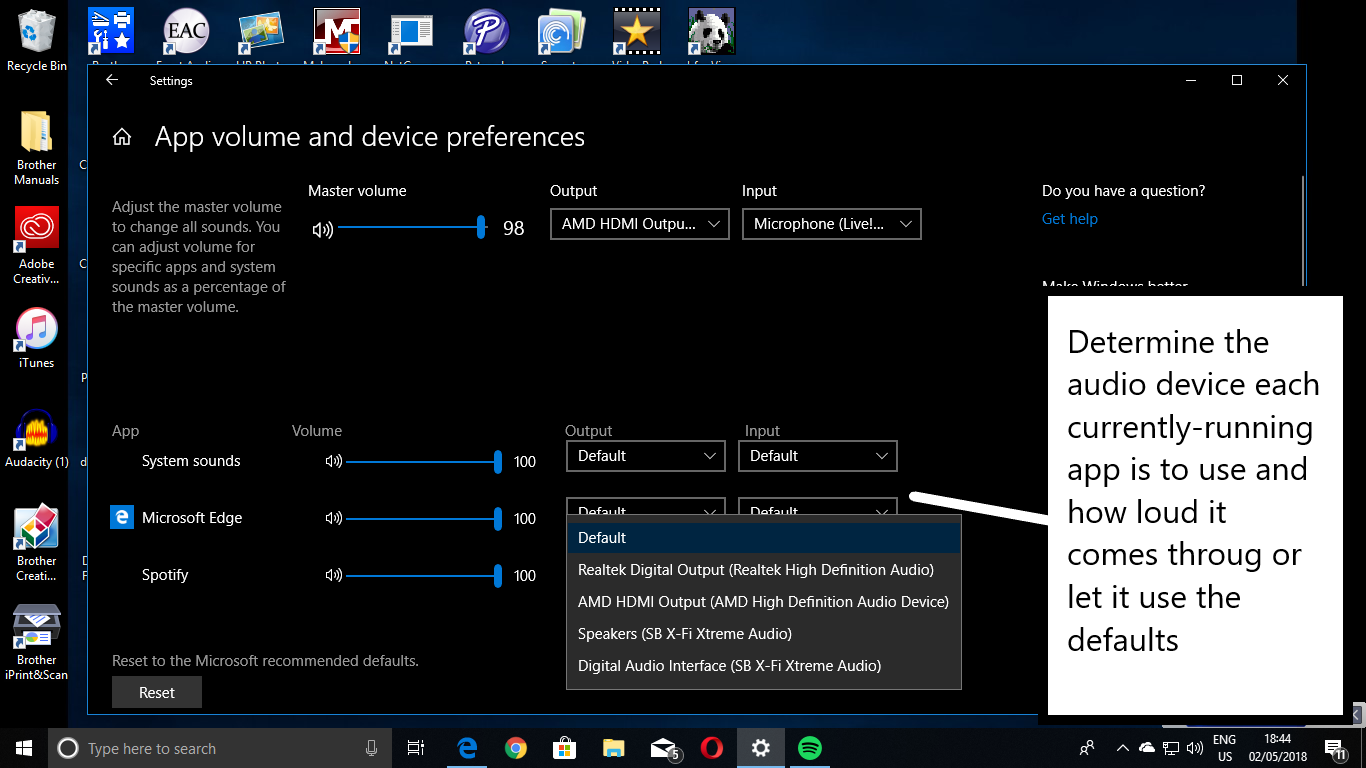
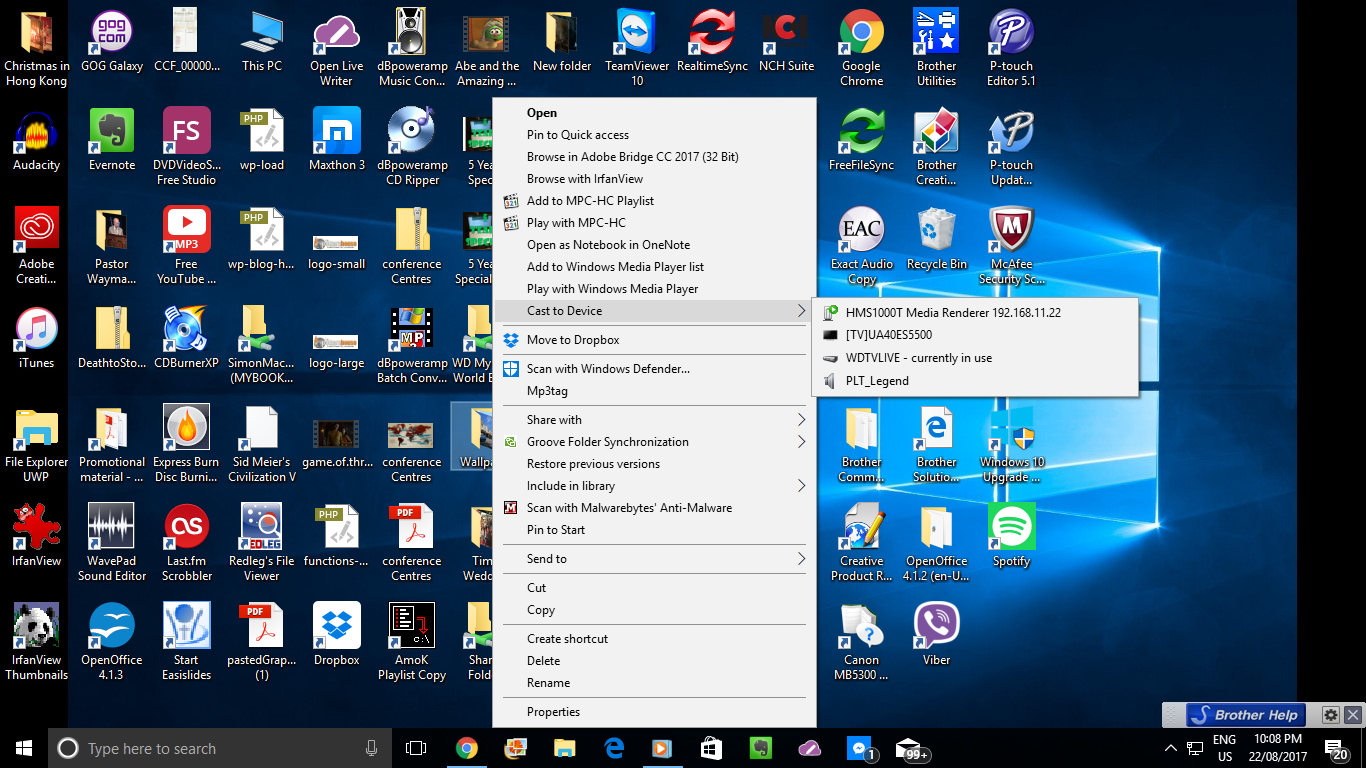
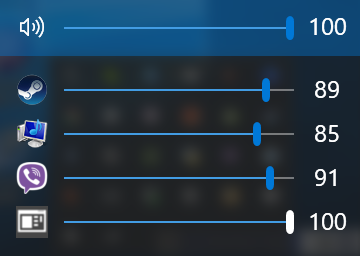
You can steer particular applications’ sound through your laptop’s HDMI output using the display audio driver

When I installed the Windows 10 April Update (Build 1803) on my computer, I had found the improved sound-management ability that this operating system update offers can make better use of this arrangement. I chose to create a sound setup to steer multimedia to better sound outputs while keeping the audio prompts that Windows makes during errors towards a lower-quality output and documented how this is done.

Here, the “display audio” driver will earn its keep as a way to allow the speakers in your smart TV, home-theatre setup or audio-equipped monitor connected to your computer’s HDMI or DisplayPort output to be used only by the software that you want.

There are two situations that this will encompass. One is to have a laptop connected to the large TV or home-theatre setup for some Netflix binge-watching or full-on game-playing but you rather have Windows sound its notification sounds through the laptop’s own small speakers.

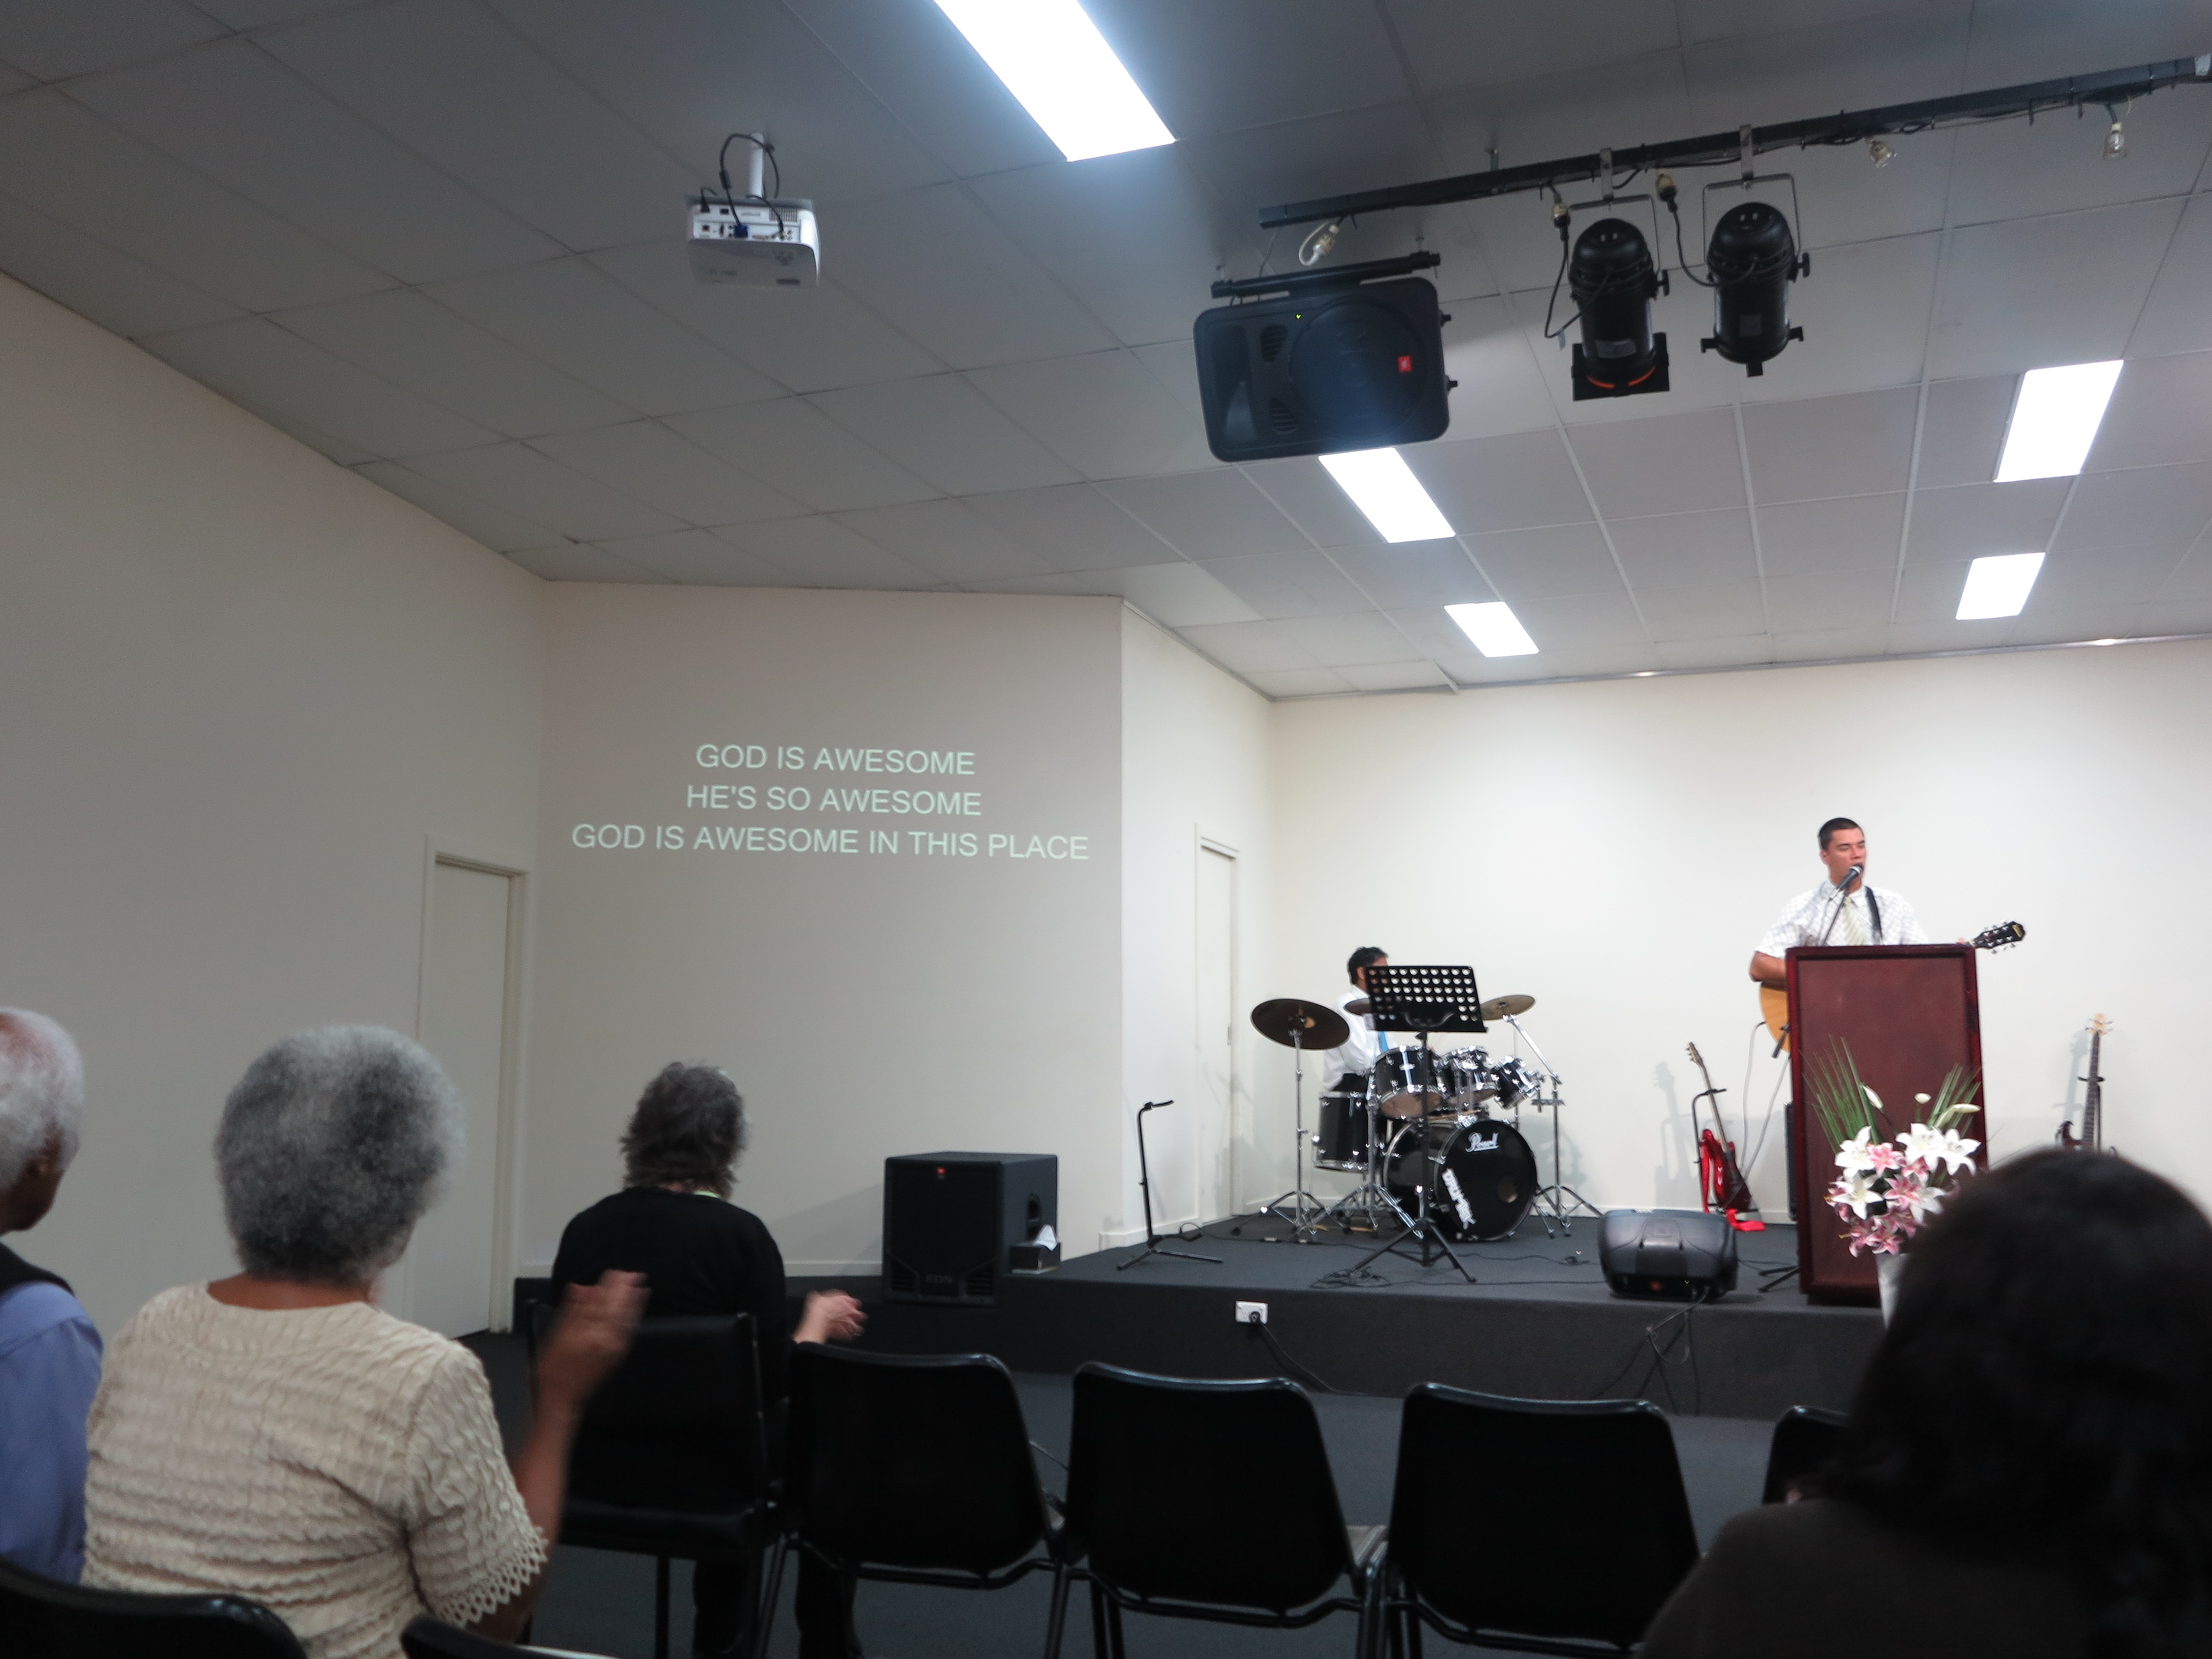
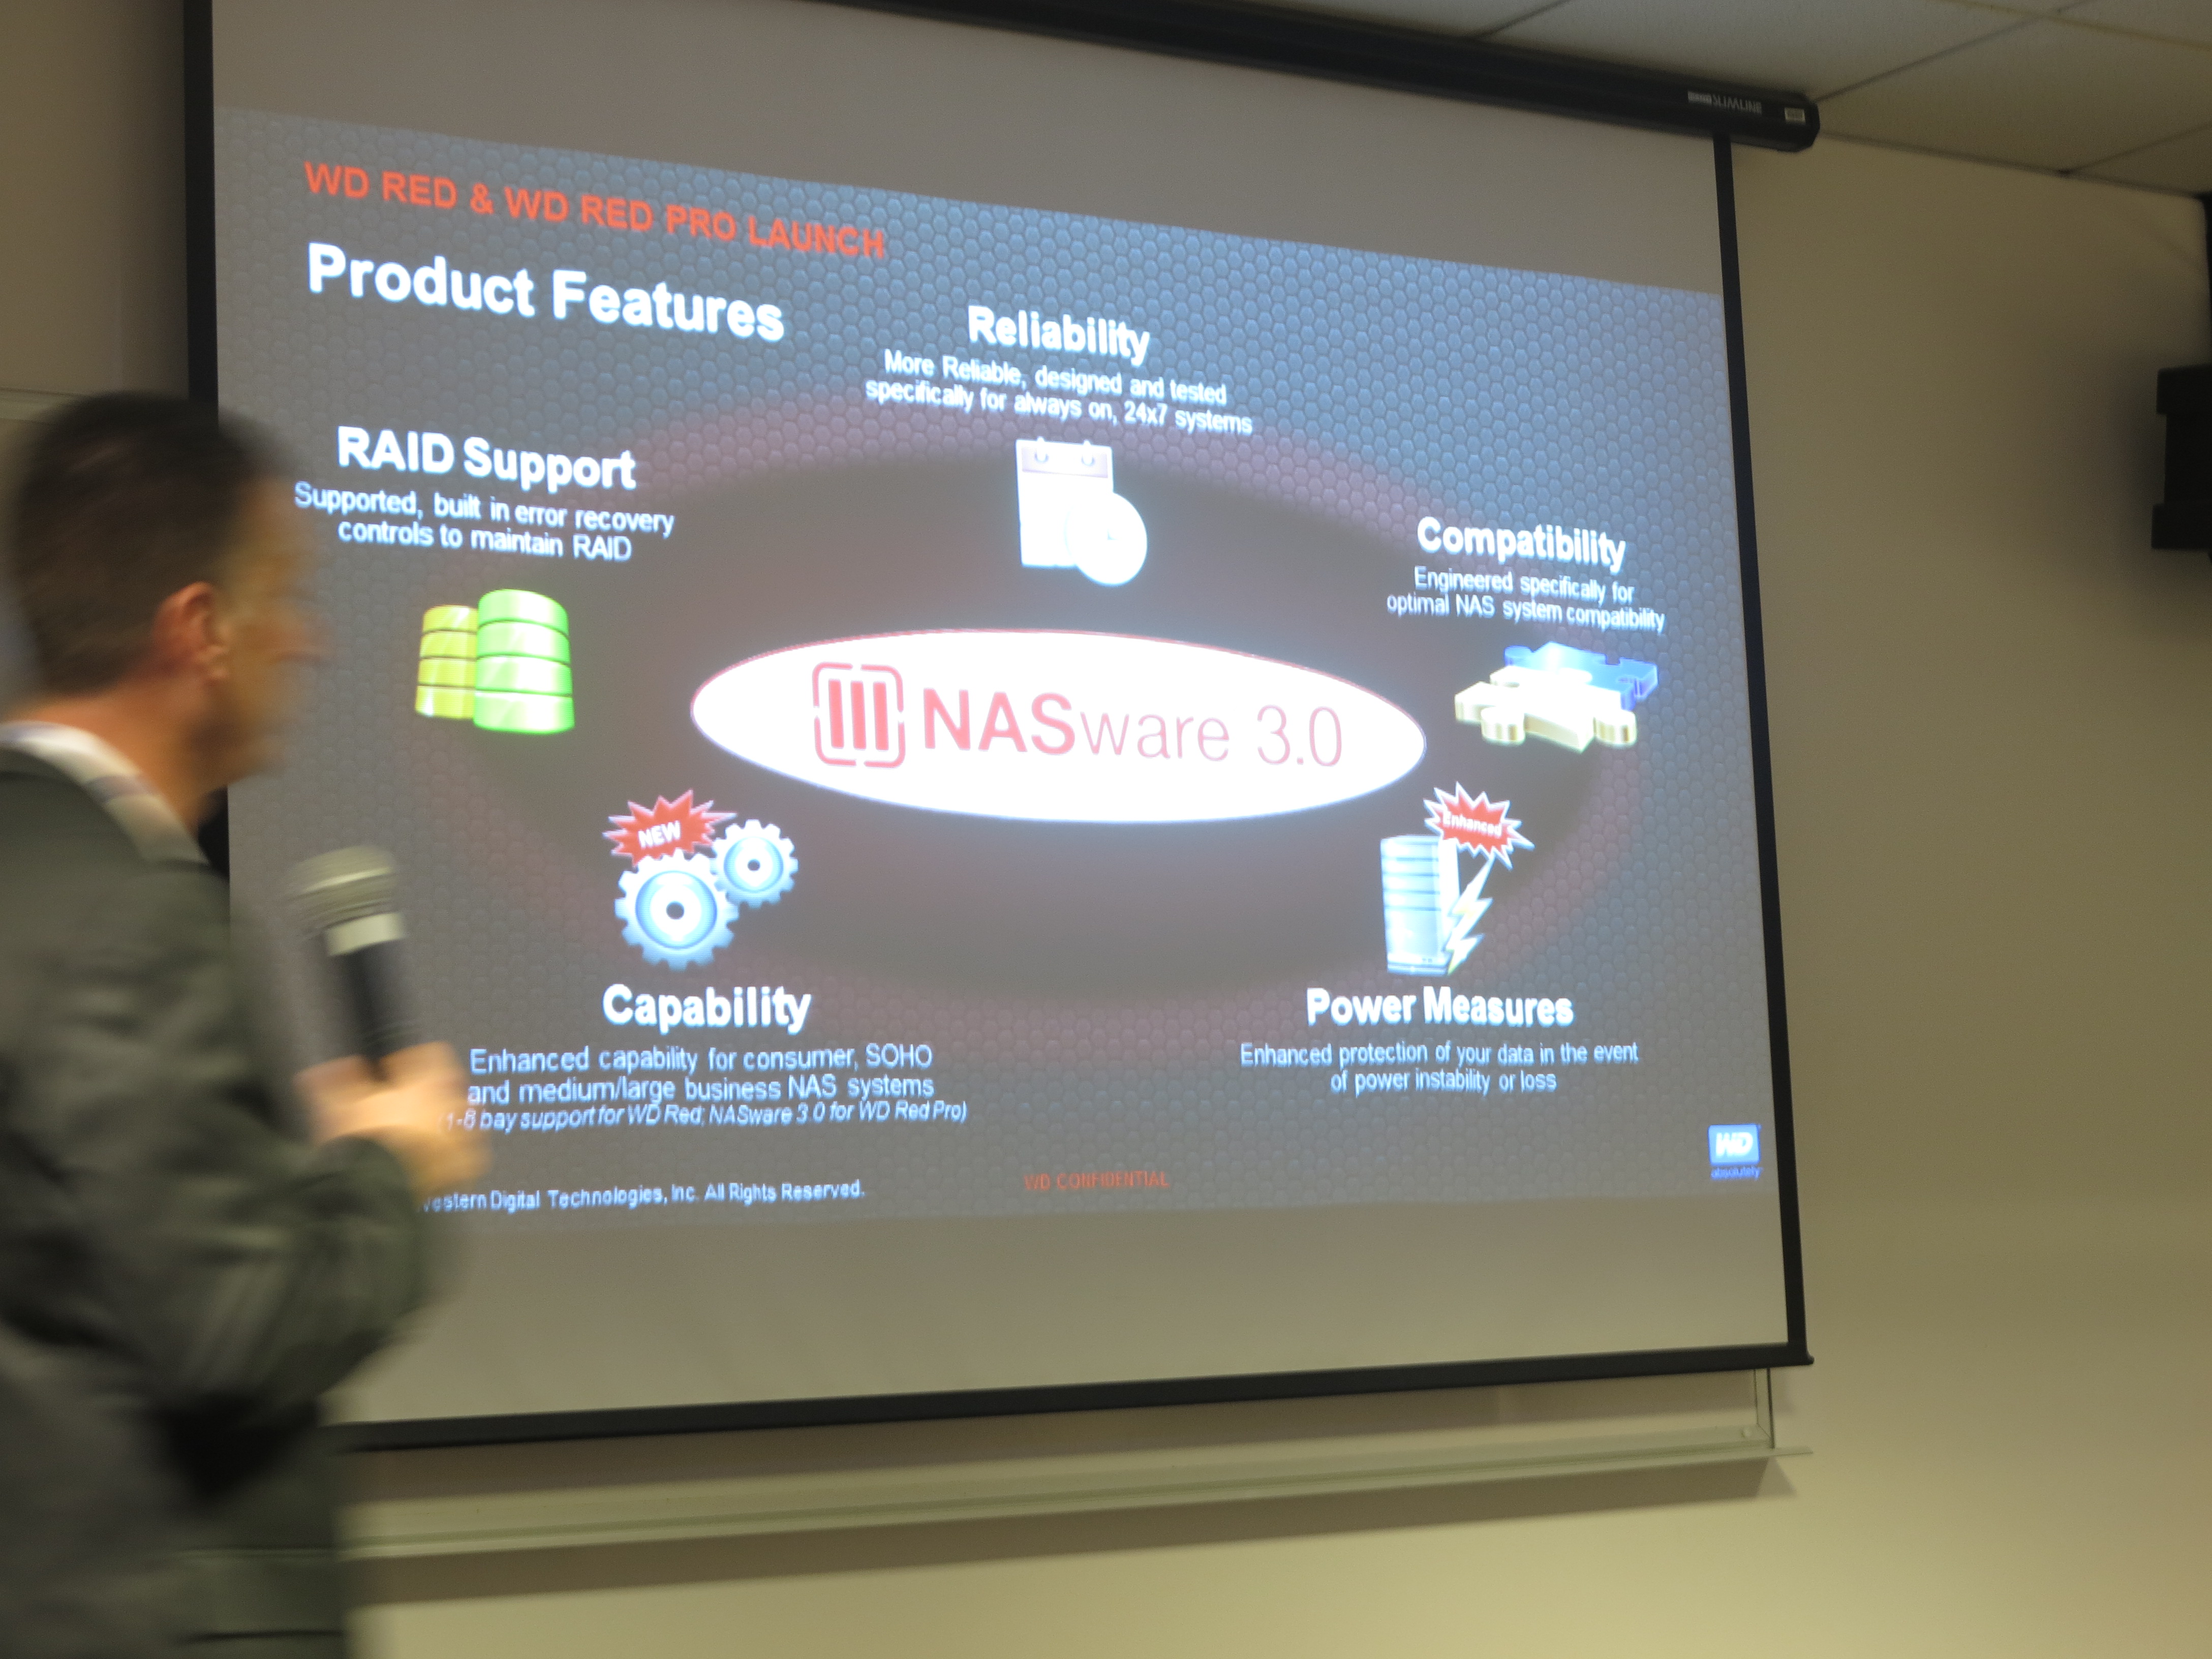
The other is where you use a monitor with not-so-great speakers as your primary display but want music or other multimedia to come out through a better sound system connected to your computer. It also includes desktop computers used in an AV playout role with a projector and PA system conveying the audio-video content to the audience but using a monitor with not-so-great speakers as the operator’s display.

The first situation involving a laptop would have the standard audio driver serving the integrated speakers set up as a “default” sound device while the Web browser, game or multimedia software uses the display-audio driver as the output device. The second situation using a monitor with not-so-great speakers would have the display-audio driver as the default driver while the Web browser or multimedia software handling the AV content to be played to the audience uses the audio driver associated with the better sound system.

Conclusion

Simply, the “display audio” or “HDMI audio” driver works with your computer’s graphics infrastructure as a separate audio driver to present sound from your computer to an audio-capable monitor or A/V device connected via its DisplayPort or HDMI connections.

Hey Cortana! You can work with GMail

Article

You can now connect Gmail to Cortana for calendar, mail, and contact support | Windows Central

My Comments

Windows 10 Cortana Notebook menu

Select “Connected Services” in Cortana’s notebook

Some of you may just use GMail simply as another Webmail account but you can have client-side access to it from certain email clients like Windows Mail, Outlook or your Android email client. Here, if you are using Windows Mail for example, you may find that you could have Cortana work your account from their simply by adding it to the list of accounts your Windows Mail installation works with.

But you may also just use the Web-based user interface for your GMail account and simply use it also as a contacts and calendar storage for your Android phone, especially if you do upgrade your phone frequently.

Add a Service menu in Windows 10 Cortana Notebook menu

Select GMail as the service to add to Cortana

Here, you can create a direct link between Cortana and your GMail account so you can summon her for information from that account. This can be of importance if you buy the Harman-Kardon Invoke smart speaker which is powered by Microsoft’s Cortana voice-driven personal assistant.

To do this, open Cortana on your Windows 10 computer and click on the Notebook icon. Then click on Connected Services in the menu that pops up. Select “Add a service”, then select “GMail”. Here, you will be asked for your Google username and password that you operate your GMail account with. Enter these credentials and Google will then ask you whether you want to allow Cortana access to your account. Once you assent to this, your GMail details are available to Cortana.

This will become more of a trend as an increasing number of social networks, Webmail services and the like provide the necessary “hooks” to allow the various voice-driven personal assistants to work with their services.

Editing favourites with Microsoft Edge

Article

Edit URL item in Favourites context menu

Edit URL item in Favourites context menu

Windows 10 Tip: Edit any URL in your Microsoft Edge Favorites | Windows Experience Blog

My Comments

A situation that can affect many Web users is to have a “favourites” or “bookmarks” list with out-of-date links in it. This can be brought about by a Website moving to a new domain or its link directory being reorganised. The latter situation can be brought about due to implementation of a new content-management system or substantial renovations to the site layout.

Most Web browsers have the ability for you to edit a Web address in the Favourites or Bookmarks list, typically through you right-clicking on a link, selecting an “Edit” option, and manually editing the Web address.

But the Microsoft Edge Web browser that is part of Windows 10 didn’t have this kind of in-place editing functionality. It was in a vain attempt to achieve a reduced-clutter user experience for viewing Web pages on your Windows 10 computer. This would have caused you to navigate to the resource’s new location, add it as a Favourite then delete the old reference from the Favourites list.

Microsoft has added in-place link editing to their Edge browser that is delivered with the Windows 10 Fall Creators Update onwards. Now what you can do is to right-click on the resource’s link in your Favourites list, then select “Edit URL” in the context menu to make the Weblink for the resource editable.

If you are using a touch-only arrangement like a 2-in-1 convertible laptop in a “tablet”, “presentation viewer” or “tent” position, you need to dwell your finger or stylus on the Web resource’s link until a square or circle appears, then remove your finger to expose this context menu. There are some stylus implementations that may have a button that you use to enable the context menu.

But now you can revise that Web link in Microsoft Edge’s Favourites list without having to add the new link then delete the old link.

Controlling Wi-Fi and Bluetooth on your iOS 11 device

Articles

If you can’t manage your iOS 11 device’s WiFi or Bluetooth from the Control Center, you may have to go to the Settings App.

iOS Control Centre’s Wireless Toggles Don’t Turn Off Wireless Radios | Lifehacker Australia

My Comments

Apple has just rolled out iOS 11 as an update for your iPhone’s or iPad’s operating system and, as expected with “.0” versions of operating systems’ major functionality updates, there will be a few bugs and issues here and there. This is typically due to Apple, like other software vendors, rushing the major-functionality version of the software out the door to satisfy the vendor’s marketing team’s needs. In this case, the goal here is to get the new iPhone X and new iPhone 8 range, which will be loaded with this operating-system version, ready to sell to the crowds queueing outside the Apple stores and mobile phone retailers on the day they are released i.e. 22 September for the iPhone 8 and 8 Plus, and 3 November for the iPhone X.

One of these is the inability to manage Wi-Fi and Bluetooth from the Control Center on your iOS device even though the buttons do exist there to enable and disable this function. Here, you may want to disable one or both of these functions for your privacy when in the vicinity of Wi-Fi networks you don’t trust, to save battery runtime when you are not connected to a Bluetooth peripheral or a Wi-Fi network or simply as part of troubleshooting a Wi-Fi network or Bluetooth peripheral connection.

The symptom shows up in the form where pressing the Wi-Fi or Bluetooth icons in the Control Center has no effect on the Wi-Fi or Bluetooth functionality. But you can work around this by going to the Settings app on your iOS device. Then you tap on WiFi or Bluetooth to select the appropriate function you want to control.

Disable the appropriate function by sliding the switch to the Off position whereupon you will see no references to Bluetooth or Wi-Fi activity and the green marker will disappear. Or enable the appropriate function by sliding the switch to the On position where you will see the green marker appear and references to the Bluetooth or Wi-Fi activity appear.

Of course, keep an eye on the Settings app for newer “point-release” versions of the iOS operating system and update your iOS device with these newer versions as they arrive. Here, these versions will typically rectify bugs, security exploits or weaknesses that become knowledge to Apple.

Photos not the right way up on your TV?

Media contents in Dropbox folder available on DLNA-capable Samsung smart TV

Pictures that are copied in using Windows Explorer may not always appear the right way up

A problem that can surface with some photos that you view using your Smart TV, set-top device or similar equipment is that they don’t appear the right way up.

It happens more so with those pictures that come in from an email whether as attachments or downloadable links, or from a cloud-storage service. Similarly it also happens if you transfer the pictures from your device to your computer using the operating-system’s file manager i.e. Windows / File Explorer or MacOS Finder by using the file-copy procedure. This latter process is something most of us do when we want to make digital pictures that we took at someone’s location available on their computer.

These cameras record information about the photo orientation as part of the picture file when you click the shutter

The main problem is that today’s cameras and mobile devices record the orientation of the photo in the file that represents the image as part of machine-readable EXIF metadata. Most of the file managers recognise this metadata and use it for creating the thumbnail that is seen for each file. Similarly, when you upload photos to an image-sharing or social-media site, you will find that these pictures will be shown the right way up thanks to this metadata. It is also true of image management software which even creates copies of the imported files that are the “right way up” as part of the image-import process.

Windows 10 File Explorer

Copying photos from your camera using Windows / File Explorer or other file managers may not guarantee the best results with photo-rotation metadata

But a lot of hardware media players like smart TVs, set-top devices and electronic picture frames don’t recognise this EXIF picture-orientation flag and show the picture with the incorrect orientation. It can be exacerbated with DLNA media-streaming setups where the DLNA media server doesn’t use this flag to rotate the picture to the correct orientation when it is being served to the client device. The same problem also extends to some photo-viewer and presentation software that doesn’t understand the EXIF photo-orientation tag properly.

Another situation that always surfaces with photo orientation is if you are photographing something on a table, floor or similar horizontal surface. Here, the camera or smartphone doesn’t properly register the orientation due to the orientation sensor being driven by gravity. In this situation you would still have to manually rotate the image even if you were importing it with software that understood this EXIF orientation metadata.

How can you work around these problem when you want to show images that are drawn in from email or copied over from that digital camera?

Cast To Device option to show picture on DLNA video player – may not always work properly with the EXIF photo-orientation metadata

One way would be to open each portrait image using a photo editor or bitmap image editor that understands the EXIF photo-orientation tag like Windows Paint or Adobe Photoshop, then save the image as a JPEG file using the software’s Save As command. This will typically rotate the image the right way up and strip off confusing EXIF tags. It would appeal to situations where you are preparing a folder of photos to be shown, perhaps on a USB stick or using “Cast To Device / Play To Device” on your Windows computer and a DLNA-capable video device.

For Windows users, especially those who regularly copy photos to their computer using Windows Explorer / File Explorer, there is a free program that can batch-rotate photos in a folder correctly. The program is called JPEG Autorotate and is freely available from its author’s site. Once installed, it appears as a secondary-menu (right-click) option to allow you to rotate a single image or all the photos in a folder including the subfolders without quality loss.

If you are using a computer as the primary storage or “staging post” for your digital image collection, the best path is to use the photo import functionality that is part of the image management software installed on it. Typically this will be Windows Photos, Windows Photo Gallery or Photos for MacOS (formerly iPhoto) that will be with your operating system. As well, make sure that the “rotate photos on import” option is selected in your software’s import settings.

This information will help you with making sure that digital pictures appear the right way up no matter the device you are using.

How to look after your video projector properly

Praise and worship at church

Making sure your video projector is looked after properly will mean that it will serve your organisation for many years to come

You have bought that new video or data projector for your small business or community organisation and are excited to have it as the “go-to” device to show large images on that wall but you need to make sure it lasts a long time. This is easily achievable if you look after it properly.

This also applies to those of you who purchase a video projector for that home-theatre setup that you invest time and money in to.

With projectors that aren’t based on solid-state “lamp-free” LED/laser-based lighting technology, the lamp that shows the image on the wall or screen also generates a significant amount of heat while it is on. Preventing a build-up of heat in the projector avoids damage to the machine’s lamp and other electronics installed in the unit.

I have written out this information especially for situations where your projector is likely to be used by many different people such as a small business with a high staff turnover rate or a community organisation that has many different volunteers coming through. It is also available as a download-to-print PDF reference sheet that you can keep with your projector’s documentation or operating procedures for your AV setup.

Make sure you set up the projector on a sturdy surface before you turn it on.

This is especially important for transportable setups where you set up the projector before each showing and pack it away when you are finished with it. The table or desk that the projector is to sit on must be stable and in good order. As well, if you use something to raise the front and/or back of the projector to get the picture right, make sure that the setup that you use is sturdy.

Economy data projector with VGA input sockets

The projector has to be on a sturdy surface

In the case of an integrated installation, you must use a good-quality mount kit and make sure that the projector is properly anchored to the mounting surface which should be installed properly.

Make sure you properly shut the projector down at the end of the session

Projector remote control - power button called outUse the standby switch on the projector’s control panel or its remote control to shut down the unit.

At this point, the projector’s fan will run for some time to remove the built up heat from inside the unit while the lamp and electronics is switched off. This will be indicated with a different light that flashes or glows during this process.

You are ready to disconnect the projector from the AC power when its fan stops and only the “standby” light glows or no lights glow on the projector that indicate operation.

Avoid the temptation to turn the projector on and off too frequently

If you need to blank the screen during your show, such as while you are preparing other material to be shown, use the Mute or Blank button on the projector’s control panel or remote control or use the similar “blank-display” function on your display computer’s software or source device.

If your projector uses filters that are easily replaceable, clean them on a regular basis.

Also cleaning the projector’s ventilation grilles on a regular basis can also help towards maintaining proper cooling for that machine especially if it is used or stored in a dusty area. This can be done with your vacuum cleaner’s nozzle.

Be aware of how your projector’s fan sounds while you are using the unit or shutting it down.

The fan should be making no more than a quiet whirring or whooshing sound. If you hear excessive noise like a grinding, buzzing or squealing sound from the projector’s fan, it is a telltale sign that the fan’s bearings are on the way out and it could cease to do its job as well as distracting your audience. This leads to unreliable operation and excessive heat buildup.

When you hear the excessive noise from the projector’s fan, have the projector taken to a repair workshop to have the fan replaced.

Conclusion

Once you know how to look after your projector by avoiding unnecessary heat buildup, you can be sure it will serve you reliably for a long time.

Set Windows not to interrupt your presentation or movie

Article

Presentation shown on retractable screen

You don’t really want Windows to throw pop-up notifications during that important business presentation

How to disable notifications while presenting on Windows 10 | Windows Central

My Comments and how to go about this further

Most of us encounter times in our work and personal computing lives where we don’t really like Windows to “pop up” too many notifications while we are concentrating. Situations where this is more so include running a presentation, watching video material, engaging in a videocall or playing games where we really crave the minimum of distractions.

Screenshot of Acorn TV website

.. nor while watching that bit of video-on-demand content on your computer

There are multiple approaches to reducing distractions caused by Windows when it pops up those notifications. These depend on the screen setup you are running with.

One screen

Quiet Hours button on Windows 10

Quiet Hours button in Action Center on Windows 10

Most of you who are using that laptop or convertible 2-in-1 will be using this machine’s screen to view your long-form video or show that presentation to two or three people at the “second-office” café. Or you are using a traditional desktop computer like that “gaming rig” and don’t want Windows to distract you from that game you are playing.

Quiet Hours option - a right click away - Windows 10

Right click on the bubble to pop up this menu

Here, you can enable the “Quiet Hours” function to prevent Windows 8 or 10 from popping up notifications when you don’t want them. This can be enabled using a “button” in the Windows 10 Action Center or by right-clicking on the Windows 10 Action Center bubble at the right-hand corner of the screen then selecting “Turn on Quiet Hours”. This will mute all notifications coming in so you aren’t disturbed.

When you have finished, you then disable “Quiet Hours” by repeating the above process. If you right-click on the Action Center bubble, the option that will show up will be “Turn Off Quiet Hours”.

Two Screens – Duplicated display

Windows 10 - Hide Notifications When Duplicating Screen

Use this option to hide notifications when you have two screens replicating each other

Some of you who have a laptop may connect your computer to the projector or large-screen TV and set it up to “duplicate” the display. This is often seen as a simplified approach to putting things up on the large screen especially if both displays have the same resolution and aspect ratio.

As well, this scenario may please those of us who are using Windows Media Player, Windows Photo Viewer, the Windows Store apps or similar software that doesn’t address displays separately, or are simply working with the Web.

Windows 10 has a dedicated setup for this scenario where if you are duplicating the display, you don’t see any of the notifications appearing on both screens. This is a separately-selectable option in the Notifications And Actions settings screen as “Hide Notifications When I’m Duplicatiing My Screen”.

Two Screens – Extended display

Extended Display setup for a secondary display as a dedicated screen - Windows 7

Extended Display setup – for a secondary display as a dedicated screen – Windows 7

There are those of you who have your computer connected to an external display in the “extend” mode. This may be because you are using presentation software that can separately address the external displays or are using the extended multiple-screen desktop.

In this scenario, you would be having your notifications appear on your setup’s primary screen such as your laptop screen. This is although, in a presentation setup, you would be having the presentation appear on the large screen.

But you may want to be sure that you are not disturbed during the presentation or video content. Here, you can follow the instructions for enabling “Quiet Hours” as described in the “One Screen” context.

Managing your system’s sound

On the other hand, you may not mind the visual notifications on your screen such as when you are watching a video or engaging in a videocall. This may be because you want to make sure you don’t miss that message for example.

But you may want to play things a bit more discreetly and not have chimes or bells associated with incoming messages or error notifications disturb you. This is more so when you have the sound coming through a sound system or a large-screen TV’s speakers, and these sounds at the default volume level can be increasingly annoying to hear.

This situation shows up very strong where the software you are using doesn’t allow you to determine which sound-playback device it should play through and you have to use the Windows “default sound device” typically shared by the system for its notification purposes. This situation applies mainly with Web-based situations, UWP / Modern / Metro apps that you get from the Windows Store or some online-service clients like Spotify.

There is the ability to turn off audible chimes for apps that put up notifications but let them put up the visual notifications. Here, you may have to use the Notifications settings screen and work through each app and turn off the “Play a sound when a notification arrives” option on each app. Then you would have to do this rigmarole again when you want the audio prompts back.

Volume Mixer in Windows 10, similar to other Windows versions

Volume Mixer in Windows – System Sounds are the notification chimes and dings

Here, you can work around this problem by using the Windows Volume Mixer to reduce the System Sounds volume output so that those beeps and chimes don’t come through very loud. You can even slide that volume right down so that those sounds can’t come through at all. If you are using Windows Store apps like some of the Windows 10 clients for the various online video services, you could use “Ear Trumpet” (Free download from Windows Store) which is an advanced volume mixer that works with these apps as well as Desktop (classic) apps as well as integrating with the Windows 10 look and feel.

Those of you who run Windows 10 April 2018 Update (build 1803) will have the integrated Volume Mixer function able to manage the sound from both the legacy Win32 apps and the UWP Windows Store apps in the same interface. This also extends to the ability to direct which sound device a program uses for its sound output so you don’t hear the notification chimes coming through your TV’s speakers, home theatre or PA system.

Ear Trumpet volume mixer app for Windows 10 - manages Windows Store apps

Ear Trumpet volume mixer app for Windows 10 – manages Windows Store apps

What Microsoft could do

Microsoft could support a “notifications profiles” setup in Windows where you can turn off the notifications abilities for particular apps and save these setups as one or more profiles. Here, it could be useful to allow users to create situation-specific profiles such as one to have when watching video content, running a business presentation or going to bed.

It could be implemented also with notifications being assigned “priority” levels so as to allow users not to have “hints-and-tips” or similar unimportant notifications come through at “do-not-disturb” times yet have important notifications come through. For email, messaging and similar software, user could assign priority levels for their contacts so that they don’t miss messages from the contacts that matter like the boss.

The sound-management software in Windows could allow you to create situation-specific sound-level settings like what happened with the Symbian-based Nokia phones. This was where you could create sound-level scenarios for particular situations by varying different sound outputs like ringtone, notification tones and multimedia sounds (music or video playback). This also appeals to other ideals like being able to relegate sound classes like system notifications to particular output devices independent of other sound classes like multimedia and communications.

Conclusion

Once you know how to manage the notifications that pop up in Windows 10’s Notification bar, you can be able to make sure you aren’t distracted by this noise when you want to run that important presentation or watch that favourite Netflix. Similarly, adjusting the sound output of your apps, especially those that are only about notifying, can allow you to achieve that quiet environment while you enjoy music, watch videos or give presentations.

Update

I have updated this article to highlight the improvements that Windows 10 April 2018 Update (Build 1803) offers in relation to sound-level and device management.

Should I use Windows Photo Viewer or my presentation program to show those photos?

Microsoft PowerPoint

Microsoft PowerPoint can do the job easily for some applications

Previously, I wrote an article about how to use Windows Photo Viewer to show a collection of digital images on the large screen like your projector. Usage classes I was targeting this at included churches and other houses of worship who were showing digital images from the mission field, businesses with a lot of new products to show, people going through a large collection of newly-taken images and the like.

But you think about whether the dedicated presentation or playout program like PowerPoint, EasiSlides or Screen Monkey does the job better in this situation compared to something like Windows Photo Viewer.

Image in Windows Photo Viewer

Windows Photo Viewer comes in to its own with a collection of many photos

The problem with these dedicated presentation or playout programs is that there is more rigmarole involved in putting an image in to the presentation and this can open up room for mistakes. This may not be an issue if you are only needing to deal with an image count of between five and 10 JPEG images being necessary for your event. You also may be factoring in using the presentation or playout program to handle the rest of your program’s visual content like PowerPoint presentation material, textual material or song lyrics.

But Windows Photo Viewer would come in handy where you are dealing with a collection of many digital images that you took with the digital camera but want to show on the screen. A good rule of thumb to work with may be at least 11, perhaps 24 to 36 images which was the equivalent of the number of slides that could fit in the slide boxes that mounted 35mm slides came in after the film was processed. Here, you would be wanting to show those images in a manner equivalent to the old-time slide show, showing them in a sequence that matches the flow of your presentation.

Here, different programs can answer different needs and this is more true when you are dealing with presentation or AV playout needs in your small business or community organisation.

FLAC–now the audio filetype for archival use

Naim NDS network audio player

This high-end Naim NDS network audio player is an example of equipment that can handle the lossless FLAC file type

If you work with audio content, whether to “rip” CDs to the hard disk or home network, or record speech or music content for audio projects, you may have been dealing with various compressed filetypes like MP3 or AAC as your main recording format.

But most of these filetypes work on a lossy principle where data is effectively lost and when the file is played back, the software reconstitutes that file to make it something to listen to. Now an open-source file format has been released to allow for lossless compression of audio content.

This recently-issued format, known as FLAC or Free Lossless Audio Codec, has answered many audio technicians’ prayers because the sound is encoded in a manner as to prevent the loss of audio content through recording or playback. This is in a similar manner to how a ZIP or RAR “file-of-files” is prepared in order to conserve disk space or bandwidth. You still have the advantage of a compressed file not taking up too much storage space or transmission bandwidth. Being an open-source free codec, it means that audio applications can implement this codec without the need to pay royalties to particular organisations and there are very few other encumbrances on that codec.

FLAC re-rip of CD

FLAC – a better archival format

One of the best analogies that I came across for using FLAC in the audio-archival context is that it is like if you are a wine collector and you purchase a premium wine-cellar to keep your collection. Here, the wine-cellar is keeping the wine collection at an ideal temperature and humidity for long-term storage. But when you want to serve that drop at the dinner party, you have the bottle sitting on the sideboard and resting until it is at the ideal serving temperature.

Previously this required a user to download and install a FLAC codec on their computer to be able to record, play or edit these files. Then the Linux and Android operating systems had native support for this filetype built in to tie operating system and various audio applications provided application-level support for working with these files. Similarly, high-end sound cards and USB DACs furnished this codec as part of their software. Now Windows 10 has provided native support for FLAC files including ripping CDs to these files.

How can I use FLAC in my audio workflow

Creating your digital-audio content

If you use a computer or a file-based digital-audio recorder (including some digital mixers) to record audio content, make sure that you record as a PCM form like a WAV or AIFF file; or as a FLAC file. You may find that some equipment like a lot of the digital mixers with integrated USB recording abilities may only work with USB hard disks or solid-state drives that use high-speed data transfer if you have them record to WAV or similar files.

Then you use an audio editor like Audacity, NCH WavePad, or Rogue Amoeba’s Fission; or an audio converter program like NCH Switch, dbPowerAmp or Foobar2000 to convert the WAV or AIFF file in to a FLAC file. You may find that some video converters may offer audio-to-audio conversion for the FLAC file.

dbPoweramp Music Converter - one of the audio converters worth using out there

dbPoweramp Music Converter – one of the audio converters worth using out there

You could do this to your audio file once you have that file in “master-ready” condition – you have edited it and applied any audio transformations to that file to get it sounding right and it is ready to distribute. On the other hand, you could also create a “raw” FLAC file from the WAV or AIFF you have recorded before you perform any of the editing and audio transformation work. In this situation, you then use this “raw” file as your reference file if you needed to approach the editing in another way.

Even if you are salvaging audio content from legacy media like LPs, open-reel tapes or cassettes, you can still use FLAC as your audio filetype for these efforts. Here, you can use theses FLAC files simply as the digital archive for this media.

As you create or edit a FLAC file, you can add metadata about the content you recorded to that file and, like with MP3 files, that data which describes the song title, performer, genre, album and other attributes stays with that file. This will work properly with smartphones or media players that play these files; along with DLNA media servers that distribute these files across small networks – these servers can index them and have them found according to the metadata that describes the content.

Distributing your FLAC-based audio content

When you distribute your content, you can then use the FLAC file as your source file – you could simply copy that file if you are targeting newer FLAC-compatible  “open-frame” equipment like Android or Windows 10 smartphones or Windows computers, or convert to MP3, AAC or Apple Lossless for Apple and other equipment that doesn’t support FLAC. Similarly, most current-issue DLNA-capable NAS units can work from FLAC files especially if you have FLAC-capable playback equipment on the network.

The FLAC file is also useful as a “master” audio file if you are creating an Audio CD because it is a compressed audio file that has has the same audio qualities as a PCM WAV or AIFF file. Similarly, you may have to convert the FLAC to a WAV or AIFF if you are importing it in to a video editing program for use as part of your video project’s soundtrack.

Conclusion

Once you use FLAC as your main file type for audio recording and editing or simply convert legacy audio files to FLAC, you are then ending up with a digital-audio file that can be used as an archival or distribution-master form.

Using audio-editor software to salvage legacy media

Linn Sondek LP12

You may want to get those old familiar records on to your computer to play on your home network

A task that you will want to do is to record content held on vinyl, cassettes and other legacy media to your computer. This may be to copy it to a CD or have as audio files that you can play on a computer, mobile device or through your home network. It is a task you will end up doing either for family-memory recordings or recorded material where there isn’t a chance of it being reissued on modern audio formats.

What do you need?

Here, you will need to use an audio-interface device such as a sound card or sound module to connect the turntable or tape player to the computer; along with an audio-editing program which records the sound and allows you to edit these recordings.

Creative Labs Sound Blaster Digital Music Premium USB sound module press image courtesy of Creative Labs

Creative Labs Sound Blaster Digital Music Premium USB sound module – useful for copying old media to your home network

Audio-interface devices need to be equipped with line-level input connections so you can connect them to an amplifier’s tape-recorder connections or to a source device like a tape deck that has these kind of connections. On the device’s side you will typically have a 3.5mm stereo audio phone jack that is typically highlighted in green or marked LINE IN or some better sound modules may be equipped with a pair of RCA sockets that are similarly marked.

If you are using a laptop computer, an “all-in-one” computer or a small desktop computer, it is a good idea to purchase a sound module that connects via USB, Thunderbolt or similar connectivity technology and use that as your audio-interface device because most of these computers don’t implement line-level input connections on their integrated sound hardware. Similarly, a dedicated sound card may work wonders for sound quality and computer stability if you are using a traditional desktop computer that can be outfitted with standard expansion cards.

Audacity audio-editor software recording

Audacity – a typical and common audio-editor program

One common software tool is the open-source Audacity program which is highly capable advanced tool but may take a bit of time learning. On the other hand, there is NCH’s Wavepad which comes across as a “free-for-personal-use” program for basic tasks or you can buy a fully-function program for under $100. This one does provide an interface that you can easily get a grip of for most editing tasks. It is also worth noting that you may have ended up with an audio-editor program if you bought an audio-interface device for your computer like a USB sound module; or it may have been bundled with a comprehensive multimedia package or perhaps your computer.

How do I go about this?

Create a software monitor path using your audio-editing software

Here, you create a “confidence monitoring” path to be sure that the sound that you want to record is getting from the source device to the software. This can be useful if you want to hear the source coming through that software or as a troubleshooting tool.

Audacity - audio inputs

Audio inputs on Audacity

Select the “recording device” or “source input” that your source device or amplifier is connected to directly on the audio-editor software. Typically this refers to the actual jack on the sound-card or sound-module that your source device is connected to. Then you select the “playback output” or “playback device” directly on audio-editor software if the software allows you to do so.

Audacity - audio outputs

Audacity – audio outputs

If you use a hi-fi amplifier with a “tape-monitor” switch, connect the sound module’s audio input and output to the amplifier’s tape input and output connections. Then you select the source you want to record using the input selector and enable the tape-monitor function on the amplifier if you want the monitoring ability.

Some highly-sophisticated amplifiers have the ability to select which audio source is recorded by a connected tape deck such as through a “record select” switch, or there are amplifiers and receivers that have two tape loops but have a “dubbing” switch that determines how the sound flows between those connections. In the former situation, you may have to set the “record select” switch to the appropriate input and in the latter situation, you may have to select “Source” on the tape-dubbing switch unless you are recording from a tape deck connected to the other tape loop, where you would select that recording device using the tape-dubbing switch.

For the software, you would have to select the sound-module audio input connected to the tape output as the recording device and the sound-module audio output connected to the amp’s tape input as the playback device. Then you would have to enable software monitoring, also known as “software playthrough” in the audio-editing software to verify that the sound is coming through. On the other hand, modern Windows operating systems have the “Listen” tab in the Recording Devices Properties dialog box to allow you to “listen” to the source through your computer’s default audio-output device or an audio output device of your choosing, again useful for verifying your setup.

Setting recording level and parameters

Most of the software will have a level meter but this may require you to enable a “monitor” function on the software to see the meter in action. It is also the time where you can troubleshoot any connection problems.

VU meters on Philips DCC-900 in play mode

VU meters that indicate playback output level

If you are playing a a recording on a playback device equipped with VU meters that show the output level during play, check these meters for audio output coming from that recording. As well, if the equipment uses an adjustable level for its line-level outputs, adjust this control to at least 75% or 80% of its maximum level. Then you use the software’s level meters to determine the recording level, making sure you allow a bit of headroom on the meters. On the other hand, you may try adjusting the software’s recording level to maximum and winding back the source equipment’s output-level control to achieve the right signal level if the source equipment is connected directly to the audio-capture device.

As well, you set the digital-recording parameters to 16 bit quantisation and 44.1 kHz sampling rate for all legacy recording media if you use an analogue signal path. Also set up the recording parameters to record in stereo unless the recording was recording from a mono source or recorded with mono equipment, whereupon you set the parameters for mono recording. Using 44.1 kHz sampling rate works properly for burning to CD, or you could use 48 kHz if you are working towards using the material in a video project, but you can use either

You may find that using one of the audio filter functions on your amplifier like a “subsonic filter” may come in handy when recording vinyl for example. Similarly, using the Dolby noise-reduction function on your cassette deck may benefit the transfer process for a suitably-recorded tape.

Assuring proper computer performance

It may be a good idea to make sure that as few applications and tasks are running on your computer before you commence recording. This is because you need to dedicate your computer’s processor and RAM resources to the recording task and make sure that it will record reliably and properly.

This may involve closing email clients, games, office applications and Web sessions before you commence the recording session. Then, while you are recording, you make sure you aren’t using any other app on the computer that is doing the recording.

For laptops, it may be better to have them connected to AC power so that the recording session isn’t destroyed due to the battery dying. Sometimes, you may have to set your computer’s power-usage behaviour to “full-on” or “high-performance” for your recording job so that it doesn’t go to sleep during recording.

Recording

When you are ready to record, start the software recording then start your legacy media playing. Once the recording is complete, make sure that you save the sound file or project depending on the software so you don’t lose the recorded sound.

Use your turntable's cueing lever or button to lower the arm when you start playing that record

Use your turntable’s cueing lever or button to lower the arm when you start playing that record

If you are recording from vinyl using a manual or semi-automatic turntable, use the cueing function if it has one to lower the stylus to the record rather than actually lifting the arm on. It is typically represented by a lever at or near the arm’s pivot or some turntables have a button on the front of the base or near the front edge. This will protect the stylus from being chipped and avoids unnecessary loud clicks.

What you will end up with is a large WAV or AIFF uncompressed PCM file for the whole recording or a side of the recording if you record different files for each side or program.

Changing the media during recording

If you have to attend to the medium such as to change sides on a record or tape, you could pause the software’s recording function before you turn the record or tape over. This has all of the album recorded as one file and may be found to reduce glitches.

On the other hand, you may want to stop and save the recording before you attend to the medium then start recording the other side to a new file. This can work well with most studio recordings which are centred around individual tracks or where each side represents a logical part in the recording.

Some audio-editing programs support a silence-based automatic pause or stop function so as to have the recording stop when the source material hits the end of the side.

Editing

Most such software offers the ability to edit a recording that you have made. This can range from simple “cut-and-splice” editing such as to split a recording in to multiple files, combine two recordings in to one recording or remove unwanted noise from a recording.  Anyone who has worked with open-reel tapes or MiniDisc will be familiar with these editing techniques. Your first recording will be a time to become familiar with how your software implements these editing techniques and the way you perform them.

Audacity and some other audio-editing tools allow you also to “mark up” a recording file with index markers kept as a separate file or as part of a logical “project” file. This may be used to facilitate exporting of the file as individual tracks, but allow you to use the effects to adjust the sound across the whole of the audio recording. On the other hand, you may use the cut-and-splice editing techniques to break up the audio files in to individual tracks.

These audio-editor programs also offer the ability to adjust the sound of the recordings courtesy of built-in “effects” or audio-processing routines. There are the elementary effects like equalisation (tone adjustment) or dynamic-range compression but a lot of the programs offer routines geared towards this activity like audio-level normalising, noise-removal and speed adjustment (handy for tapes that have been recorded on portable equipment with half-dead batteries, using a turntable that is only capable of working at 33rpm and 45rpm to work with 78s or salvaging open-reel tapes recorded at speeds not supported by the deck you are playing them on).

A good practice is to save your recording when you get your editing perfect. Sometimes you may want to save the recording as a copy if you are trying an edit or effect out so you don’t ruin your original recording or a successful edit or effect treatment. This may be an important practice as you become familiar with your editing software and will be of value if you are trying to “bring out” poorly-recorded material like cassette recordings made using portable recorders with their integrated microphones.

Editing techniques for legacy media transfer

A good editing technique would be to trim off silence at the start and end of the whole recording and excess silence that has existed between sides or programs of that recording.  For example, some recordings especially those that are on a tape have a longer silent period before the end of the side to preserve a logical program break but have extra space available on the medium for that side.

You could also be removing unnecessary clicks and pops, especially those that are loud and are typically of equipment being started or stopped.

As well, you use the normalising function to bring the tracks’ peak volumes louder but preserve any dynamic range that exists in the recordings. You may have to set up channel-independent normalisation if you have recorded form most consumer-focused equipment because there is a tendency to make one of the stereo channels stronger than the other.

Similarly, the amplify function can come in handy for those recordings that have come through very weak but this is simply about multiplying the volume in that recording and can lead to clipping and distortion if you aren’t careful.

Various filter and equalisation function can be of use to remove unwanted noise such as tape hiss or vinyl rumble. Here, you may have to save a “reference” version of your file and toy around with these filters if you are trying to remove the noise.

Exporting

Most audio-editing software allows you to export the audio content in to different file formats like MP3, FLAC, WMA or AAC compressed forms or a WAV or AIFF uncompressed form. Some of the programs even allow you to “burn” an audio CD from the files you create thanks to an integral CD-burning software engine.

If you use another program to burn audio CDs, make sure that you export your audio content to WAV or AIFF uncompressed PCM files with one file per track. These are the best-quality audio files you can work with when you are targeting these CDs.

Most exporting procedures also allow you to add metadata to CDs as CD-Text data or to files as integral ID3 data. Here, fill in as much metadata as you can about the recording and assign genres particular to the recording’s content. It is important when you copy the files to your DLNA media server or smartphone, or make use of CD-Text when you burn CDs.

Then, you can get away with exporting your legacy-media salvage effort to FLAC files which are a lossless file being handled by most good-quality audio equipment. Similarly, you could export the recording to a 320kbps MP3 file if you want widest compatibility with older MP3-playing equipment.

Conclusion

Once you use a suitably-capable audio interface device connected to your hi-fi equipment along with audio-editing software, you can use your computer as a tool for recording LPs that won’t ever be released anymore or salvaging family memories thus having them on your home network.