Category: Computing Tips

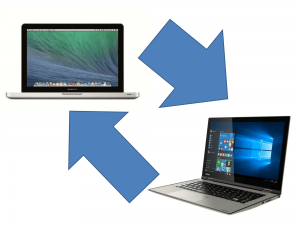
Moving between Macintosh and Windows

Article – From the horse’s mouth

Use these resources together if you are working both Windows systems and the Apple Macintosh.Working on both Macintosh and Windows

Microsoft

Making The Switch: MacBook to Microsoft Surface Book

Apple

Switching PC Habits

My Comments

Increasingly Windows computers have reached or eclipsed the kind of aesthetic and stability calibre associated with Apple’s Macintosh computers especially the MacBook portable-computer family.

But a person who works on the Apple Macintosh platform will typically find it hard to move their computing life over to a Windows-based computer. This situation may also be of use for anyone who is working a “multi-platform” environment where they maintain a Macintosh and a Windows-based computer.

Microsoft’s article is focused on their new Surface Book but the instructions apply more or less to anyone who is moving from MacOS X to Windows 10 or a Mac user who is wanting to be familiar with the new Windows 10 operating system or know how it works.

Apple does provide similar resources for people who are used to the Windows platform moving towards the Macintosh platform ever since people moved from Windows because of Windows Vista.

Most of the basic keyboard shortcuts are:

Apple Windows
Undo Command-Z Ctrl-Z
Select All Command-A Ctrl-A
Cut Command-X Ctrl-X
Copy Command-C Ctrl-C
Paste Command-V Ctrl-V
Save this document Command-S Ctrl-S
Print this document Command-P Ctrl-P
Refresh Webpage / screen Command-R Ctrl-R or F5
Switch between open programs Command-Tab Alt-Tab
Hide current program Command-H
Command-M (Minimise)
 Windows-(Down Arrow)
Hide all programs  Command-(Mission Control) Windows-M
Stop current program Command-Q Alt-F4
Force a program to stop Command-Option-Esc

Macintosh

The Command key on the Macintosh is the one with a snowflake and / or Apple symbol on it.

The “Mission Control” key will be the F3 key on recent equipment or F11 on older equipment.

Windows

The Windows key on Windows computers has a window icon and / or the Start word on it.

Assistance Journal–Linking a desktop computer to a home network

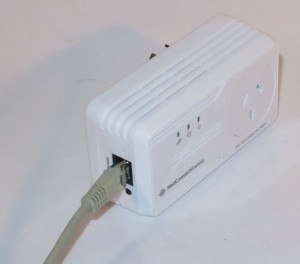
HomePlug AV adaptor

The HomePlug powerline adaptor – a no-new-wires network best for that desktop computer

This last Saturday, my church’s pastor opened up to me that he was running in to difficulties with connecting his desktop computer to his home network. This happened after he moved to a new location due to a new ministry placement.

In his previous location he ran an integrated Wi-Fi setup because the router for his home network was located in the lounge area, next to his home office and this wasn’t causing any problems for him. But the new location required the computer and router to be further away from each other.

A follow-up call led me to find that he had bought a wireless range extender with an intent to use as a wireless-Ethernet bridge but found that this device was difficult to configure. Here I suggested something better in the form of a HomePlug AV500 powerline network segment which is something I have always advocated on this site as a “no new wires” solution for situations involving desktop computers and similar devices. He was confused about how these network segments worked because he was used to either a “new-cables” Ethernet setup or a wireless setup as a network setup and though this technology wasn’t going to work in his situation.

After the church service, we went out to lunch at a local shopping centre and afterwards, he and I went to a local JB Hi-Fi store in the shopping centre and he bought a HomePlug AV500 kit upon my recommendation. I had him have a look at the concept diagrams that were on the boxes of some of the other HomePlug devices stocked nearby this kit to understand what these devices were about and how they work.

Later on, my pastor rang me for assistance in setting up the HomePlug AV500 network and I helped him over the phone through the setup process where you have to press the SimpleConnect paring buttons to pair the adaptors over the AC wiring and establish the connection. This involved holding down the SimpleConnect button on one device for 10 seconds then pressing the SimpleConnect button on the other device for 2 seconds but watching for the lights to flicker in a certain way.  I also suggested that this procedure is done on power outlets that are located close to each other before finally connecting them to the desktop computer and the router.

I also stressed that these adaptors had to be plugged directly in to the wall or in to an ordinary powerboard or double adaptor that doesn’t have surge-protecting or line-conditioning features. A few minutes later, I received a text-message of success that he had established the HomePlug AV500 powerline segment and set this up with the desktop computer and router.

Here, this support situation illustrated the fact that Wi-Fi wireless networking doesn’t suit all network needs and situations; and that a HomePlug AV500 powerline network can provide a better “no-new-wires” solution for sessile devices like desktop computers or home entertainment equipment.

You can rip CDs to FLAC using Windows 10’s Media Player

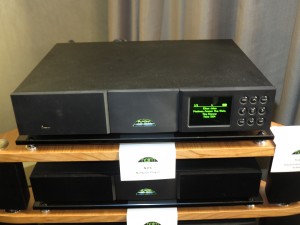
Naim NDS network audio player

You can use Windows 10 to re-rip your CDs to allow network media players like this Naim NDS to sound their best

Previously, I had covered the fact that Windows 10 has native support for the FLAC lossless digital-audio codec which is seen as the way to go for best-sounding file-based audio. But I thought this was limited to Windows 10 natively playing any FLAC file you throw at it. This is important if you connect your computer to an audiophile-grade USB DAC or use network media players that are up-to-snuff for your top-notch hi-fi system.

But I discovered for myself when I ripped the “Too Slow To Disco 2” CD to my computer’s hard disk that Windows Media Player does rip to FLAC and have set it up that way. This will lead to sound that is properly CD quality from any of your CDs that you “dump” to your computer’s hard disk to transfer to your DLNA-capable NAS or FLAC-capable open-frame smartphone or media player. For that matter UPnP AV / DLNA does support FLAC audio files in a de-facto manner and most, if not all, hi-fi network media players that work to UPnP AV / DLNA standards will stream FLAC files.

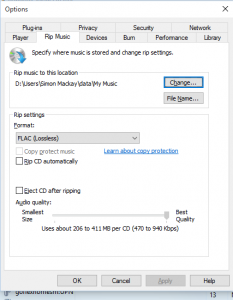
Windows 10 Media Player Options menu - Rip Music settings

Rip Music settings in Windows 10 Media Player Options menu

How do you set Windows Media Player to rip to FLAC

  1. Start Windows Media Player in Windows 10
  2. Select Tools then Options
  3. Click on the Rip Music tab
  4. Change the format option to FLAC (Lossless)
  5. Adjust the Audio Quality slider to “Best Quality

If you are about to rip a CD like I was, click on “Rip Settings” when you see your CD’s track list in the window. Then click on “Format” and click “FLAC (Lossless)” to have it ripped in FLAC.

Rip Settings menu when you are about to rip a CD

Rip Settings menu when you are about to rip a CD

In this mode, if you were playing a CD and you wish to commence ripping it, the music will stop playing until the rip is complete. This is to achieve best results. As well, I would prefer to rip to the computer’s local storage to provide for increased stability and better sound quality. These files then can be copied out to your NAS so you can have them playing on your network-capable CD receiver.

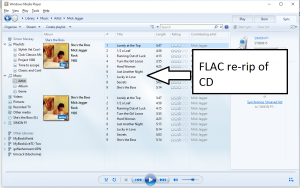
FLAC re-rip of CD

FLAC re-rip of Mick Jagger’s “She’s The Boss” CD

If you re-rip your CD collection to FLAC, each re-ripped album will be marked as “FLAC” on the album cover. But Windows Media Player doesn’t make it easy to update playlists and have them point to the new FLAC files. Instead, you have to go through each playlist and identify tracks from the albums you just re-ripped, add the tracks from these re-rips, move them next to the original track and remove the original track from the playlist.

There are ways Windows Media Player could go about this better. One way would be to create copies of each playlist with references to all the member tracks. Then as you re-rip your CDs, it then discovers the FLAC files  The copy could be tagged as a “FLAC” playlist while your existing playlist could be kept as a MP3 or WMA playlist which you could then use for portable equipment. On the other hand, Windows Media Player could work through each playlist and have them point to your FLAC re-rips.

Those of you who value open-frame computing can get on board with Windows Media Player in Windows 10 as a way to get your CDs on to the higher-quality FLAC format to see if it is right for you before committing to more expensive CD-ripping software.

How to “save as” on Mac OS X Lion and newer versions

Article

How to enable “Save As” in Mac OS X Yosemite | AppleWorld.Today

My Comments

Those of you Mac users who worked with a previous version of Mac OS X may have been able to use the “Save As” command to save that document under a different name or in a different Folder. But this feature is missing on Lion and newer versions of Mac OS X and may confuse those of you who “climbed the operating-system ladder” by installing subsequent versions of MacOS X on your Macintosh.

But you can bring back this function through a procedure that is very simple. Here, you bring up the File menu as normal then press the Option key on your keyboard where the option that was previously “Duplicate File” becomes “Save As”. Click on this or subsequently press CommandShiftS together to bring up the Save As dialog box so you can save it under a different name.

This function is important if you have to create a new different version of that document or wish to save it in a particular location like a removable drive or a special folder and you realise you needed to do this after the fact.

Windows 10 Start Menu–not your father’s old station wagon

Windows 10 Start Menu

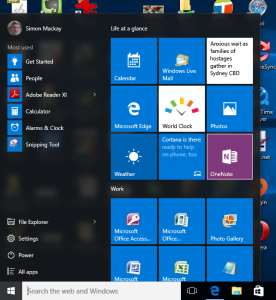
Start Menu in Windows 10 – the pop-up look from Windows 7 with the tiles from Windows 8

Windows 7 and its predecessors had a traditional pop-up start menu with an option to see all the programs or the frequently-used programs on your computer. This was presented in a list rather than a cluster of icons or tiles.

But Windows 8 headed down a totally different path with a dashboard-style layout hat has all of the programs or a user-defined set of programs represented as tiles. This had thrown many computer users off the operating system and caused some unnecessary worry.

The Start Menu

Windows 10 brought back the pop-up Start Menu that looks like a combination of the traditional Start menu and Windows 8’s tile-based look. This includes the famed “Live Tiles” that are always updated with new content thus working like a dashboard.

In the early days of your experience with Windows 10, you can mess around getting that tile-based Start Menu area looking how you want. If you run Windows 10 on a touchscreen laptop or a computer with a touchscreen monitor, this menu style can work just as well for you.

Getting it right!

You can organise your tiles in to groups by dragging them in to the space between two groups to create a group or dragging them in to a group to have them part of that group. This can be done in both the traditional pop-up view and the Tablet Mode view mentioned later on at the end.

Then you can name each group by right-clicking or “dwelling” your finger on the group name then typing in the name you want to give it.

Browsing for that program

Windows 10 Start Menu - All Apps highlighted

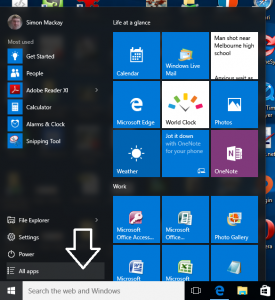
Looking for that program – click All Apps on the Start Menu

This will be a situation for those of you who have held out with Windows 7 or its predecessors, where you will be wanting to know where all of your programs have gone even though they aren’t on the Start Menu or Taskbar.

Browsing for that particular program? Click on “All Apps” to see a list of all programs on your computer. Then, click on any of the letters to bring up a list of alphabetical letters. Subsequently, you just need to click on the first letter of the program’s title to be sent straight to a list of the programs beginning with that letter.

You then have two options to have your program readily accessible. One is to “pin” your program to the Taskbar so it is always accessible and this setup may remind you of the station-preset buttons on your car radio. On the other hand, you could “pin” your program to the Start Menu where it will appear as a tile which you shift around until it is in the right place for you.

Tablet Mode

Windows 10 Tablet Mode

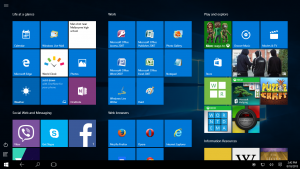
How Windows 10 looks when you use Tablet Mode

The Tablet Mode gives you a view that is not dissimilar to how you have operated your Windows 8 or Windows 8.1 computer. It is automatically selected if you detach a keyboard from your detachable-style “2-in-1” tablet or fold over a convertible notebook so the screen becomes a tablet. But you can manually select this mode on any Windows 10 computer.

Windows 10 Notification Menu buttons wiht Tablet Mode highlighted

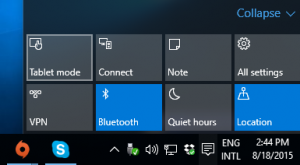
How to select Tablet Mode manually

As I have said just before, this doesn’t just those of you who work with tablet computers or 2-in-1 devices. You can use it with a laptop or desktop computer and it doesn’t need a touchscreen to benefit from this function. Rather you would use your mouse or trackpad to navigate around the screen and a scroll-enabled mouse earns its keep by allowing you to scroll downwards. In the Notification Menu, you have a button labelled Tablet Mode which you can use to toggle between this mod and the regular Desktop Mode.

I would recommending having your screen in the Tablet mode if you are trying to sort out the Start Menu groups after an upgrade because you can use the whole of your screen’s real estate to do this.

Search Bar

There is an always-visible Search Bar on the Taskbar which you can fill in your search requests for local or Web-hosted resources. This works with Cortana which is the personal digital assistant in the same vein as Siri or Google Now.

Here, ordering a search is as simple as clicking or tapping on the search area and typing in what you are after.

Conclusion

Anyone who has worked with any of Windows’ incarnations will find the Windows 10 Start Menu as something that doesn’t daunt you but allows you to get more out of the operating system.

Making it easier to safely remove that USB flash drive in Windows

Safely Remove Hardware icon in Notification area

Notification area space where hidden icons exist – click on Customize to determine how they will appear

You may want to be sure you are doing the right thing when it comes to properly and safely removing that USB flash drive, external hard disk or SD card but it may be hard to find the “Safely Remove Hardware” icon in the Notification bar at the bottom right of your screen.

What tends to happen if you haven’t been doing anything regarding removable storage is that icon becomes sidelined and available behind the up-arrow on the Taskbar. This is more so if other applications have claimed space on the Notification Bar and seldom-used icons exist behind that up-arrow.

Notification Area Icons customisation screen - when you click on Customize

Notification Area Icons customisation screen – when you click on Customize

There is a way to work around this problem by customising the Notification Bar icons to make sure that certain icons appear always.

To do this, click on the up-arrow at the left of the Notification Bar to pop up all of the icons. These will appear in a white square and you will also see the word “Customize”. Click “Customize” to see a list of the icons with each icon having its own drop-down box that determines how and when it will appear.

Options available for each icon in the Notification Area Icons customisation screen

Options available for each icon

The different modes are:

  • Show icon and Notifications. This will have the icon appear at all times and “pop up” any notification messages. Here, you may want to have the icon always visible and accessible especially if you instigate tasks from that icon.
  • Hide icon and Notifications: The icon won’t appear at all in the Notification Bar even if there is a relevant notification or it changes state. This may be useful where you find an icon always popping up messages
  • Only show notifications. The icon pops up when there is a relevant notification and will show that notification. In some cases, this icon may appear if it changes state. It may apply to “sentinel” icons that appear to crowd out the Notification Bar even though they seldom yield a notification or change state.
Preferred seting for Safely Remove Hardware And Eject Media icon

Preferred seting for Safely Remove Hardware And Eject Media icon

Here, having the “Safely Remove Hardware” icon set to “Show icon and Notifications” means that while there is a USB storage device connected to the computer or an SD card inserted in the computer, this icon will appear. This will make it easy for you to know what to click when you need to remove the USB hard disk USB memory key or memory card.

You may also find this of us with other Notification Bar icons where you are always instigating tasks from or needing to keep an eye on incase they change state like the Skype icon.

Using Bluetooth audio devices with your laptop computer

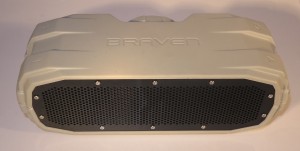
Braven BRV-X outdoor Bluetooth speaker

Braven BRV-X outdoor Bluetooth speaker – another of many Bluetooth speakers with speakerphone functionality

There is an increasing number of Bluetooth-connected wireless audio devices available for  use with smartphones and similar devices. But you may want to use these headsets, audio adaptors, Bluetooth speakers or Bluetooth-integrated audio devices with your laptop instead of those tiny speakers that are the norm for these computers. The best example for the speakers would be the Bose SoundDock speakers, especially the SoundDock 10, due to its good bass response, when used with the Bluetooth adaptor. As well, I ran a test setup with the Motorola DC800 Bluetooth adaptor connected to an older Sony boombox and had the review-sample Fujitsu LH772 laptop being fed through this Bluetooth adaptor.

Similarly, there are those of us who may want to use a Bluetooth headset like the Plantronics BackBeat Pro with a laptop computer so you can roam around the office or home listening to your favourite tunes or podcast or as a contingency measure to avoid missing that important VoIP call.

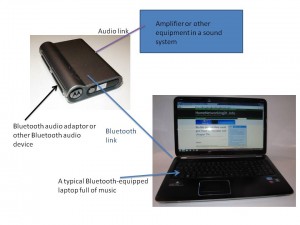
How a Bluetooth audio setup would function for a laptop

You can achieve these setups with Bluetooth-equipped laptops that run Windows 7, MacOS X Snow Leopard and Linux and newer versions of these operating systems. This is due to the supply of a class driver for the Bluetooth A2DP audio profile  and Hands Free Profile as part of the operating system distributions.

Initial setup

First, you have to set up the Bluetooth A2DP-capable audio device to become discoverable. The method for this is explained in the instructions that come with the device but you typically may have to hold down a setup button to achieve this goal.

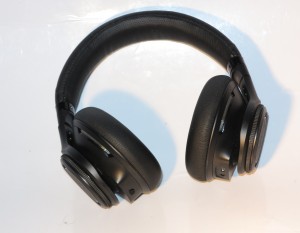
Plantronics BackBeat Pro Bluetooth noise-cancelling headphones

Headphones you can treat your laptop to

Then you have to put the computer in to a “Bluetooth setup” mode in order to annex the device to the operating system. In WIndows 7, you would have to click on “Devices and Printers”, then click “Add Device”.

After you complete these procedures, both the device and the computer start to pair up and identify themselves to each other. The computer would then find and install the A2DP audio-device class drivers that are part of the operating system. In some cases, the class driver may be fetched from Microsoft’s or Apple’s Website. The same thing will also happen with the Bluetooth Hands-Free Profile or Bluetooth Headset Profile when you initially connect a Bluetooth headset, headphone audio adaptor or other device equipped for communications functionality.

Now the Bluetooth audio device is defined as a sound device and some Windows setups may have it run as the default audio device for all of the laptop’s sound output.

Which sound device

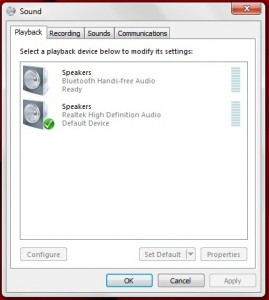
Bluetooth device listed alongside default audio device

List of audio playback devices including the Bluetooth audio device

But you may want to have a split setup so that music and video sound go to the Bluetooth speakers and all of the notification sounds come via the laptop speakers. Here, you would have to set the integrated sound subsystem as the default audio device. Then you would have to set iTunes, Windows Media Player or other media-management software to use the Bluetooth A2DP audio device.

This latter setup may not work well with software like games, the Spotify desktop program or Web browsers where there isn’t an option to specify the sound output device for that application. Here, you would have to specify the Bluetooth audio device as your default audio device to have the soundtrack from video on demand including YouTube videos, or your Spotify playlist coming through that device.

Bluetooth headsets and speakers with speakerphone functionality will cause Windows to purpose the Bluetooth Hands-Free Profile or Headset Profile as a Communications Device and may cause Windows 7 to determine it as a Default Communications Device.

Sound devices that you can send an app’s sound output through

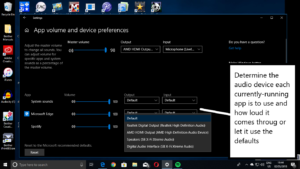
Windows 10 has improved on this problem by allowing you to use the operating system’s user interface to determine which audio output device a program uses. But if you are using a Web browser, the same audio device will be used for all sessions of that browser, whether they appear as separate tabs or separate windows. In this situation, you would have to have the audio output device associated with your laptop’s inbuilt speakers as the default audio device while you set Spotify or a similar multimedia program to play through the Bluetooth device. This is available for the Windows 10 April Update (Build 1803) available since May 2018 and newer versions of that operating system.

The controls on these Bluetooth devices should map through to the applications’ controls courtesy of operating system support for Bluetooth AVRCP control profile for media navigation and the call-control functionality of the Hands-Free and Headset Profiles. This will apply to applications that currently have the focus for media playback or communications.

Multipoint Operation

The Sony SBH-52 Bluetooth Headphone Adaptor - supports multipoint operation for two devices

The Sony SBH-52 Bluetooth Headphone Adaptor – supports multipoint operation for two devices

An increasing number of communications-capable Bluetooth devices have support for “multipoint” operation where they can work with two different source devices. This function is typically to support people who use two mobile phones such as a “personal” one and a “work” one.

As I discovered when reviewing the Sony SBH-52 Bluetooth headphone adaptor, I found that this function can also work with a computer. This can be of use if you are maintaining a playlist or listening to Web content on your laptop.

Here, you have to determine which device is your “priority” device which allows the headset to primarily control that device. This is something you would do either through the device’s setup menu, a desktop or mobile control program or a certain keypress sequence depending on the device. But some devices like the JBL E45BT headphones may implement a simplified “priority-device” setup which is dependent on the device that you are currently using rather than you having to determine that role.

You may be able to at least use the call-control button to answer and end calls when you are using your secondary device. It is a good idea to set the laptop as the priority device when you are playing content from it or are wanting to use a VoIP app that may come across as being rickety.

Conclusion

Once you know what your Bluetooth-capable laptop can do with those Bluetooth audio accessories, you can then let it perform at its best with these devices and they don’t need juhst to be considered for mobile phones anymore.

Updates

This article is subject to regular updates based on my experience with newer Bluetooth hardware that I have reviewed along with highlighting the Bluetooth Hands-Free Profile used for communications purposes and multipoint operation offered by an increasing number of Bluetooth devices. It will also be updated as desktop operating systems are being refined for Bluetooth-device operation like what has happened with Windows 10’s April Update.

Why do you need to safely remove or eject removeable media?

USB memory key

USB storage device

As you use a computer, you will have to get in to the habit of removing or ejecting external or removeable media safely and in a proper way rather than just unplugging the device or pulling out the card.

What is this about safely removing or ejecting removeable storage?

Mainframe and similar large computer setups required the operating system to logically mount a tape or disk pack after the system operator installed the medium in the appropriate drive. This procedure makes the files on the medium available to the operating system and computer programs
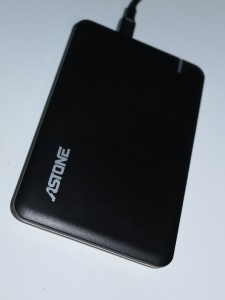
USB external hard disk

USB hard disks are more critical with this procedure

Then when the medium was finished with, the system operator had to logically unmount the disk or tape which forced all files to he written back to the medium and the operating system to deem the files on the medium to be unavailable. This procedure was also simplified when the tape and disk-pack drives used electromechanical readiness detection like sensing when a lid or door was closed or a tape was past the heads to let the host computer know that they had media on board and were ready to work with it. It would then require the operator to logically mount the medium and make it available to the system’s programs, typically by typing a special “mount” command.

Desktop operating systems like MS-DOS did away with this to simplify the operating procedures for most people especially as they were used just by one user compared to the previous mainframe systems that were used by multiple concurrent users. It also allowed the use of low-cost disk and tape systems on these computers.

Here, these operating systems immediately wrote back all file changes to the disk when a file was created, modified or deleted. As well, if a program was after a file, it would perform a directory search to determine if the file was there on that disk and the operating system didn’t cache the removeable medium’s directory structure in to the host’s memory. In a lot of cases, the act of closing the disk drive’s door or inserting a 3.5” floppy disk cause the operating system to start reading the disk’s directory in to memory.

But the Apple Macintosh maintained a similar operating requirement to the larger computer systems where you had to logically remove a floppy disk or CD from the system typically by dragging the disk’s icon to the Trash before the computer ejected the disk. This was facilitated with these computers having floppy drives that implemented electromechanical load-eject mechanisms and no hardware “eject” button ever since the platform was created.

This was carried through with Zip drives and other similar removeable-media drives that used any form of electromechanical load-eject mechanisms. The presence of an eject button on these drives typically worked as a way of telling the operating system about an intent to remove the medium so it is logically unmounted and was also implemented with newer iterations of the MS-DOS / Windows operating system along with driver programs for earlier iterations of that operating system.

Similarly, those of you who have used the MiniDisc format, especially with an MD deck or a music system that has an integrated MD recorder, may notice this taking place when you are recording to these discs. What will happen with these decks is that a message will flash up on the unit’s display screen that it is writing all the changes to the disk when you press the eject button or power off the unit before the disk is available or the unit switches off. This makes sure that all of the recording and editing activity is properly committed to the disk and is intact.

Why was there a need to tell the operating system that you were intending to remove the medium

If removeable media is removed by surprise, there can be problems with the quality of the data that is written to the medium because the operating system and applications think that certain files on the medium are available to be worked with.

This can lead to corrupted files because all the changes to the file being worked on haven’t been written to the medium completely. There are also issues with the files being locked by programs that are writing back the necessary changes so that other programs can’t interfere with this process, and if a program hasn’t released these locks or committed all of the changes, the files may not be available for other programs to work with. In the worst cases, your computer can go in to a headspin if it is working with a file that exists one minute and doesn’t exist the next.

How do you safely remove USB removeable media?
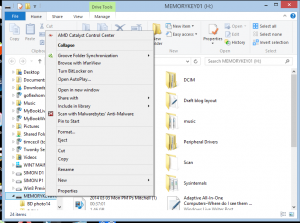
Windows Explorer (File Explorer) eject option

Eject option in Windows Explorer

With a computer, you make sure that you have closed the files you are working on if you were using a program to work with them. Then you perform a safe-removal procedure that is dependent on your operating system.

Macintosh users simply drag the icon representing the removeable storage to the Trash icon at the bottom right of the Desktop screen. Then there will be a message to say that it is safe to remove the medium.

Windows users can do this in two ways. They can open Windows Explorer (File Explorer) or My Computer and right-click on the removeable storage which will be represented as its own drive letter. They then select the “Eject” option to begin safely removing the storage device.
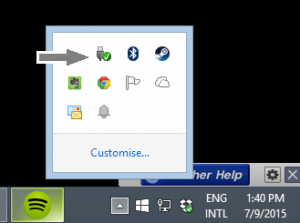
Safely Remove Hardware icon in Notification area

Safely Remove Hardware icon in Notification area

The other method requires you to click on the Notification Area on the Taskbar and right-click on the “Safely Remove Hardware And Eject Media” icon. Here, you are presented with a list of USB storage devices that are connected to your computer. Click on the one you want to remove to begin safely removing it. In some cases, a physical device may represent two or more logical volumes (drive letters) because it has been partitioned as such. Here, you select the physical device’s name to safely remove that device.
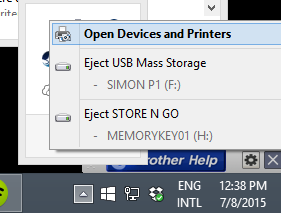
Safely Remove Hardware devices list

Devices available to remove

USB-based removeable-media adaptors like floppy-disk drives, Zip drives and memory-card readers have the ability to safely remove a particular medium or the whole device. Here, you can click on the medium to remove the card or disk or click on the physical device name to remove the device before you unplug it.
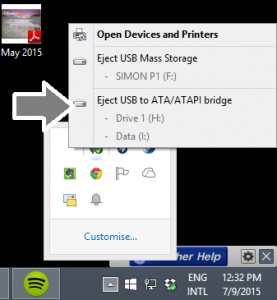
Safely remove hardware devices list

Two logical devices in one physical device – the one that is written clearly is the one to remove

This is more important with those devices that handle multiple media types like some multi-slot memory-card readers or devices that have a combination of fixed and removeable storage options like some digital cameras and camcorders that have internal storage along with an SD or microSD card slot. In the latter situation, these devices would have fixed storage greyed out while the removeable storage is written in black.

I have prepared a PDF reference sheet about the procedure needed to safely remove your removeable media from your Windows computer. Download and print this and keep it by your computer if you or others need to know how to do this properly.

Android users would go to the Storage menu and select the “Unmount SD Card” option for the SD card or “Unmount Mass Storage” for storage devices connected to their mobile devices via USB “On The Go” connectivity.
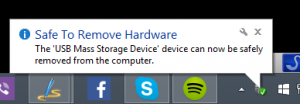
Safe to remove notification

It is safe to remove

For other devices like A/V devices that write to an SD card or USB memory key, you would have to go to the device’s menu and select the “Unmount”, “Remove” or, more likely, “Eject” option. This process would be analogous to ejecting a tape, CD or MiniDisc so you can work with another medium.

Of course, powering off the equipment properly such as selecting a logical shutdown option would prepare any media or removeable devices attached to the equipment for safe removal.

Conclusion

Once you know how to properly and safely remove media or detach USB storage devices from your computer or similar device, you can avoid situations which can place your computer’s reliability or the data on that medium at risk.
Moving those games to another hard disk without breaking them

Article

Windows Explorer (File Explorer) - two or more hard disks

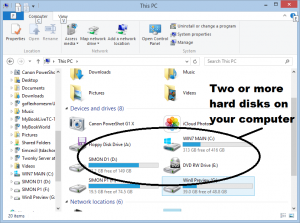
Two or more hard disks or partitions on your computer may make you want to move games to the larger disk

How To Move A PC Game To Another Hard Drive (Without Re-Downloading It) | LifeHacker

New Information

How to Move Microsoft Store Games To A Different Partition | Next Of Windows

How to Move GOG Games to Another Drive or Computer | iFindSoft

My Comments

You may have two hard disks in your tower-style desktop computer, or the main hard disk is partitioned in to two spaces and you want to move your games to the secondary disk or partition. Or you are running a laptop with a small hard disk and want to use a USB external hard disk for your games.

External hard disk

An external hard disk could be useful for offloading games from your laptop

This may come across as being very difficult for games based on game managers like the Steam or Origin systems, or the Microsoft Store; which typically put all the software on the main disk or partition i.e. Drive C: . But how can you move an existing library out to the other disk or partition or to an external hard disk?

Steam startup screen

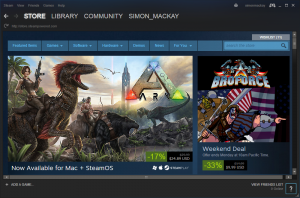
Steam – one of the most common games managers

One way is to use a utility like the “Steam Mover” utility to move the files and create symbolic links (system references) to them.

Another way would be to use the game manager to logically move the games across to the other storage location. This is simply by redefining where the game library should be for each of the games.

Steam

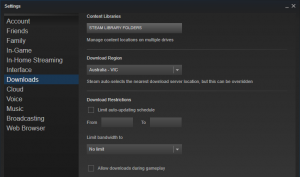
  1. Steam - Settimgs - Downloads menu

    Steam – Settimgs – Downloads menu

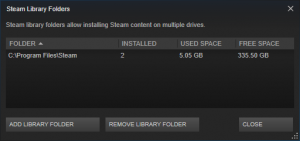
    In Steam, you use the “Add Library Folder” option in Settings>Downloads>Steam Library Folders to create the new library folder on the disk or partition you are moving your library to.

    Library Folders list in Steam

    Library Folders list in Steam

  2. Then you would need to add a “steamapps” folder to that folder you created in the previous step and insert in to that a “common” folder using File Explorer (Windows Explorer in Windows 7 and earlier). Then you copy the game folders using File Explorer from the existing steamapps\common folder to the newly-created steamapps\common folder.
  3. Using Steam, you then right-click on the game and select “Delete Local Content” to logically uninstall the game at its old location, then click the Install button to logically install the game at its new location. This routine is about creating new logical references to the game’s new location.

Origin

  1. In Origin, you just create a folder in the new location for the games using File Explorer then copy the games over to that location.
  2. Then you start Origin and go to the “Application Settings>Advanced” menu and update the Downloaded Games option to reflect the games’ new locations. This step tells Origin where to download games files for newer games purchases.
  3. Then you would have to go to the My Games view and tell Origin to re-install the games by clicking “Download”. Here, the games aren’t being drawn down from Origin’s servers but are having logical changes to point to the new location.

Microsoft Store

  1. Click on “Settings” which is the “gear” icon within Windows, then open “Apps And Features” or “Apps” depending in how old your Windows 10 build is
  2. Find the game you want to move and click the “Move” button. You will see a list of volumes you can move your game to.
  3. Select that volume to begin the software move process.
  4. Beware not all games offered through Microsoft Store will offer this simplified software-move experience

GOG Galaxy

Most games installed through GOG Galaxy will be simple to move if you are familiar with the Windows Explorer or similar file managers.

  1. Use Windows Explorer to create a folder on your destination hard disk called “GOG Galaxy”. Then, within that folder, create another folder called “Games”.
  2. Again use Windows Explorer to “copy and paste” the game folder from “C:\Program Files” or “C:\Program Files (x86)” folder to the “GOG Galaxy\Games” folder you have created on your destination hard disk or partition. You will find the game folders in the “GOG Galaxy\Games” within the abovementioned Program Files folder..
    It will be more likely for those of us running a 64-bit Windows computing setup to have these games in the “C:\Program Files (x86) folder due to them being written for 32-bit Windows computing setups.
  3. Run the GOG Galaxy software and  reimport the games you have moved to the secondary hard disk. Here, you click the “gear” icon at the top right of the GOG user interface. Then you select “Add Games And Friends”, then “Scan Folders for GOG Games”.
  4. You will be asked to find the folder where you moved your game to. Once you select this folder, you will find that GOG Galaxy will integrate the data that is in the new location.
  5. On the other hand, you may then have to run GOG Galaxy and enter the “Add Games And Friends” menu. Here, you would select “Add Game Manually”. Then you select the game’s title and be required to look for and select the game’s primary executable file which has the game’s title.

Different game installers may use different methods for shifting the logical position of your game library or allowing to move games between one or more libraries.

A problem that may surface with this kind of routine is that if Windows decides to allocate a different drive letter to your removeable storage device every time you connect it, you may end up with unreliable operation. Here, you may have to run the “Download” or “Install” routine to logically update the game manager to the current drive-letter location.

This situation could be easily redressed by integrating library management functionality in to game-manager or app-store software so you can determine where to shift games or other programs. As well, the game manager could reference volumes by volume-names as well as drive letters.

Similarly, game managers or app stores focused on games could simplify the process of setting up games to run entirely from USB memory keys or USB hard disks in a manner to facilitate portable play. This could include installing a copy of the game manager on the medium, managing multiple titles on one medium along with storing the state of play on that medium.

Update:

15 December 2020

Added information for Microsoft Store and GOG Galaxy

Simplified hand-switching for pointing devices

What is the problem?

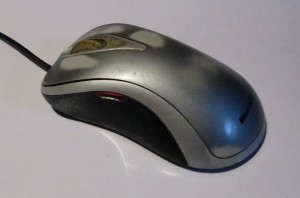
Work needs to be done to make it easier for left-handed and right-handed users to use the same computer

Work needs to be done to make it easier for left-handed and right-handed users to use the same computer

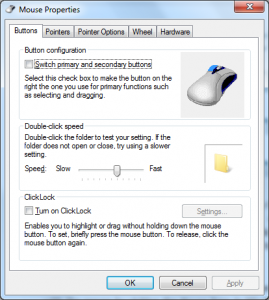
A feature that I notice is sorely missing from Windows is the ability to switch between left-handed and right-hand use of the mouse without having to go to the Control Panel and select the Mouse option there.

It would be OK for a person who has a normal hand to “switch” the computer to work to their hand using this method, but would be difficult in some circumstances.

One of these circumstances would be where a computer is shared amongst multiple users with one of the users being left-handed and others being right-handed. Examples of these include workplace, school or public-access computers or computers shared amongst members of a household including houseguests such as the common “his ‘n’ hers” setup.

Windows mouse control panel

Mouse Control Panel dialog – Windows 7

Another circumstance is where a user has to switch between left-handed and right-handed operation as part of a physiotherapy requirement for their hands or simply to keep their hands supple. It is something that is becoming common with older people who want to stay active with their hands.

But having to head to the Control Panel or similar preference settings in your operating system each time you have to do this can bewilder people who don’t have much confidence with technology.

There are ways that Apple, Microsoft and the open-source community could facilitate this.

What are the possible solutions?

Hot-key selection

One would be to use something like a hot-key combination or a simultaneous-mouse-button combination to switch between the operating modes. This could be an option that one could enable in the preferences settings for the pointing devices.

Having this feature would earn its keep with shared computers, workplace computers and public-access computers because users only need to press a certain key combination or operate the mouse buttons in a certain way to “switch hands”. It would also earn its keep with users who find navigating dialog boxes very bewildering and intimidating.

Maurice Tejado wrote an “add-on” utility for Windows (available through CNET Download.com) that allows you to “switch hands” using a hot-key routine.

Set preferences on a pointing-device basis

Another way that could work even better would be to set the operating mode for different pointing devices. Here, you could have two mice connected with one sitting on the left hand side of the keyboard and one on the right hand side. Or you could resolve to use your laptop’s integrated trackpad as a “left-hand” device and a Bluetooth mouse as a “right-hand” device or vice versa. Here, you could set one device to be left-handed while another device is right-handed.

Some laptops like some of the Toshiba / Dynabook business-laptop range and a significant number of Lenovo ThinkPads implement two pointing devices. One is in the form of the thumbstick mounted on the keyboard while the other is the trackpad below the keyboard. In these cases, there is a separate set of “select” buttons for each of these pointing devices. Here, having pointing-device-specific hand-selection as outlined here would come in to its own with these computers so you could have the thumbstick set for right-hand use and the trackpad for left-hand use.

This function is supported by some desktop Linux distributions but isn’t supported on Windows or Mac OS X. But there is a third-party free utility that can support this in the form of EitherMouse which supports multiple pointing devices in use at the same time with different settings.  This can cater also for users who are slow with trackballs and trackpads but quick with mice.

How can this be done better?

Having to use add-on programs to achieve this goal can become awkward, especially when it comes to computer performance and stability and operating systems could go better by baking this kind of functionality in to their pointing-device code.

As well, some computer users and IT departments don’t have confidence in the use of add-on programs because of the fact that these programs can be poorly written or can contain questionable code that can jeopardise computer stability and security. This is more so with those of us who had passed through the “bulletin-board” / “download-site” / “CD-ROM” era of computing where there was a lot of poor-quality software for download.

Rather, operating system developers could write this functionality in to a subsequent version of their products to answer these needs more effectively and especially cater towards older users who are still using today’s technology.

Updated to cover experience with Lenovo ThinkPad and Toshiba laptops that are equipped with two pointing devices. This includes the Lenovo ThinkPad X1 Carbon Ultrabook (2015) and the Toshiba Tecra R950 (2012) that are suitably equipped.