Category: Computing Tips

Making cloud-based file-share services work with your DLNA-capable NAS

The typical media-sharing situations with cloud-based file sharing

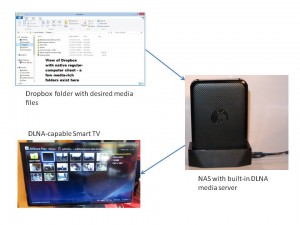
Dropbox folder to DLNA-capable TV availability concept

Dropbox folder to DLNA-capable TV availability concept

You attended your friend’s wedding and took a lot of choice pictures during the celebrations on that day. Now you import your pictures to your computer, use a media-management program to curate them all and manage them in to a folder tree representing that wedding and sync them to your DLNA-capable NAS for backup and availability on your fantastic smart TV.

But you want to share the images with the lucky couple without supplying a disc, or USB stick or dealing with unwieldy email attachments. You may want to post them on your Facebook or other Social Web presence or photo-share service. Here, you could use a cloud-based file-share service like Box.com or Dropbox to share these pictures so they have access to “original resolution” images to view, print out or take further.

Why “original resolution” images? Some of us want to be able to print out the pictures to put on the mantelpiece. As well, one of these pictures such as the one of the couple having the “obligatory kiss” as part of the wedding may be worth printing as a larger feature picture that is to be on the wall. Today’s cameras can yield image resolutions that are to a standard fit for printing but you need the high resolution available at the print shop.

Similarly, you may be pushing out visual-merchandising content to your two shops that you own and you want to use Dropbox as a reference point for this material. Then you want this material appearing on the TV screen attached to the DLNA-capable Sony BDP-S390 set up at each of these locations.

Using a cloud-based storage service like Dropbox as a file exchange

Typical this involves you having an account on one of these services, such as Dropbox. The reason I exemplify Dropbox in this article and others on cloud-based file-storage services is because of it being available across all regular-computer and mobile platforms as a native application along with it being available through a Web user interface thus making it suitable as a file exchange.

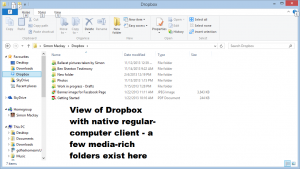
Dropbox native client view for Windows 8 Desktop

Dropbox native client view for Windows 8 Desktop

But if you use another cloud-based storage service, make sure that there is an application for your regular-computer platform that integrates this cloud-based storage service with the operating system’s file system as a folder tree. It also must be able to mirror the contents of your storage service’s account on your computer’s main secondary storage such as the hard disk as a way to gain quick access to the contents. As well, the storage service must have a native front-end program for at least the popular desktop and mobile computing platforms.

Then you upload a folder-tree full of the choicest images to your Dropbox and sharing that with the couple and others you want to share it with. Here, you have to know each recipient’s email address so you can send an invite to view the folder full of photos. Of course Dropbox identifies through the email those who already have Dropbox accounts and lets them know that the photos are available in their Dropbox view. But if a person doesn’t have a Dropbox account, they get an email invite to set up an account for free as part of the invitation to view the pictures.

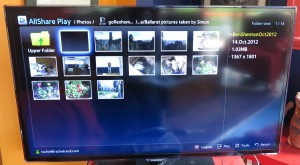
Media contents in Dropbox folder available on DLNA-capable Samsung smart TV

Media contents in Dropbox folder available on DLNA-capable Samsung smart TV

Here, they may want these pictures up on their Smart TV so they can show their family group the pictures that you took. Similarly, you have a Dropbox account and someone shared some of their choices pictures and videos with you. But you want them to be visible on your Smart TV for group viewing whenever you want.

The goal is not to share the entire contents of your Dropbox account to everyone because you may be simply using Dropbox as a data drop-off point for most of your personal and business data such as works-in-progress along with exchanging the media with your friends. Here, most Dropbox front-ends that are implemented by NAS untis typically operate on an “all-or-nothing” approach and don’t readily integrate the DLNA abilities that the typical NAS unit has nowadays.

Creating a DLNA-sharable folder for your Dropbox folder

Here, you could copy the Dropbox tree over to the NAS’s media folder. Some NAS units may allow you to add extra folders to the publicly-sharable mount point that you can share using DLNA. Here, you use the NAS’s Web control panel to add these extra root folders to the DLNA server’s folder list. In this case, you could create and share with your network a “Dropbox-Incoming” folder for this purpose.

In all cases, you need to have SMB/CIFS access to your NAS’s DLNA media directories. This would be achieved if you are already “dumping” media to your NAS and it is a good idea to create a shortcut to this on your operating system’s desktop.

You will need to perform these tasks using a competent file manager which is part of most regular-computer operating systems such as Windows, Apple Macintosh or Linux. Examples of this include Windows Explorer for the Windows environment or Finder for the Apple Macintosh environment. Things may become awkward if you are using a mobile operating environment like iOS or Android.

Manual sync methods

Using the Dropbox native front-end

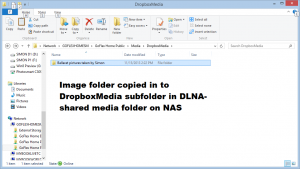
Dropbox folder copied to DLNA Media folder on NAS

Dropbox folder copied to DLNA Media folder on NAS

Make sure that you have the shell-integrated Dropbox front-end that you download from Dropbox installed on your regular (desktop or laptop) computer. This effectively integrates your Dropbox folder tree with your operating system’s folder tree and presents itself as though it is a member of Windows Explorer or Macintosh Finder. This includes making a file-by-file “mirror” of you Dropbox account’s directory layout and contents as part of your operating system’s directory tree.

Here, you use Windows Explorer or Macintosh Finder to copy the folders containing the media from Dropbox to your NAS’s DLNA media directory. You are not altering the contents of this folder in the Dropbox account but are copying it out to your NAS.

Do not move the files from the Dropbox folder because if you move them, you effectively delete them from everyone else’s Dropbox view.

In some cases, you may want to selectively copy images and videos from the Dropbox folder to your NAS for viewing on your DLNA media device. This may be important with a large media pool or a directory that contains office documents along with media files.

Using the Dropbox Web page

If you use the Dropbox Webpage to work your files, you download the folder that you want on your NAS as a ZIP file. Here, you right-click the folder (Ctrl-click with an Apple Macintosh that has a single button mouse) and select “Download” to cause the folder to be downloaded to your local hard disk as a ZIP file.

Then you use a file-decompression utility to expand the contents of this ZIP file to your NAS’s DLNA folder and make sure this is under a subfolder of its own in the DLNA folder.

Both these methods may allow you to “boil down” the folders so that you only have on your NAS the media files in that folder. This may involve a bit of hard work by you manually deleting the non-media files like executable programs, documents, PowerPoint presentations and PDF files.

Automatic sync method

Using FreeFileSync, Dropbox’s native front-end and your NAS to take advantage of a media pool

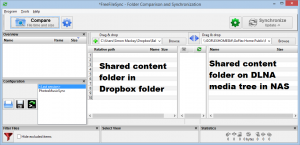
FreeFileSync sync job to automatically synchronise media from Dropbox folder to DLNA folder on NAS

FreeFileSync sync job to automatically synchronise media from Dropbox folder to DLNA folder on NAS

Some of you may set up on Dropbox an improved “media pool” where each of you can contribute photos and videos of a special event, something the lucky couple could do after a wedding for example. Or the proud parents may create a media pool of their best images and videos of their children for the doting relatives and friends to see. This could be something where relatives and friends can have “contribute” rights to so they can pool what the baby had done while in their care.

This could be set up instead of or alongside Facebook’s new photo-pooling feature so as to provide “best-quality” images, to support videos as well as not disenfranchising people who aren’t Facebook Friends of yours.

To do this, you install FreeFileSync on your regular computer which should also have the Dropbox front-end installed. As well, you create a subfolder in your NAS’s media folder accessible by its DLNA media server that represents this media pool. Then you set up up a manual or timed sync job in FreeFileSync which links to the Dropbox folder and the aforementioned subfolder on your NAS’s DLNA media folder.

Ideas to make Dropbox work this way

Your children’s life

As you have children, you will be taking photos of them and want to share some of these photos with your relatives and friends. As well, your relatives and friends take pictures of your children at events they attend or when they have your children in their care. Similarly, when you have their children in your care or attend their events, you end up taking pictures and videos of them.

Here, you could create a shared folder in Dropbox which has all the pictures that you and your relatives or friends copy pictures and videos to concerning your children during these times. Both you and these doting relatives and friends can then see the moments that are important.

That special celebration

One person that I know of used to create a “photo board” for their parties with their guests supplying pictures that they took to appear on this photo board. A Dropbox folder which you share with each of your guests can serve as the digital equivalent of this “photo board”.

For events like weddings where there is the likelihood of many celebrations along the way like the engagement party, bucks’ night and hens’ night, you could create a “master folder” with subfolders for each of the celebrations. This is so you can maintain a master theme for the group of celebrations while you have particular folders representing, for example, the wedding day.

They are in town

Your relatives or friends have come in to town to enjoy your town’s assets and catch up with you. Most likely you establish a Facebook album for the visit, knowing they are on Facebook. But you want them to have access to the higher-grade pictures, perhaps allow them to “pool” their pictures that they took and do more. Similarly, you want them to have these pictures end up on their NAS so they can view them on their DLNA-capable TV or print them out on their printer.

Here, you could create and share a Dropbox folder tree that represents this visit alongside the Facebook or Google+ albums that you set up with them. Then they take their pictures and videos and add them to this folder tree while you shoot your pictures and videos and contribute them to that tree. This could be done for each “phase” of the trip such as specific outings.

In memorium

You can use Dropbox and your DLNA-capable NAS to memorialise a relative or friend who has passed away. Here, you raid your physical photo albums and scan all of the best pictures or go through your digital photo collection and copy pictures of them in to a folder that is shared with contribute rights amongst the family and friends via Dropbox.

The pictures then are shared across Dropbox as a way of creating a group-based memorium of the deceased person

Business promotions

Having your DLNA-capable Smart TVs or Blu-Ray players play media off a DLNA-shared visual merchandising directory on your NAS can become a powerful business tool. Then you use a business-capable cloud service to keep your visual-merchandising material with it being synchronised to the DLNA-shared visual-merchandising directory can permit you to create the content from home or have others like PR teams and commercial artists contribute this content off-site with the goal of this material appearing on your displays.

Here, the sync routine could be set up on a daily or twice-daily basis for your on-site server or office computer so you always have fresh material available and on the screens regularly. This could be performed as a manual task or you could use FreeFileSync to synchronise the promotions folder on Dropbox to your NAS.

Conclusion

The new consumer and business cloud-based file sharing propagated by the likes of Dropbox, SkyDrive and Box.com can be easily integrated in to the DLNA Home Media Network once you use a NAS as your media server and can use a regular computer as part of the equation.

Want to check on what is being printed using Windows 8.1

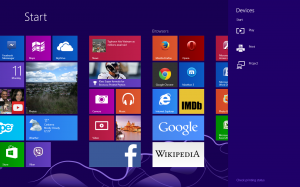
Modern User Interface - Device Charm menu when print job is in progress

Modern User Interface – Device Charm menu when print job is in progress

Those of you who have moved to Windows 8 and 8.1 may have found it difficult to know what’s printing when you send out a print job to your printer. Here, you may be used to the “Devices And Printers” window since Windows Vista where you could click on the printer icon to check what print jobs are being printed at a given time.

Here this routine has been simplified in Windows 8 and is available in both the Desktop and the Modern UI views as a consolidated list. This is easier for those of you who have two or more printers like a laser printer that you run as a “printing press” alongside a baseline inkjet printer for ordinary document printing.

Modern User Interface (Metro User Interface)

  1. Bring forward Charms (hidden task-specific option buttons) on right side.
    Touchscreen users simply swipe from the top right-hand corner while mouse users move the pointer in to the top right-hand corner.
  2. Click or touch Devices.
    The “Check Printing Status” text lights up when a print job is pending or in progress
  3. Click “Check Printing Status” to view the jobs list
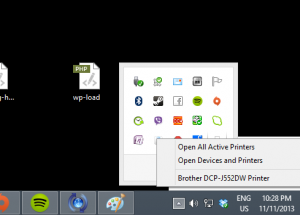
Right click on Printer icon in Desktop notification area to bring up these options when a print job is in progress

Right click on Printer icon in Desktop notification area to bring up these options when a print job is in progress

Traditional Desktop User Interface

  1. Right click Printer icon in Notifications area in Taskbar
  2. Click on Printer icon
  3. Click on Open All Active Printers for all jobs sent to all printers
  4. Click “name of printer” to show this printer
  5. Desktop UI users can also follow the Modern UI steps as another way to bring up the pending print jobs.

Microsoft could improve on this by having the Devices Charm change colour when a print job is in progress or change to a different colour when something needs attention.

Using FreeFileSync to sync media files out to your NAS

You use a regular Windows or Macintosh computer to curate your pictures, music and video files and store these files on your computer’s hard disk. Then you buy a high-capacity network-attached storage device to make these files available on your home network at all times and also as a backup or “offload” measure.

Normally this will require you to use Windows Explorer or Macintosh Finder to copy the files out to the NAS every time you synchronise them out to your NAS. This can be annoying especially if you have made changes to a few of the files or added a handful of files to the collection such as the latest downloaded images or a CD “rip”. Here, you have to answer a file-owerwrite prompt that the operating system puts up every time you write over an existing file as part of a copy process and this can be awkward if you did something like modify your files’ metadata or edited a photo, You could select the “Yes to all” prompts but this runs a slow copy process which transfers redundant data or work through each folder and file manually and find that you hadn’t reflected all the changes you had to reflect..

There is a free open-source application called “FreeFileSync” which automates the process of keeping your files that exist on two locations in sync.  This is available for Windows, Macintosh OS X and Linux and can work with locally-mounted drives or SMB network-shared folders.

Here, you can set up a “there-and-then” sync job or create a sync job affecting certain files and folders on both the source and destination in a particular way. A sync job that you save can affect multiple pairs of files and folders thus avoiding the need to create one job for each folder pair.

Prerequisites

FreeFileSync must be downloaded and installed on your computer

You download FreeFileSync from FOSSHub or Download.CNET.COM and install it as you would for downloaded software for your operating system.

Identify on your computer where your media manager software is storing your music, photos and videos.

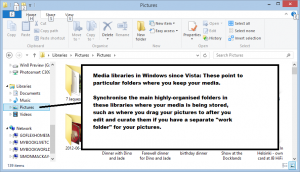
Media libraries in Windows 8.1

Media libraries in Windows 8.1

In iTunes, this is found under the “Advanced” tab in the Preferences menu. Windows Media Player and Windows Live Photo Gallery use the Pictures and Music or “My Pictures” and “My Music” libraries created by Windows. Other media-management tools may use a particular folder that you set in their options or preferences window as the place for their media library.

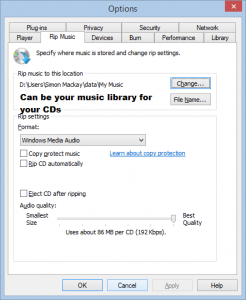
CD rip location in Windows Media Player

CD rip location in Windows Media Player

Most audio-based media management tools like iTunes and Windows Media Player typically use the library as their import folder for when you “rip” a CD or purchase music through their online store whereas a lot of photo and video tools may have you create a separate import folder away from your library for images and video you import from your camera or scanner. This then allows you toe edit the images and video before adding it to your library.

Identify and make available the “media” folders that you are using to store your media on your NAS.

A NAS that uses a DLNA media server and an iTunes media server typically references a folder tree like “Media”, “Shared Media”, “Shared Music” or something similar. These are typically at the “Public” SMB mount point and are accessible using SMB/CIFS as well as these media servers.

If your NAS uses one shared media folder, create a sub-folder for the music files, another for the images and home video and another for other video like “download-to-own” content.

Create a media sync job

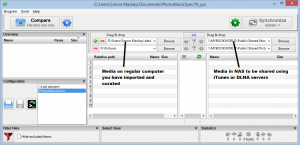
Setting up FreeFileSync for media syncing

Setting up FreeFileSync for media syncing

These actions are for a Windows computer and most NAS units

  1. Open FreeFileSync
  2. Click ProgramNew
  3. For each root folder representing your media collection kinds,
    a) Drag the root folder representing the media type on your computer to the left file list pane
    b) Drag the destination media folder for the media type on your NAS to the right file-list pane
    c) Click the + symbol to add extra media type pairs to your sync list.
  4. Click the gear icon next to the Synchronize button to determine the kind of synchronisation to take place
    In this case, you will have to select the “Update” option for this job. This effectively contributes new and modified files and folders that exist on the computer to the NAS without deleting any files that have been removed from the computer’s media folder. This is important if you just keep your files on your regular computer just to curate them before adding them to your media collection, or you “shift” older files to your high-capacity NAS to create space for newer files.
  5. Click on the “Update” button to select this option.
  6. Click on the “Save As” option to save this sync job as a file. Give it a name like “MediaSync” or “MediaNAS” to reflect the goal of it syncing your media to the NAS.

Manually running this sync job

Here, you open FreeFileSync, select the name of the “media sync” job and click “Synchronize” to start the sync process.

When to run this

Run the :FreeFileSync” job whenever you have done significant work on your media library like importing new media or editing existing media including the metadata. This can also be done as part of a backup routine before you start off the main data backup on your PC.

Handling the many-source one-destination situation with Bluetooth audio devices

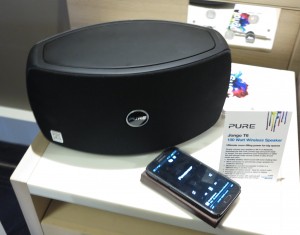
Pure Jongo T6 wireless speaker

There may be difficulties running a Bluetooth speaker like this with multiple source devices in the same room

The Bluetooth A2DP audio playback setup which provides a wireless link between a mobile device and a sound system or Bluetooth speaker has now brought along its own set of complications. This is something that will show up more as the number of Bluetooth-capable wireless speakers, audio adaptors and music systems in circulation increases.

One main complication is that the last-connected Bluetooth-capable source device “lays claim” to the Bluetooth-capable sound system until either device’s Bluetooth functionality is turned off. This is even though the user of that source device stopped playing the audio content using the media player and can cause complications where, for example, an “established” Bluetooth device like a tablet cannot be used with the sound system it is normally used with because a guest “walked up” to the sound system and paired their iPhone full of their music collection to that unit to play some of their tunes.

The practice is expected to be common with music systems that are operated during a party where you want to let a guest “look after the tunes” for the evening; and will become common with cars when a group of people go on a long journey and one of these passengers offers to “look after the tunes” for a part of the trip. At the Australian Audio And AV Show 2013, the people who were demonstrating the Aktimate active speakers with a Bluetooth adaptor allowed me to try the speakers with a track on my phone but asked me to make sure the Bluetooth on my phone is off or the speakers removed from the phone’s devices list after I had finished playing the music.

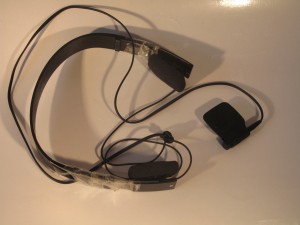
Nokia BH-111 headphone adaptor connected to headphones

Two or more devices paired to the one Bluetooth headset and on in the same vicinity may cause problems.

It can also show up when you use the same Bluetooth headset or audio adaptor amongst a group of devices which is common when you want to use your headset with your smartphone while walking down the street or use it with your laptop to make that Skype or Lync call.

How do you handle this situation

When you have finished using a Bluetooth sound system, especially one you use on an ad-hoc basis, you have to make sure you logically disconnect your computer or mobile device from that sound system. Most commonly, you may have to turn off your computer’s or mobile device’s Bluetooth functionality. But if you are using your own Bluetooth peripherals, then you have to enable the Bluetooth functionality again.

Logically disconnecting the device

The recent versions of the Android mobile operating system handle this better by allowing a Bluetooth device to be “disconnected” without the Android smartphone or tablet losing its paring data. Here, you enter the Android Bluetooth menu to tap on the currently-connected device to disconnect it immediately.  The ability to retain the pairing is important if you are using a particular Bluetooth device regularly such as a car sound system in the car you regularly drive or a commonly-used Bluetooth-capable hi-fi setup.

Unpairing or removing the device from your operating system

Most other desktop and mobile platforms require you to “remove” or “”unpair” the music system from the Bluetooth-capable source device. Then if you want to use the same Bluetooth device again, you have to put that device in to pairing mode which typically requires you to press and hold a button to invoke this mode; and use the operating system’s Bluetooth menu or “Add New Device” menu to add or pair with a new Bluetooth device.

In Windows, this requires you to go to the Devices Menu, select the device and select the Remove option to remove the sound system. There is the Bluetooth icon in the Taskbar which has the right-click option to “Show Connected Devices” to bring up all the Bluetooth devices associated with your system.

Macintosh users have to click on the “System Preferences” item under the Apple menu, select the Bluetooth icon in the System Preferences window, select the device in the left-hand list box and click the “-“ button to remove the device.

For iOS, you may have to go to the Bluetooth menu under Settings – General. and touch “Unpair” to detach the sound system.

What needs to happen

Support for “connect / disconnect” on all desktop and mobile operating systems

An improvement that needs to be able to exist for an operating system’s Bluetooth functionality is to allow the user to logically “connect” and “disconnect” a Bluetooth peripheral manually. Here, the parings are retained in the host device while it is disconnected yet, when you connect, they come in to play as part of attempting to connect up with the device. This doesn’t remove the ability for a device to immediately connect when it is paired but  allows it to stay paired without being connected.

Bluetooth-capable audio equipment to support multiple connections

We are starting to see some Bluetooth headsets, speakers and in-car setups able to support multiple connections to different devices. This is typically to facilitate a media-player-only device like an Apple iPod Touch to play content while the device serves as a hands-free for a smartphone that is not necessarily used as a media player. Sony has made an effort with their SBH-20 Bluetooth headset adaptor to support the multiple-connection requirement for two smartphones thus facilitating one-touch answer from either phone.

Similarly, a Bluetooth-capable audio device could implement a multiple-connection setup where it can stay connected to many Bluetooth host devices. Each of these host devices can be enumerated as a virtual source as far as the Bluetooth-capable audio device is concerned and there is a user interface on the Bluetooth audio device to select between the different hosts.

Automotive implementations could allow multiple smartphones to connect with one being determined as a “primary” device for making and taking calls and receiving messages and others determined as either “secondary” devices used primarily to take calls or as “media-player” devices that only play media.

Conclusion

This issue of having Bluetooth devices, especially Bluetooth audio devices, work with multiple host computing devices is something that has caused headaches and will be doing so until the people designing the operating systems and devices can handle this reality properly and easily.

Computers or other devices perform better after a reboot–why this?

Article

Why Rebooting Your Computer Fixes Problems | Lifehacker Australia

My Comments

Why is it that your laptop, tablet or smartphone performs so much better when you restart it? Why is it that some devices implement a watchdog circuit to force them to restart by themselves when they are critically underperforming?

This is typically to make sure the computer is working on a clean slate as regards to its primary storage (RAM – random access memory). Most software, especially if it is poorly written, can take up more of this memory as it is used. But when you close that program, it releases the memory it used. But a lot of recent regular-computer and mobile operating systems encourage the ability to run multiple programs at the same time, with the ability for programs to “sink” in to the background when they are not being used.

If this situation is allowed to get out of control, most operating systems undertake “paging” or “virtual-memory” procedures where they use space on the secondary storage as primary storage. At this point, most computer start to underperform and become devilishly slow. The worst-case situations that come about include programs or the computer simply “freezing” or “locking up” thus becoming unresponsive, a situation commonly described as “hanging”.

Even placing that PC or other device in to a “sleep” or “hibernate” mode or allowing the device to fall to sleep wouldn’t really rectify the problem because these modes cause the device to preserve its current operating state either to the RAM or its secondary storage (hard disk or solid-state drive). This is typically to provide a quick start-up for the device.

But when a computer or device is restarted using the operating system’s restart option or having it then shut down properly before you restart it, this causes all the programs it runs to start on a clean slate. For mobile devices, it may require the user to press the hardware Power button for a long time to bring up a “power-option” menu with the shutdown or restart option or pressing two buttons together for a long time to force a full shutdown or restart of an obstinate device.

You know when this restart has occurred when you see a longer boot time and see the startup screens or other startup graphics appear on your device’s display. You typically will then notice that the device is performing with a bit more “pep” in it. This is because the device is working on a clean slate with fresh “known” data.

A good practice to do in order to keep your computer running smoothly is to have it restart at least once a fortnight. This may be something you have to do when you install or update software. I also see this being more important for laptop users who typically close the lid when they have finished with their machine, causing it to go to a sleep or hibernate mode, or desktop users who turn off the monitor or use the sleep or hibernate modes at the end of a computing session.

This is also a good practice with well-used smartphones and tablets, especially if these devices are being used with poor-quality apps from the app store.

Formatting external hard drives to native file systems may allow them to work optimumly

Article

Using external drives to save space on your Mac? Format them first. | MacFixIt – CNET Reviews

My Comments

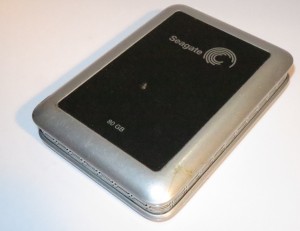
External hard disk

A typical external hard disk

This article highlighted the benefits of formatting external hard disks that are to be connected to an Apple Macintosh as HFS+ file-system disks. This advice hails well for formatting an external hard disk to an operating system’s native file-system such as NTFS for Windows or ext3 for Linux. This is because most of the external hard disks come preformatted to FAT32 more as an interchangeable file system that can be used on Windows, Macintosh and UNIX/Linux.

In the context of an external hard disk that you attach to a network-attached storage device for extra capacity, it may be worth looking through the instruction manual for your NAS or router to find the optimum file system. Some of the NAS units may work with ext3 or NTFS as the file system whereas most, including the routers with NAS functionality will stay with FAT32.

But this situation would apply to external hard disks that are primarily connected to the host computer all of the time rather than the “portable” hard disks that are likely to be moved between different computers and file systems. It wouldn’t hold well with thumb-drives and memory cards that you would expect to move between various computer devices including specific-purpose devices because most of these devices would only know the common FAT32 file-system.

This advice is best applied with an external hard disk that you have just purchased rather than one that contains all of your data because a format routine can wipe all of the data that exists on the hard disk.

What has happened about the faulty firmware issue for the PS3

Article

Sony releases PS3 firmware update to fix last week’s fiasco | Tech Culture – CNET News

Instructions – From the horse’s mouth

Sony PlayStation

Manually updating your PS3 with the firmware

Safe Mode on PS3

My Comments

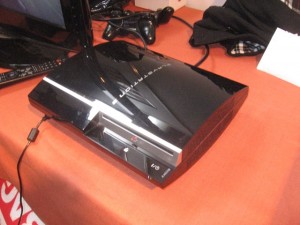
Sony PS3 games console

Sony PS3 games console – latest firmware should be 4.46

Previously, when Sony rolled out version 4.45 of the PlayStation 3 operating software, this update had caused many PS3s not to boot properly for interactive use. The situation had been described where the consoles were effectively “bricked” and Sony had to immediately pull the update from their PS3 software-update servers.

Now they have released version 4.46 of this firmware and made it available also as a manual-update file so you can recover a PS3 that had suffered this fate. When this situation had occurred with the PS3, the version-4.45 software went in to an “endless-loop” during startup thus not reaching the standard “XMB” start menu.

Fortunately, Sony had set up a “safe mode” for the PS3 in a similar way to what Microsoft, Apple and others have offered as a diagnostic startup option for their regular-computer operating systems. Here, this places the equipment in a known state with minimum software and hardware overhead that allows one to perform diagnostic or recovery work on faulty equipment.

In this case, you can load the firmware from a USB memory key and Sony have provided instructions on how to go about this, such as which folder to position the firmware file on the USB memory key. Here, you would need to use your desktop or laptop computer to download the firmware file to the USB memory key in the known location (\PS3\UPDATE).

Here they also detailed how to place the PS3 in to the aforementioned “safe mode” so you can load the firmware from the USB memory key. As well, you would have to connect the game controller to the PS3 via a USB cable while it is in this mode and be sure to select the “System Update” option on the menu that pops up to start this update without destroying your data and settings.

As well, I would suggest that you check that the version of the firmware on your PS3 is indeed 4.46 or newer in order to make sure that your console is behaving in a reliable manner.

An issue that could be raised regarding field-updatable firmware especially for consumer-electronics devices is providing a fail-safe update process with a rollback mechanism. This is more of an issue when there are situations like bugs that missed the quality-control process; failed download / install processes or, at worst, malware written in to field-updated firmware.

Here, the previous firmware could be kept in a separate section of flash memory or secondary storage, as well as the ability for the device to start in to safe mode thus providing the option for software rollback if the software didn’t start to the normal user interface.  Similarly, the standard user interface could be used as a way to facilitate this kind of software rollback, which can come in handy with bugs that creep up during normal operation. This is similar to what has been achieved with most desktop operating systems like Microsoft Windows, where the operating system creates “system restore points” at the start of software install or update processes and is able to roll back to these points if the install or update becomes dysfunctional.

What we are starting to see is that devices like games consoles, smart TVs and printers are becoming as sophisticated as regular computers and entering a point where the same kind of irregularities could creep up on them.

What to do if the App Store gives your Mac the Dreaded Beach Ball

Article

Tackle a hung App Store update in OS X | MacFixIt – CNET Reviews

My Comments

You have that Macintosh computer running with Apple’s App Store as your preferred download spot for programs. But you notice that the Mac is not being its usual self while you are running an App Store update or download. It starts to show that dreaded “beach ball” for ever during the update process while nothing is happening. This means that the App Store client application is hanging and effectively slowing down the rest of your system.

The main problem that can lead to this typically are about the App Store working with corrupted files in its folders as what happens with any computer programs. This encompasses where the installation packages are held after they are downloaded as well as any temporary files that the App Store creates. The folders will exist on the “Macintosh HD” secondary storage location which is the main storage location for all of your Mac’s programs and data.

Here, when you notice this behaviour, you would have to “force-quit” the App Store application. Either this is done by selecting “Force Quit” from the Apple menu or pressing CommandOptionEsc on the keyboard. You could also “force quit” from the Dock by using Option-Right-Click on the unresponsive application’s icon. After you have done this, the Mac should be more stable by now.

Dealing with the corrupted data

Installation package folder

Then you would have to use Finder to clear out the App Store Updates folder which is at Macintosh HD/Library/Updates. This is where the software update or download packages are held by the App Store before being installed. Once you clear this folder out, it means that the App Store application can draw down fresh “known-to-be-good” install packages from the iTunes App Store.

Temporary and “work” files created by the App Store

Another location that you may have to clear out are the App Store Caches. These represent the temporary files that the App Store application creates as it goes about its work.

Here, you run Terminal and type in: “open $TMPDIR../C” to expose the “cache” folders where data that the App Store needs for speedy operation exists. In this window, look for folders that begin with “com.apple.appstore” and remove these folders.

You also go back to Terminal and type in “open $TMPDIR../T” to expose the temporary-file folders. Here, you look for the folders that begin with “com.apple.appstore” and remove them.

The App Store will take longer to start as it re-builds the cache and temporary files with the fresh “known-to-be-good” data.

Permissions fix for the system resources

This is another area that could house corrupt data and could generally affect your Mac’s stability. It is because the information about the permissions required by the applications to use system resources is kept as data on the Macintosh HD.

Here, you use the Disk Utility to do this task. You select the Macintosh HD in this program’s sidebar and click “Repair Permissions” in the “First Aid” tab to start it repairing any corrupt system-permissions data.

Tips to avoid this problem

If you are using a Wi-Fi wireless LAN connection or a mobile-broadband connection, and you intend to do a lengthy App Store update, make sure that you are getting a consistently strong signal from the wireless network. This is because a poor or inconsistent wireless signal could lead to an increased risk of failed downloads.

As well, it may be a good idea to have your MacBook connected to external power while you are doing a lengthy update. This avoids the risk of a failed download occurring because the battery is on the way out.

Here, you could confine the App Store software updates to your home or workplace so you can be sure of a smooth update scenario.

A router or other network device on the way out could be what is causing flaky network or Internet activity

Article

Yes, Routers Do Die – SmallNetBuilder

My comments

A typical situation that may make you think that the router at the “edge” of your home network is dead is simply no connection to network or Internet resources. The same can also hold true for network connectivity devices like wireless access points, range extenders or HomePlug powerline devices. It is infact the first point of elimination by some people when they are dealing with an Internet connection that has started to play up.

In some cases, you may be dealing with the wall-wart power supply that may have just died out, usually due to a power spike. You may be able to check this out if you have either a multimeter or a spare working power supply with the same voltage and current output that belonged to other equipment to compare with.

On the other hand, erratic Internet or network activity like Wi-Fi clients taking longer than usual to associate with the router’s access point or Internet activity becoming “off again, on again” can indicate equipment that is on the way out. Similarly, the indicator lights on the device could he glowing in a static manner or flashing regularly rather than flickering. As well, you may have had to reset the router too many times either through power-cycling it or pressing the “reset” button.

In the case of network equipment that may serve a particular device, area or network segment, the behaviour may be noticed by network client devices connected to the equipment concerned.

For example, you may have had stellar Wi-Fi network performance in an area of your premises served by a Wi-Fi access point but it’s all gone downhill lately even though you could get good performance out of areas served by other Wi-Fi access points in the same premises. Or you may find things going wrong with the HomePlug AV powerline network segment when it work so smoothly before.

The increased unreliability with this kind of equipment is very similar to that point in a car’s life when it starts living at the mechanic’s workshop and drills a nice big hole in your wallet because of the increased amount of repair work that is needed.

It may crop up more readily with older or poorly-built low-end consumer equipment or in a house or neighbourhood where the mains power supply may be erratic. The erratic power supply can also be brought about due to circuit breakers including earth-leakage circuit breakers (safety switches) frequently tripping or fuses blowing frequently, or simply many whitegoods in operation at the same time.

The key issue to notice is that when a piece of network equipment in the network starts to cause the network connection or Internet service to become increasing unreliable, it could be an indicator to think of newer equipment and budget for better quality equipment.

Tips to avoid those mistakes that can easily happen with tablet and ultraportable computers in the living room

As the small computer form factors such as the tablets and ultraportables (Ultrabooks, etc) become popular, there is room to make mistakes with using them in the living room. This environment is where you are most likely to be when you are tired and wanting to relax and, in a lot of cases, you may be having a bit to drink.

These mistakes can end up with your equipment being out of action for a significant amount of time and could, at worst, cause irreparable damage. It is although the manufacturers are understanding the realities associated with the portable equipment and are making it more rugged.

Avoiding the risk of that device being sat on

A similarly-coloured iPad can be at risk of being sat on when on the couch

A similarly-coloured iPad can be at risk of being sat on when on the couch

For example, you could be using that iPad while lounging on the couch and you need to get up to visit the kitchen or bathroom or answer the door. Then you put that iPad on the couch as you get up. This can be a risky move for the device if one hasn’t got their eyes peeled for these devices.

In the living room, this can easily happen with most of us when we are tired or have had a bit too much to drink. It can be exacerbated with devices that have sleeves, wraps or other accessories that could blend in easily with the scatter cushions and other upholstery that exists at your house. Then you could end up easily sitting on that iPad that is on the couch as you find somewhere comfortable to sit and this can cause damage to that device.

A good idea to avoid this situation would be to place the portable computing device on the coffee table or side table when you want to get up from that chair or sofa. Personally, I would make this easier by having side tables that have enough room to rest at least one 10” tablet like an iPad or avoiding the temptation to forego the coffee table or similar tables in the name of minimalist living.

The book-style cover offers extra protection for tablets in the living room

As well, the covers that you can get for the iPad and other tablet computers that open and close like a book also work well in keeping spilt drinks from damaging these computers and are a must when you use them in the lounge room. Here, you simply close these covers when you put the computer on that table.

Similarly, decorating the accessory covers or the backs of the tablet or ultraportable computer devices in an individual manner can allow one to make a device easily identifiable from the others especially when there are many of these in a common area. I would find this more important with popular devices like the iPad which use a consistent style and interface and also find this important where a particular brand or model of this device is favoured by most of your family or friends. I made a reference to this practice when I reviewed the Toshiba Satellite L730 which was available in white.

Reducing the risk of drinks being spilt in to that ultraportable computer

As well, ultraportable notebook computers can be at risk of drinks being spilt in to them when they are left open on the coffee table. This is more so with drinks that are in tall containers like bottles, tumblers or wine glasses.

Here, a good practice would be to close up these computers when they are not in use there. In the case of the detachable-keyboard “hybrid” convertible, these computers could be assembled before you close them up to keep drinks out of them.

Further on, a laptop wrap may also work wonders in protecting these computers from being damaged by drink spillage on the coffee table.

Avoiding the romantic candlelight mistake when using notebook computers

Candles and portable computers - a bad mix

Candles and portable computers – a bad mix

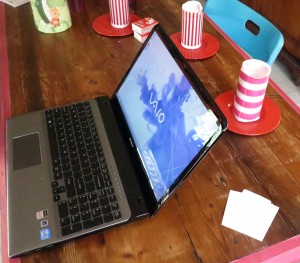
As for laptops, notebooks and similar computers, the area behind the screen can be a death trap for these computers when it comes to using those candles to set up that romantic environment. This is a greater risk with wide candles including tea-lights rather than the tall “taper-style” candles that are typically used with a candlestick and the risk is greatly exacerbated when you swing the laptop lid outwards.

This was highlighted by an incident that happened with some close friends where the husband was downloading pictures from a digital camera on to his laptop and his wife, who just so loves that romantic candlelit look, set up some candles at his work table. There happened to be a small candle just behind the computer in the blind space behind the screen and this scorched the display unit in that computer.

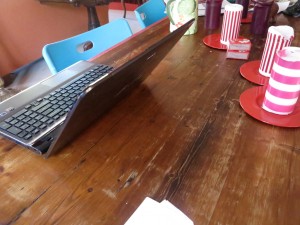
The blind spot that exists behind a laptop and is risky when it comes to candles

The blind spot that exists behind a laptop and is risky when it comes to candles

In these situations, check that there are no candles behind the computer before you open it up and keep an eye on those candles that are on your work table. Especially pay attention to the blind spot behind your computer and make sure any candles in that area are fully visible.

It may be better to make sure that if you want to set up those candles around the laptop, that any lit candles stay on the side of the computer or towards the centre of the dining table.

Conclusion

By reading this, you can avoid placing your equipment at risk of damage when you use it in that lounge area whether you are working or relaxing.