What is my computer’s file-storage system about?
How is your data organised on your computer, whether on its main disk or any removable storage connected to it>
A computer always needs to be able to hold programs and data in a non-volatile manner so users can get back to this data when they switch the computer on again. Here this has evolved through different methods and technologies that answered these needs in different ways.
What were these technologies that were available for home computers?
Initially, home-computer users used to have to use audio cassette tapes to store this data. Subsequently, the magnetic diskette, commonly known as the floppy disk due to it being like a piece of card, became the preferred storage method for computers. Typically, the better computer setups would end up with two floppy-disk drives so that two disks can be accessed at once.
A USB external hard disk
The early 1980s saw some manufacturers offer high-capacity fixed-disk drives, which were known as “hard disks” as a storage option for computers with this being preferred by business users. These storage devices earned this name as them being seen as an alternative to the old floppy disks.
Subsequently, Sony brought forward the hard-shelled 3.5” “micro-floppy” and this was brought out alongside a similar technology offered by Hitachi and a few other companies. It was to provide a higher-capacity smaller data-storage magnetic disk that was more rugged than the previous designs and appealed to the design of highly-portable computers.
The optical disk, which is based on CD technology, came in to being as an affordable software-distribution and large-data-distribution technology during the mid 1990s. Subsequently, solid-state non-moving flash storage came to fruition from the late 90s as a removable storage medium for digital cameras and PDAs but became more viable for regular computers since the late 2000s.
Since the magnetic disk came on the scene, there was an increased importance placed on organising where the data existed on these storage systems, with an emphasis on such concepts as file systems, volumes and folders or directories. This was because the various magnetic-disk systems were becoming more and more capacious and users needed to know where their data existed. Here, the file system effectively became a hierarchical database for the information you store on your computer and provided a logical relationship between the files and where the bits and bytes that represented them existed on the storage medium.
Desktop computers required the ability for the user to insert and remove any removable media at a moment’s notice but this required the user to be sure that all the data that was written to the medium before they could remove it. This is in contrast to what was required of mainframe and similar computer systems where an operator had to type commands to add the disk to the computer’s file system or remove it from the file system as part of physically attaching and detaching these disks.
This concept changed when Apple brought in the Macintosh computer which used the Sony 3.5” microfloppy disks. Here, they allowed you you to insert removable media in to that computer but required you to “drag it to the Trashcan” before the disk could be removed. Some advanced removable disk types like the Zip disk implemented this kind of removal in the Windows and other operating system by providing what has been described as a “VCR-style” eject routine due to its relationship to how you used an audio or video recorder. Here, you pressed the eject button on the disk drive which would cause all the data to be written back to the disk before the disk came out.
Now the modern computer has at least one hard disk and / or solid-state disk fixed inside it along with USB ports being used for connecting USB-connected hard disks or memory keys. You may also be inserting your camera’s SD card in to an SD-card slot on your laptop computer or in to an SD-card reader module that plugs in to your computer’s USB port if you were downloading digital images and videos. Some of you may even have an optical drive integrated in your computer or connected to it via a USB cable and use this for archiving data or playing CDs and DVDs.
Your operating system’s file manager
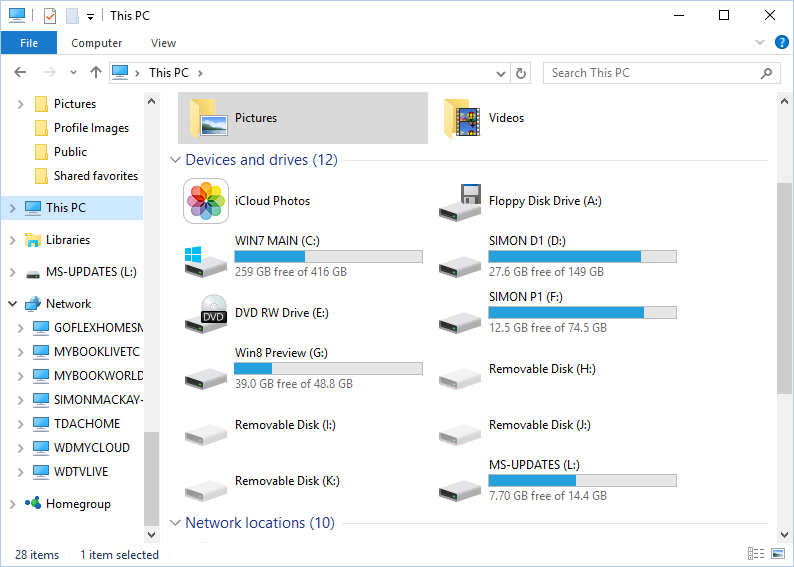
All the logical volumes available to a computer – representing hard disks with their logical partitions along with removable media
The operating system that runs your computer will have a file manager that allows you to discover and load your files or move, copy, rename and delete files amongst the logical volumes available to your computer. In Windows, this used to be known as File Manager, then became known as Windows Explorer but is now known as File Explorer. The Apple Macintosh describes this file manager simply as Finder.
This used to be a command-line task but since the arrival of the Apple Macintosh, the file manager is represented using a graphical user interface which shows a list of files, folders or logical volumes that you are dealing with.
Clicking on a folder or logical volume will bring up a screen to show you what is in that folder or logical volume. But clicking on a file will cause it to be opened by the default application or, in the case of a program, cause that program to run.
Moving or copying files nowadays is simply a drag-and-drop affair where you drag the files from the source to the destination, but you may have to hold down the Shift key or use the right-hand mouse button to modify a default move or copy action.
As well, the modern file managers have a “two-stage” delete action for files on a hard disk or other fixed storage where they end up in a “holding-bay” folder known as the Trashcan or Recycle Bin when you delete them. This is to allow you to find files that you may have unintentionally deleted. But to fully delete them for good, you have to delete the contents of this “holding-bay” folder, something you can do by right-clicking or Ctrl-clicking on this folder to bring up a context menu and selecting an “Empty” option.
What is my computer’s file storage system about
The logical volume
Most operating systems represent as their storage system every logical volume be it a removable disk or each partition of a hard disk as its own element. It was the only way to work in the early days of computing because each fixed or removable disk didn’t hold much in the way of data and was its own element. As hard disks became more capacious, there was a requirement to partition them or break a single physical hard disk in to multiple logical volumes because the operating systems of the early days couldn’t hold much data per volume. You can also set up some operating systems to present a folder on a NAS or file server available to you over a network to appear as a logical volume, a practice that was important before networks were commonplace and personal-computer operating systems could address network resources directly. All removable media are still represented with one logical volume per disk, card or stick.
Each logical volume would have the ability to be given a volume name and be represented as a distinct icon which is part of a “Devices”, “Volumes” or similar cluster in the file-management system that is part of the operating system. The icon is typically a crude representation of the storage medium that the logical volume exists on.
Windows, harking back to the Microsoft MS-DOS days, would also assign each logical volume a “drive letter” owing to the fact that each disk drive on the original IBM PC was assigned its own letter with A and B reserved for the floppy disk drives.
The Apple Macintosh represented on the right side of the Desktop screen a “disk” icon for each logical volume currently available to the system. But recent iterations of the Macintosh’s operating system provided a setting so that all of the logical volumes that represented the computer’s fixed storage didn’t appear as desktop icons.
The mid 1980s showed up a situation where an operating system had to identify what kind of disk a logical volume was on because hard disks were becoming more viable and a computer could have multiple disks of different kinds. This was also being augmented by the arrival of networks and file servers where you could “pool” your files on a common computer with larger storage, and CD-ROMs in the early 90s being a cheap way to deliver large amounts of software and data. Thanks to the graphical user interface, this was represented via an icon that represented the kind of disk being handled.
How are they represented?
In Windows, each logical volume, whether fixed or removable,is represented in Windows Explorer or File Explorer by an icon in the left hand panel under “This PC” or “Computer” or something similar depending on the version. If you click on this icon, you will see a list of all the logical volumes available to your computer.
On the Macintosh, you would normally have each of these volumes represented by an icon on the right hand side of your desktop, where you would click on that volume to invoke a Finder window to see all of the files in this volume. On the other hand, Finder would represent all of the volumes in a separate left-hand-side pane.
In both cases, each logical volume would be represented at least with its logical volume name and icon. With some systems, if there is a device that can hold removable media like an SD card reader, floppy disk drive or an optical drive, you will see that device listed but greyed out or de-emphasised if there is nothing in it.
Some operating systems like MacOS X may represent a removable volume like an SD card, USB memory key or optical disk with a distinct icon to highlight their removeability. This will typically be an “eject” symbol which you can click to safely remove that volume. Windows even lists the “eject” word in the right-click option menu for all of the volumes that are removable.
Folders

All the folders that exist on a hard disk, this time the system disk
The Macintosh and, subsequently, MS-DOS and Amiga brought around the concept of directories or folders as a way of organising data across increasingly-larger data volumes. Here, you could organise the data in to smaller clusters that relate to a common theme or purpose with the ability to create a folder within another folder.
Some operating systems like some versions of the Macintosh operating system allowed you to represent a folder with a graphical icon but this was used mainly by software developers when you installed software on the computer.
But all of the computers typically allocate a special folder on the main logical volume for storing all the programs that you run and, in some cases, even create a temporary folder for keeping data that a program stores on an as-needed basis.
How are they represented
On the graphical-user interface, these were represented as a folder icon that is a part of how the contents of a logical volume was represented. Clicking on this folder icon will allow you to see the contents of that folder.
What is the main or system disk of your computer?

The Main Disk or System Disk for a Windows computer
The main disk on your computer, which is a hard disk or fixed solid-state-device, stores all the files that are to do with its operating system and all the applications you run on your computer. Such a disk is listed as C: in Windows or MACINTOSH HD on the Macintosh. It is also described as the system disk or the boot disk because it has the operating system that the computer has to load every time it is started, a process described as the “boot” process.
Where the programs that you run exist
It will also contain the data you create but all of the files needed to run the operating system and the applications will be kept in particular folders. For example, the “Applications” or “Program Files” is kept aside for the applications and games the user installs, with each application you install creating its own subfolder of that folder. This is while a separate folder like “Windows” or “System” is kept for the operating system’s files. Some operating systems like MacOS may also use another folder for keeping plug-ins, fonts and similar common application resources while others may keep these with the applications / programs folder, usually as a subordinate folder.
Where the Desktop is represented
As well, all the icons and files that you store on the Desktop will be kept on a “Desktop” folder which represents everything that exists there.
The data you have created
But you will also end up with user-data space like “Documents”, “Photos” and the like where you save all of the data you create with your computer’s applications. Your e-mail program may store your emails in that folder or in a separate folder on this same disk.
Some operating systems, most notably Windows and earlier iterations of the Macintosh operating system, even let you create folders on the System Disk that aren’t earmarked for a purpose for you to use as your data folders. This also includes other programs keeping the user-created data in their own folders.
The secondary holding place for deleted files
Then there is the “Trashcan” or “Recycle Bin” folder which is used as a holding space for files you delete should you regret deleting them. When you delete a file from one of your folders on the main disk or other fixed disks in your computer, these files will end up in this “holding space”. Then if you want to remove them permanently, you have to delete them from this folder.
Removable Storage

USB storage device – an example of removable storage
All of the removable storage devices work on a freeform method of organising data across each of their logical volumes because there typically isn’t a requirement to keep certain folders for certain system processes.
This is except for memory cards associated with digital cameras because of the digital photography industry’s desire to implement a “Digital Camera File System”. Here, you have a DCIM folder for all digital-camera images and your camera will keep the pictures and videos you take in a subfolder of that DCIM folder, This was to simplify the searching process for digital images when you used a printer, photo-printing kiosk or electronic picture frame. There is also a MISC directory where DPOF print-order files are stored when you order photos to be printed using your camera’s control surface and either insert the camera card in to you multifunction printer or a photo-printing kiosk.
When you delete a file from removable storage, it is gone for good. As well, you need to make sure that you properly remove memory cards, USB memory keys and similar removable storage because most operating systems won’t write back all of the data changes to that storage device as they occur. Some operating systems like Windows allow you to immediately remove the classic floppy disks but most of them require you to use a “safely remove” or “eject” routine to properly write all the data to the removable medium before you can remove it. The Macintosh even allows you to drag the removable medium to the Trashcan to safely remove it.
Conclusion
The file system that your computer has is one of the key tenets of managing your data on your computer and it is about how your data is organised across multiple storage devices and within these storage devices.