Some of you may be buying a projector for the first time such as to add large-screen video display to your organisation’s presentation abilities; or you are replacing your existing video projector that has got a bit long in the tooth.
Choosing the right projector can allow a church or other organisation to gain the most mileage from it
But when you are considering the purchase of a projector, take time to consider where you are intending to use it and what you are using it for. This will make sure you are going to end up with a machine that can satisfy your needs exactly by projecting the brightest and sharpest image where you are using it.
What to look for
There are certain attributes that you need to look for when buying that projector such as its brightness and contrast-ratio specifications along with factors that affect how you can install your projector.
How your projector’s image will look
Brightness (lumens)
This specification affects how bright the images that appear on the screen will be. A projector with more lumens is also able to deal with competing light sources like room light easily. Today’s office projectors will typically end up with a brightness of at least 3000 lumens.
It is worth noting that a projector will yield the quoted brightness when it is using a relatively-new lamp and set to operate at full brightness.
Video and photo material along with games places more demands on the visibility of the image especially in existing light compared with graphic material that changes infrequently. This may call for a projector to have increased brightness. As well, you may have to look for a projector with increased brightness if you aren’t able to control the ambient lighting especially for video or photo content such as with rooms that have a lot of natural lighting.
The rule of thumb here is to buy the brightest machine you can afford no matter how small or brightly-finished the room is. This is more important if your room has large windows and you have a view to using the projector there during the day such as hospitality applications; or you intend to run the projector with the room’s lighting switched on which is the reality with most business or worship applications.
Contrast Ratio
This specification identifies how dark the black parts of an image will be and how white the white parts of that same image will be. It may influence the “perceived sharpness” of the projected images.
How your projector will “fit in” to your venue
There are certain specifications that concern how far back you have your projector from the screen or wall you are projecting the images on in order to have the largest useable image.
Throw Ratio
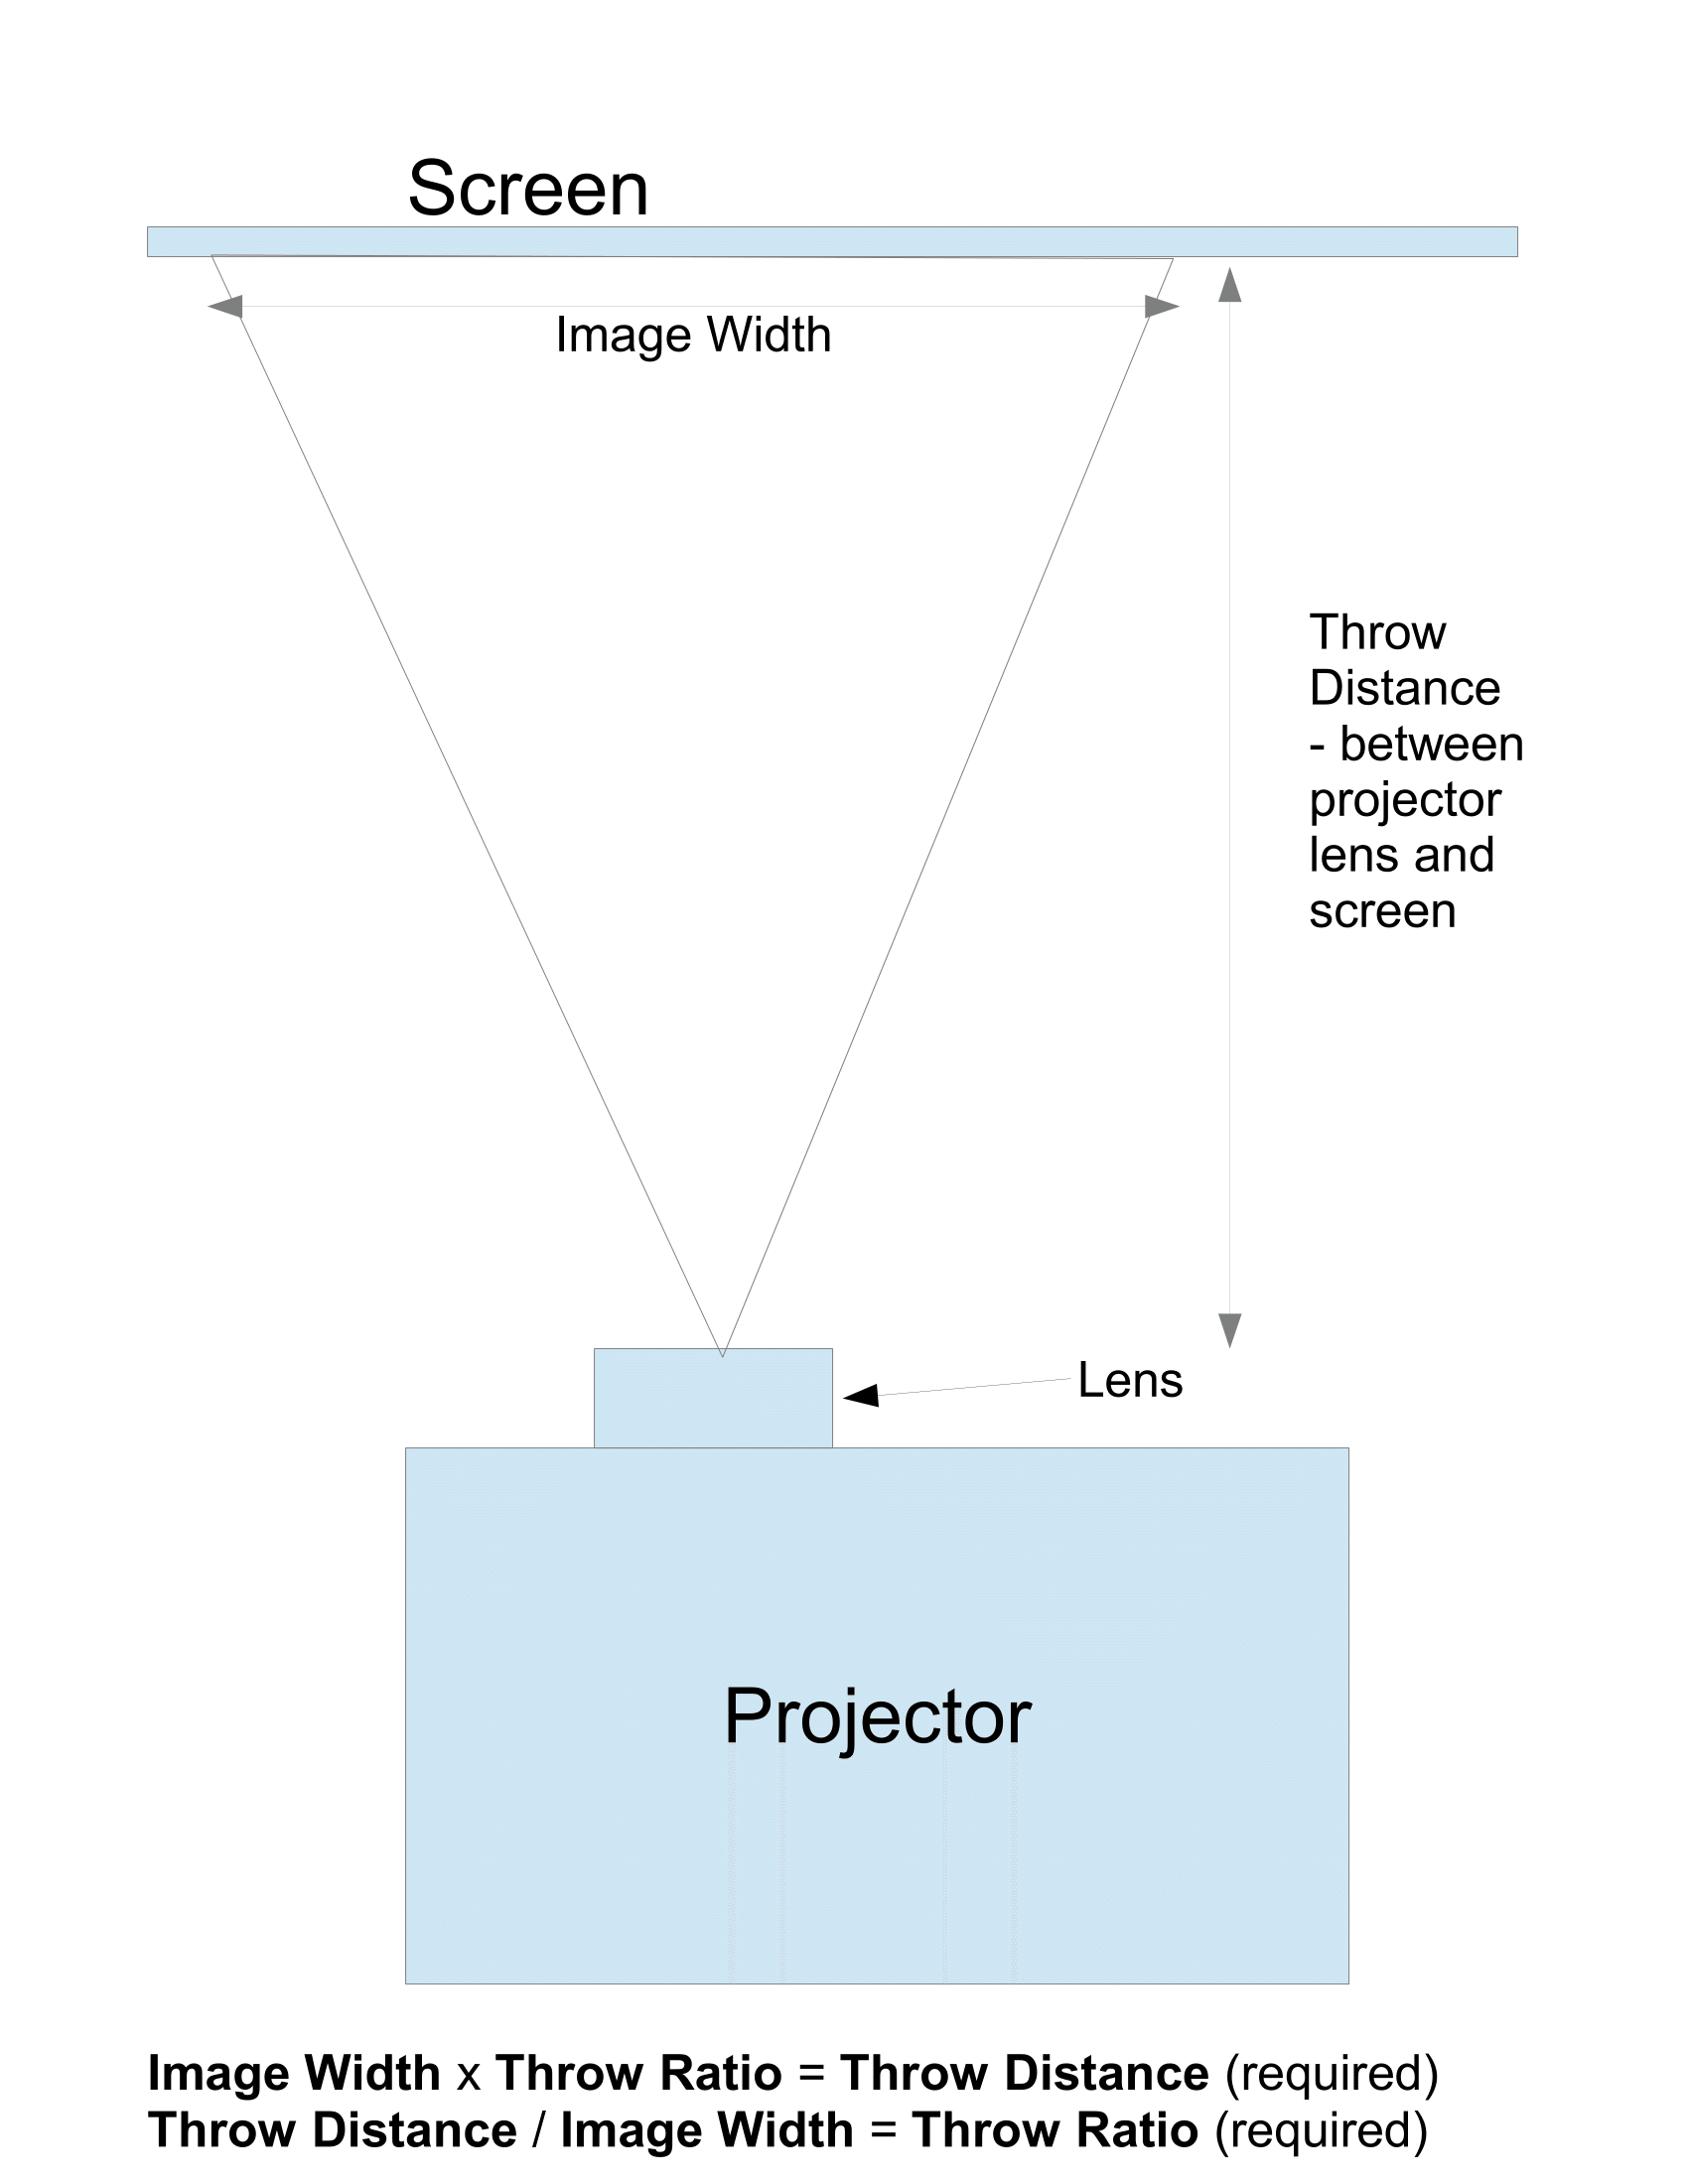
Throw distances and ratios explained in a projector setup
The projector lens’s throw ratio determines the effective size of the projected image in relation to the “throw” which is the distance between the projector’s lens and the screen. A lower figure allows for the projector to be closer to the screen for the same image size than a higher figure.
A projector that has a zoom lens, like most of the equipment pitched at small businesses and community organisations, will be specified a minimum and maximum throw ratio that is determined by the focal length you set the lens to. The zoom lens may help you with getting your image “just right” for your setup after you position the projector for best image size.
The “standard” throw ratio for most office and classroom projectors will come in at between 1.5 and 2.0 while a short-throw projector will come in at between 0.5 and 0.7. The newer ultra-short-throw projectors typically have a throw ratio of 0.3, allowing you to position them very close to the screen.
When you choose your projector, a short-throw projector can earn its keep in small rooms or for portable / temporary setups. These machines can earn their keep if you want your projector to be “ahead” of your audience. There are environments where an ultra-short-throw projector can come in handy like a small room such as a classroom, or a permanent installation for a space which gets crowded very quickly like a bar. Similarly, you may find that your venue has a bulkhead near the screen’s location where you can feasibly mount your projector, which may call for an ultra-short-throw model.
Projection Distance
Manufacturers will also provide a minimum and maximum projection distance specification in order to specify how close to or back from the screen the projector should be to yield a useable bright image.
But your setup’s “throw distance” will be based on the throw ratio of your projector’s lens multiplied by the width of the screen and this should be within the distances specified for the projector you are using. Once you know this figure, you can then determine how far back the installation’s ceiling bracket should be positioned.
Aspect ratio and Resolution
A projector, like a digital camera, is specified with a native aspect ratio which is the aspect ratio for the actual LCD or DLP image panel that realises the pictures. As well, they have a maximum native resolution that the LCD or DLP can handle for best results.
The “pillar-box” effect when you show 4:3 material on a natively widescreen display
They can handle other aspect ratios but will yield “letterboxed” or “pillarboxed” images which have the black borders at the picture’s edges. You may have noticed this effect when you watch television and you watched some newer widescreen content on your old TV or you watched older TV content on your newer flat-screen LCD TV. In this case, you would need to determine your screen size based on the projector’s native resolution.
A projector with a wide native aspect ratio like 16:9 makes better use of wide screen areas whereas a projector that uses 4:3 as its native aspect ratio may work well for narrower screen areas including “traditional” screens.
Native 16:9 projectors are important if you are regularly showing live TV, movies or other video content turned out in this ratio; as well as yielding that wide look that easily impresses. You can get away with a native 4:3 projector if you occasionally show video but show a lot of graphics material or digital photos prepared in this ratio. It is also worth knowing that projectors that have a native 16:10 aspect ratio may allow for some flexibility between allowable screen area and what you show and is a go-between for 4:3 and 16:9 as well as accommodating scanned 35mm slides and prints.
As for the resolution, I would work towards projectors with a vertical resolution of at least 768 lines even for business applications. 16:9 projectors with the 1920×1080 “Full HDTV” resolution would earn their keep with most of today’s TV and video content, especially if you are running them with an HDTV set-top box or Blu-Ray player.
This is important because your audience will want to see a very sharp clear picture and the eye is less forgiving about fuzzy or blocky images on the big screen.
Connectivity and Functionality
Essential Connections
Nowadays a projector should have an HDMI socket for newer computer and video equipment as well as a VGA socket for legacy equipment
Make sure that the projector that you are after has at least an HDMI input with HDCP for today’s computer and video equipment along with a 15-pin “VGA” RGB input for older computers that don’t use this connection.
If you intend to use your projector with consumer video equipment especially the Apple TV box or pay-TV services, make sure that the HDMI connection supports HDCP content projection. As well, a projector that implements HDMI-CEC control functionality can be a real boon with providing “one-remote” operation with most consumer electronics equipment especially Blu-Ray players.
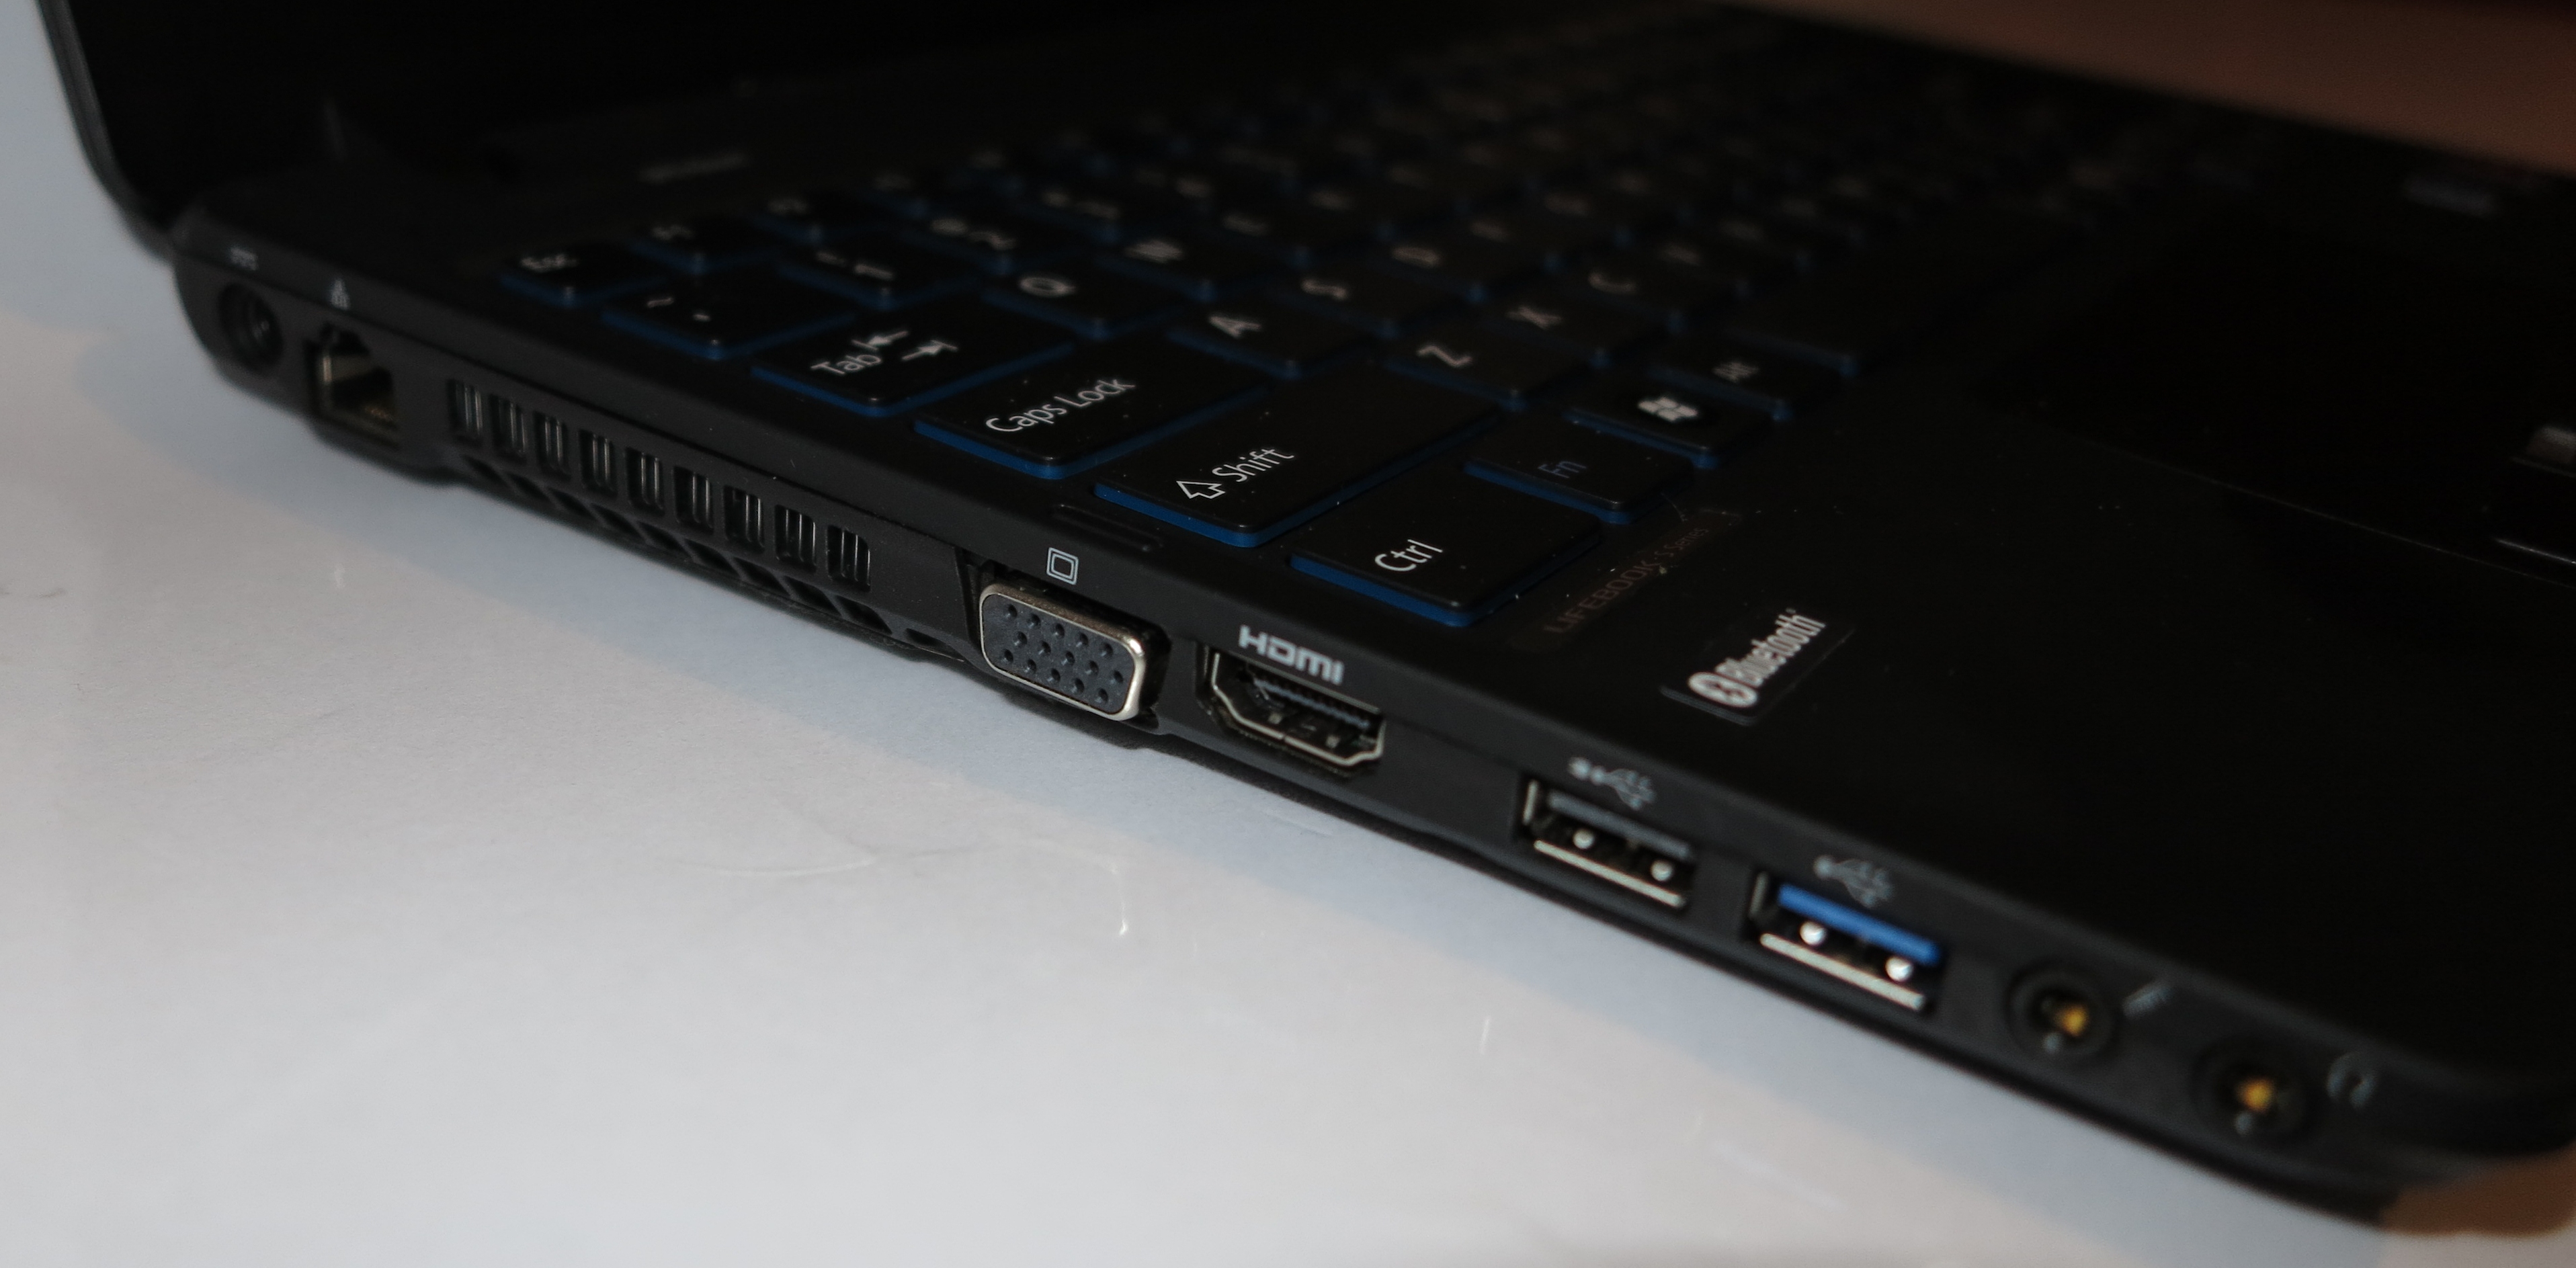
HDMI is now par for the course for computer display connections
Integrated image/video projection functionality
An increasing number of projectors are being equipped with the ability to display images and video footage held on a USB memory stick, onboard memory or other media which can make them become today’s equivalent of the old movie and slide projectors. This feature can be used for “there-and-then” applications or where you can’t connect a computer to the projector and is highly relevant to portable applications.
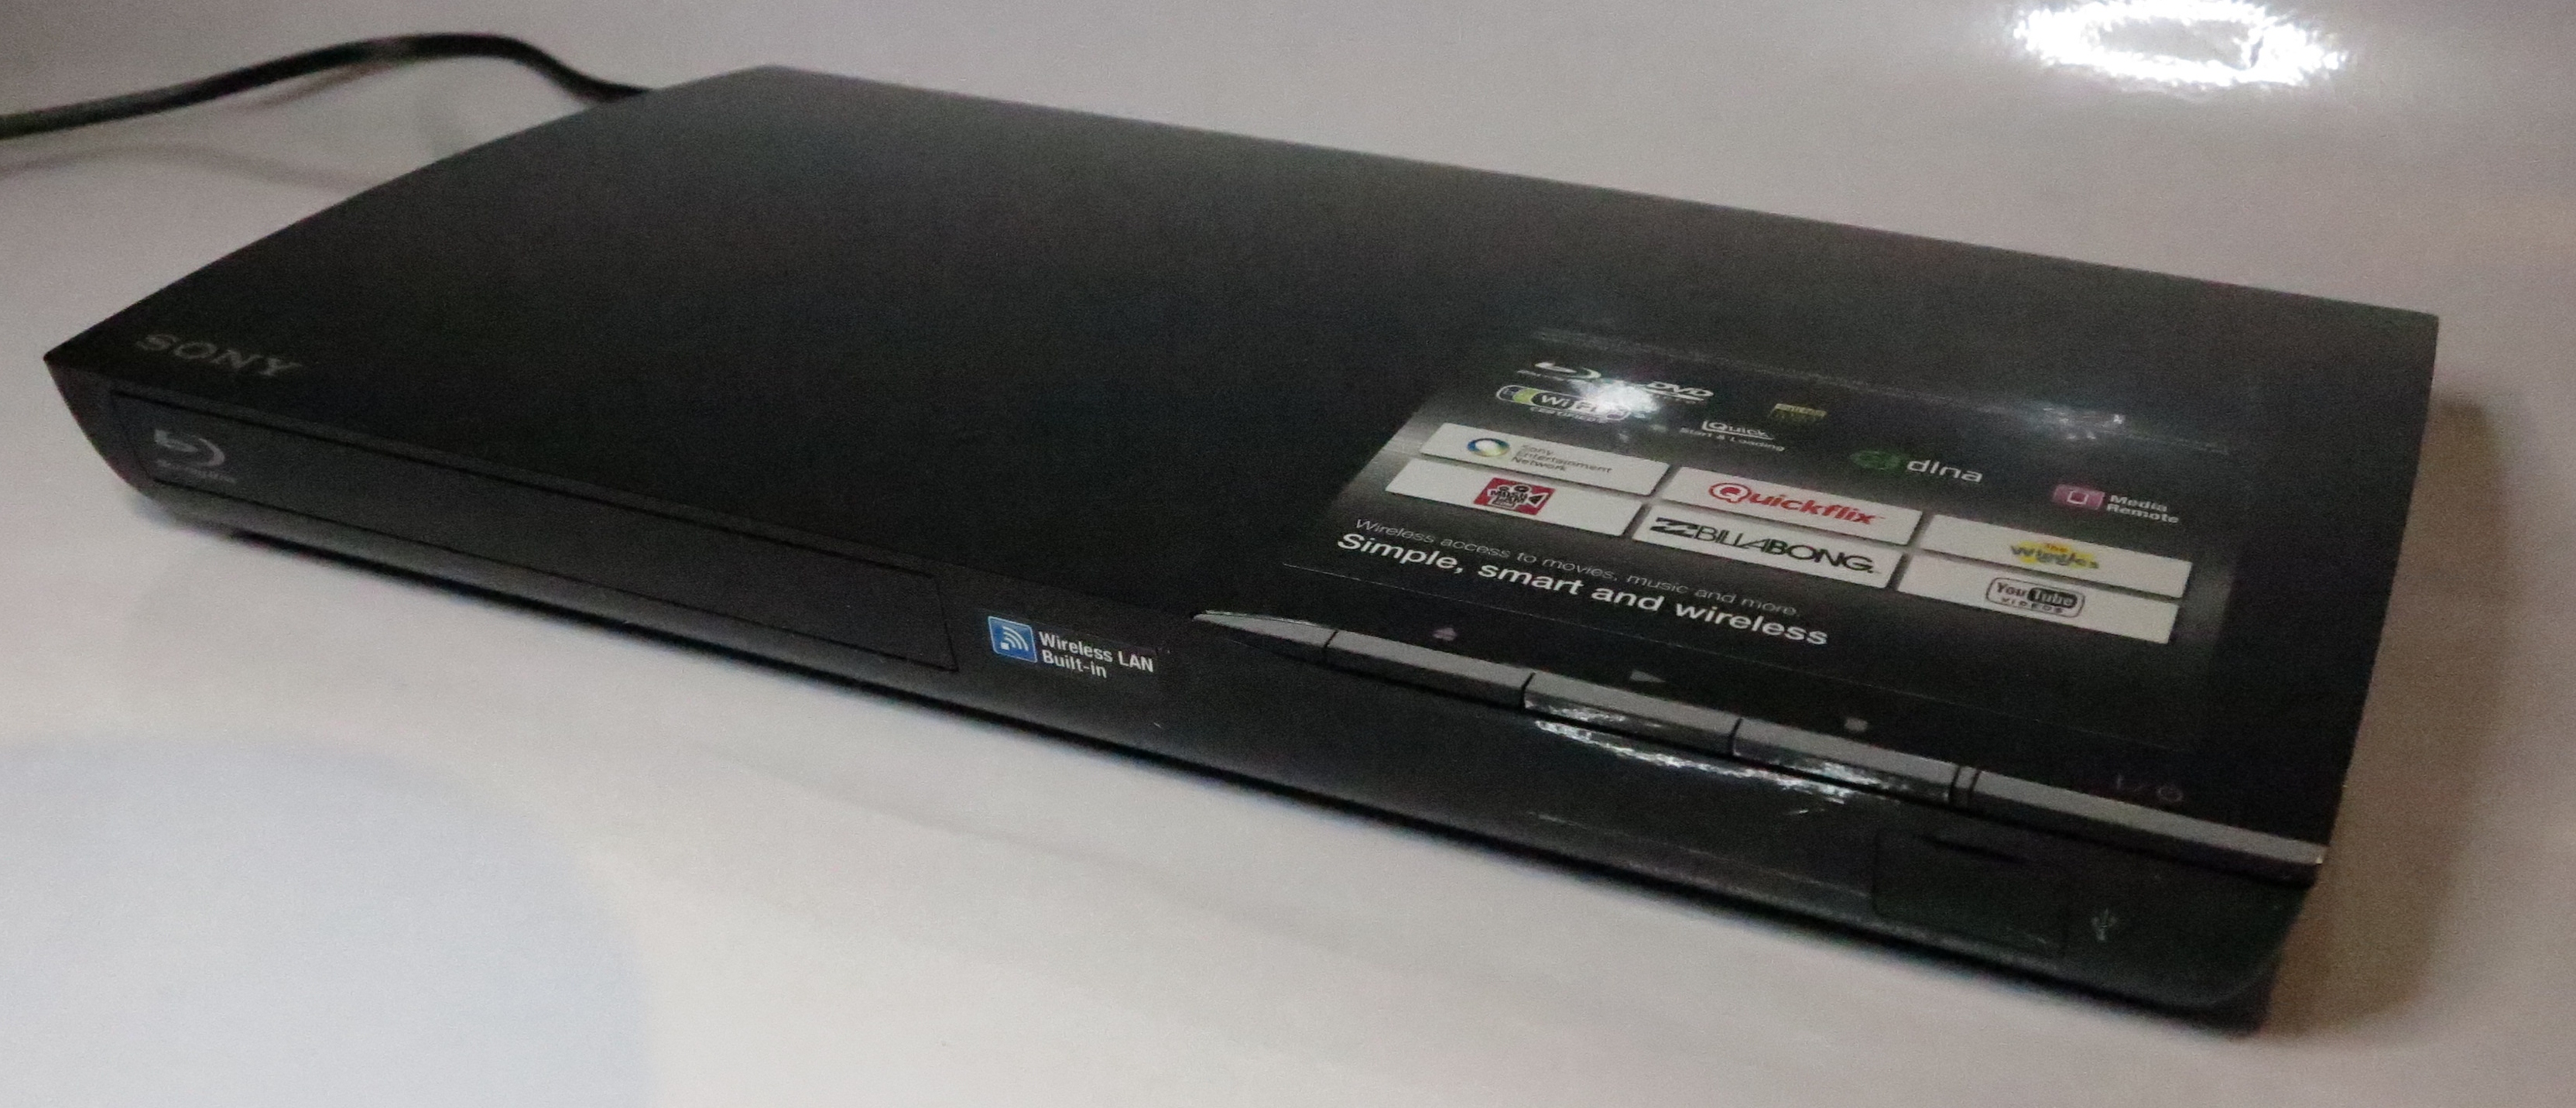
Most recent Blu-Ray and DVD players can show still and video material from USB storage devices
On the other hand, if you don’t want to use a computer to show pictures or file-based video content, you can use a recent DVD or Blu-Ray player, network media player or similar device to fulfil this role.
Wireless and network projection
Another feature that is available with an increasing number of video projectors is the ability to project images from a computer or mobile device via a network, a dedicated Wi-Fi link or a Bluetooth link.
Most of these implementations are very dependent on the client device running particular software or the purchase and installation of certain interface devices. At the moment, Miracast and Intel WiDi are considered stable standards in this space but you need to be sure if there are other implementations that are able to work across devices offered by multiple manufacturers.
On the other hand, there are video-peripheral devices like the Apple TV and the Google Chromecast which can answer this role effectively. This is more so if you want native network-projection support from iOS and Mac OS X devices in the case of the Apple TV or Android and Chrome OS devices in the case of the Chromecast.
Audio
Most projectors will have an integrated amplifier and small mono speaker for sound reproduction and many will have an audio DAC if they are equipped with an HDMI connection. This is good enough at a pinch but I would rather use a powerful sound system such as a hi-fi, home-theatre or PA system for reproducing the sound.
It is also worth knowing that most of the projectors with an integrated amplifier and speaker will have a stereo line-out connection, typically in the form of a 3.5mm stereo phone jack. This comes in to its own with HDMI-equipped projectors that reproduce the sound from the HDMI connection and earns its keep if you have the sound system located close to the projector so you can keep a short unbalanced analogue audio link between the projector and the sound system’s amplifier.
If you want the sound to be reproduced independently of the projector such as to play music without a visual display, you may have to either connect your computer directly to the sound system or use an HDMI audio-extractor also known as an HDMI audio adaptor or HDMI DAC for best results with your sound system.
Lamp life
A projector will have its lamp life rated based on how long the machine will continuously operate before the lamp is half as bright. This is against the common logic of rating the lamp life based on how long it will operate before it “blows” (burns out). But I still factor in the reliable operation angle in that same equation. This specification is based on having the projector run at full brightness but being treated properly.
But most of today’s projectors implement lamp-management logic to effectively run the lamp for a longer service life. Examples of this include offering an “eco-mode” or similar setting to run the lamp at reduced brightness, tapering the lamp’s brightness slightly when the projector is showing the same image for a long time or some even adjusting brightness based on room lighting.
Problem can still surface with some projectors where the lamp lasts a long time but hits the end of its useful life and a good quality replacement isn’t available for that machine anymore. This can happen when a manufacturer makes equipment that is less “parts-common” with prior models when it comes to user-replaceable parts and it could be more financially viable to replace the machine with something of a similar or better standard when the bulb comes up for replacing.
Solid-state lighting (“lamp-free”) projectors
An increasing number of manufacturers are offering projectors that implement solid-state projection lighting which implements LED and/or laser-diode lighting technology. This is compared to the common practice of using a bulb-based lamp and allows for lower maintenance requirements. Manufacturers call these projectors “lamp-free” by virtue of not having to factor in the risk of the projection lamp “blowing” and stopping the show or you having to keep a spare lamp on hand.
These projectors offer best value for installations like displays where you are likely to have the projector running constantly. In other cases, you can get by with a projector that implements the regular light-bulb technology.
Buying guidance
When you choose your new projector, buy a projector which has as high a lumens rating as you can afford and look towards units with at least 3000 lumens. This is more important if you intend to use it in settings where you intend to run video content or show photographs in ambient lighting or your environment is brightly finished or has plenty of natural lighting.
Look towards purchasing projectors that support a 16:9 or 16:10 native aspect ratio unless you are using a narrow wall space as your screen.
Short Throw or Ultra Short Throw projectors earn their keep with small rooms or where you want the projector to be in front of the audience.
If you expect to frequently run your projector for long sessions, like a display, a worship scenario, or a bar that is showing the big sports fixtures every weekend, look for equipment that has a very long lamp life. If you can afford it, you may want to consider a projector that implements solid-state “lamp-free” technology.
Making sure your projector lasts a long time
You will typically get around five to seven years useful life out of a good-quality projector if it is operated and maintained properly.
To achieve this, make sure that the machine is on a sturdy surface before you turn it on. This also is of importance if you are using something to raise the front of the projector slightly to get the picture right. As well, transportable projectors have to be handled gently especially when they are on or just been turned off. If you are setting up an integrated installation, make sure you are using a good-quality mount kit and that it is anchored properly to the mounting surface.
At the end of each session, make sure that the projector is properly shut down so that the lamp, image panel or electronics isn’t damaged by excessive built-up heat. This procedure is more important for transportable or other small projectors, or units that are in an installation where they can be enclosed when not in use like “drop-down” installations. Here, you have to turn off the projector using the standby button on the unit’s control panel or its remote. At this point, the lamp and the circuitry associated with the projector’s signal path are turned off but the fan will continue to run for a few minutes. Depending on the machine you are using, an indicator light on the projector will flash or glow to let you know that this is taking place. This cool-down process is completed when the fan shuts down and only the “standby” indicator glows or no lights glow depending on the machine. Only then you can unplug it from the AC power.
Avoid the temptation to turn the projector on and off too frequently because this can shorten the projection lamp’s lifespan. Here, if you need to have nothing on the screen such as when loading up subsequent content, use the “Mute” or “Blank” button on the unit itself or the remote; or a similar function on your display computer’s software to achieve this goal.
If your projector uses filters, make sure you change them on a regular basis. As well, it is a good idea to clean the ventilation grilles to stop dust building up in them. This may simply be a case of running your vacuum cleaner’s crevice nozzle over these grilles; and is more important in dusty areas.
Be aware of how your projector fan sounds when you are using your projector. If you hear excessive grinding or squealing noise, this is an indication that the fan’s bearings are on the way out and it could cease to do its job. It leads to unreliable operation and heat build-up which could shorten the lamp’s lifespan. This may be a time to send the projector to a repair workshop and have the fan replaced.
The screen you use for your projector
The other factor that you also have to consider when you buy a projector, especially for the first time, is the screen on which your projected content will appear. This may not be of concern if you are simply replacing an existing projector with a newer model.
Fixed Screens
Some of you may use a white wall or whiteboard as a fixed screen for your projector when you are on a budget or, in the case of a whiteboard, you intend to implement an interactive-whiteboard display.
On the other hand, you may purchase a dedicated fixed screen that mounts on the wall or on an adjustable bracket. Wall-based setups will occupy wall space even when they aren’t used and you may use doors, shutters or curtaining that complement your décor to conceal the screen when it is not in use. The adjustable-bracket setup will earn its keep with classrooms, worship applications and the like where you have a main focal point of attention.
Here, it would be preferable to have a fixed-screen setup if you have a permanent setup or can keep unencumbered wall space available for a screen.
Retractable and Portable Screens
But, if you don’t have that wall space, you may find that you have to purchase a retractable screen of some sort.
Portable screens
These come in a portable form that either is the classic tripod screen that most of us are familiar with or a “pull-up” screen which is a simpler larger form with the screen coming out of a large tube that sits on the floor or table. Some of the “pull-up” screens may be designed so that they can be attached to a wall, bulkhead or other similar feature on a temporary basis so they are effectively portable pull-down screens.
Fixed retractable screens
A presentation shown on a retractable screen
On the other hand, you have fixed retractable screens that have a roll that is permanently mounted.
These screens, commonly described as “roll-up” or “pull-down” screens, are pulled down like a traditional roller blind when they are needed. They can be mounted with the tube that the screen rolls into exposed or this tube can be concealed, whether in the ceiling or a specially-built pelmet with the screen emerging from a slot in the ceiling or pelmet.
There are some more expensive varieties that extend and retract under electric control but are more suited to permanent installations. These may look more elegant and opulent but you will also find that they last a lot longer because they are less subject to the manhandling that a typical manual roll-up screen is subjected to. I would recommend this type of pull-down screen for those venues where the equipment is expected to gain a lot of regular use.
What to look for here
Here, you need to place importance on the screen’s build quality because this affects both durability and image quality. This is more important with retractable and portable screens when your screen will be set up and put away by many different people such as what happens if you have a high turnover of staff or volunteers.
As well, when you buy that portable screen in a “bricks-and-mortar” retailer, try to set it up and pack it up yourself before buying it. This will allow you to identify if it is well-built and can be easily set up or packed up by an inexperienced person, something expected of in volunteer-driven organisations like churches, or businesses like bars or cafés which have a high staff turnover rate. You also have the chance to see how stable the screen is once it is assembled in order to be sure of a high-quality picture and less need to adjust the projector during a showing.
It is worth paying attention to the fabric that the screen is made of. A heavy fabric or a lighter fabric that uses tensioning at the edges leads to high-quality images especially when you intend to use it with ultra-short-throw projectors. You can get away with a matt-white screen finish when you are using today’s video projectors so avoid being sold the exotic finishes like glass-beaded surfaces if you want to save money.
Conclusion
Whether you are replacing an existing projector or are buying a new projector and screen setup for your organisation, it pays to take some time to purchase the right equipment for your needs rather than rushing in to it. This will allow you to see a highly-reliable setup perform for many years of use.
