UPDATED 26 January 2010
Most of us will end up with a large collection of picture, music or video files on our computers, especially if we use our computers as a large media library. It would be nice to have access to this content without having to copy it out to thumbdrives, SD cards or iPods before we can enjoy it.
Why share your music, pictures and video the DLNA way?
An increasing number of dedicated network media client devices are on the market and nearly all of these devices work according to the UPnP AV / DLNA media-client standards. The ubiquitous Xbox 360 and Sony PlayStation 3 games consoles that every teenage boy dreams of having both work according to these standards. Most manufacturers who are selling premium table radios are supplying at least one which can pick up Internet radio broadcasts through a home network and these sets are also capable of picking up media made available to them from a UPnP AV media server. I have reviewed a few of these units in this blog lately, such as the Pure Evoke Flow and the Revo iBlik RadioStation. This same function is increasing becoming a product differentiation feature for most consumer electronics equipment like home-theatre receivers and flat-screen televisions.

Denon S-52 Wireless Network CD Music Systm (DLNA enabled)
Tivoli NetWorks Internet Radio (DLNA enabled)
By using a DLNA-based setup, you don’t need to install different media-server programs for each network-media client that you happen to buy. In some situations, you may only need to run whatever is supplied with the computer’s operating system.
Setting up your network for DLNA media
Most home, small-business and some branch-office networks don’t require any revision because they typically are one logical network that spans the premises with the router that exists at the network-Internet “edge” being the device that handles basic network housekeeping. This doesn’t matter whether the network has one or more media segments like WiFi wireless, Cat5 Ethernet or HomePlug powerline cabling.
You will need to know the ESSID and the WEP or WPA security key for your wireless network. This may be obtained through the router’s Web administration page or through your client PC’s wireless-network-setup parameters such as in Windows Connect Now. If you are connecting your DLNA media client to the network via wireless, you will need to make sure that the wireless access point or router is broadcasting the ESSID so you can pick it from a list using the device’s user interface and be sure you are “in reach” of the network. This practice would be important when you run a multi-access-point wireless network or simply to help with making sure that neighbouring wireless networks are set up properly. As well, you will need to be ready to enter the WEP or WPA security passphrase by “picking out” characters from a list using buttons on the device or its remote control.

Network layout
Setting up your PC jukebox software for DLNA
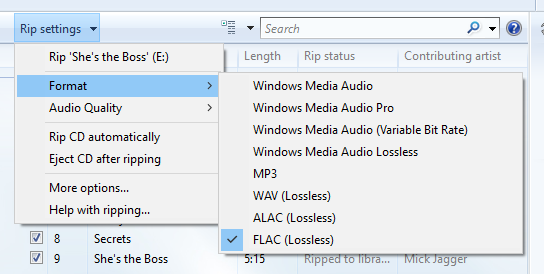
If you are running Windows XP, Vista or 7, you can use Windows Media Player 11 or Windows Media Player 12 (in the case of Windows 7) as your media server. Before you start “ripping” CDs to the hard disk, make sure the program is set to rip without DRM (Copy Protect Music checkbox in the Rip Music options tab is cleared) and that it is set to rip CDs at 192kbps WMA or 320kbps MP3. The reason I would rip at these settings is to be assured of sound reproduction that is as close to the CD album as possible. You may use the MP3 codec for maximum compatibility or WMA for efficient storage if your DLNA media clients can handle WMA.
.
As well, you will have to set Windows Media Player 11 to automatically permit devices to benefit from its media library. This is done by going to “Library”, then selecting “Media Sharing” and clicking on “Settings”. The “Media Sharing – Default Settings” dialog box will open whereupon you make sure that the “Allow new devices and computers automatically” checkbox is selected.
If you don’t use any sort of ratings in your media as far as sharing is concerned, you may have to select “All ratings” in both the “Star Ratings” and “Parental Ratings” options. This will make sure all media is available for all of the devices.
For your pictuers, you will have to add the folder that contains your photos to Windows Media Player’s media library. Similarly, you will have to do this for your video folders.
Linux users have access to a large plethora of media-server software such as TwonkyVision and TVersity as well as a large collection of open-source media-server software. You will still have to use a CD jukebox program set up to rip CDs at 320kbps MP3.
Apple and Windows users who use iTunes as their CD jukebox but will need to use either TwonkyVision, Elgato EyeConnect or Allegro Media Server. They will need to make sure that the iTunes directory is the one to be provided by the media server. Again, iTunes will need to be set up to rip at 320kbps MP3 for best compatibility and quality. The program may support transcoding to lower bandwidth settings for use whenever music is being transferred out to an iPod.
Infact, I have written up some more detailed information about setting up an Apple Macintosh computer to work as part of a DLNA-based home media network because of the increasing popularity of these computers. The article, “UPnP AV (DLNA) for the Apple Macintosh platform”, covers other media server programs that exist for that platform.
The media server would need to be set up to work with the folders that are being used as the primary folders for music, photo and video storage. I have explained how to go about this for your music, especially if you use iTunes or Windows Media Player. For your photos and videos, you simply add the folders used by your photo management and video management software to store your images.
The DLNA media-server programs typically index music files according to artist, album, track, genre, and some may support separate identification of composers, contributing artists (important for soundtracks and compilation albums) and other metadata for pictures and videos. Some, like TwonkyVision, allow for alphabetical clustering and other efficient sorting arrangements. This is typically because UPnP AV / DLNA allows for the server to determine how it presents the library to the client devices.
As far as playlists are concerned, they will typically be listed in a “Playlists” collection with each playlist being its own collection in that tree. By having a playlist as a collection of tracks rather than a reference to a playlist file, it means that the media clients don’t have to be compatible with the playlist file format that the jukebox program works with.
Some of the media servers like Windows Media Player 11 or TwonkyVision support transcoding to common file formats for situations where a DLNA media client cannot handle a particular media type. This can come in handy for file types like WMA which aren’t handled by all UPnP AV media players.
Setting up the DLNA clients
Enrolling the DLNA clients in to your network
You will need to make your DLNA media client become part of the network. This can be a simple task of plugging it in to your Ethernet network segment or into your HomePlug powerline network segment using a HomePlug-Ethernet bridge.
Integrating wireless-enabled DLNA clients to the wireless network
If you are connecting your wireless-enabled DLNA media client to the WiFi network, you will need to configure it for this network. This will require you to enter the device’s setup menu and select the option pertaining to wireless network setup. Then you get the device to search for your network’s ESSID which is commonly referred to as the SSID, Network Name or something similar. Once your device has detected your wireless network, you will be prompted to enter the WEP or WPA security passphrase. At this point, enter the passphrase in to the device. These procedures will have to be done as mentioned in the “Setting up your network for DLNA media” section.
Some DLNA network media clients may use a “quick set-up” method like Windows Connect Now or WPS. This will typically involve either transferring a USB memory key between a Windows XP or Vista wireless-equipped notebook computer and the device; or registering the device with the wireless router. This procedure may be as simple as pressing a “register” button on the router and the device or copying the device’s PIN number (which would be on the device itself or in a WPS setup option in the device’s setup menu) in to the wireless router’s setup menu.
If you use MAC-address filtering on your wireless router, you will need to register the DLNA media device as an “accepted” network device. This will require you to copy the device’s wireless MAC address, which will be on a sticker attached to the device itself, in to the router’s trusted MAC-address list.
Making sure the DLNA clients detect the media server
You will need to make sure that the media server program is running on the PC that has the media that you are sharing. Most such programs may run a media server component as a background task while the computer is fully on but some may require the jukebox program to be running all the time.
Another thing to check is the desktop firewall software. This should be set to allow the media server software outbound and inbound access to the network as a server. The Windows Firewall software that is part of all Microsoft desktop operating systems since Windows XP Service Pack 2 makes this easy by allowing immediate access to Windows Media Player or asking you if you want to allow the application to have network access. Other third-party firewalls may require the server application to be allowed Internet access by you adding the software to their application “white lists”.
You may have to select “Network Music”, “PC Music” or something similar on most network-enabled music devices like Internet radios in order to gain access to the music library that you have made available. Then you select the “hostname” of the PC, which may be commensurate to its standard computer name or its primary owner’s name. The DLNA client will then show the media type that it can work with. You then select that type and use the controls to select the media you are interested in.
Summary
Once you have your network and media-server computer set up properly, you can work with providing music and other media to network media receiver devices without much hassle.