You use a regular Windows or Macintosh computer to curate your pictures, music and video files and store these files on your computer’s hard disk. Then you buy a high-capacity network-attached storage device to make these files available on your home network at all times and also as a backup or “offload” measure.
Normally this will require you to use Windows Explorer or Macintosh Finder to copy the files out to the NAS every time you synchronise them out to your NAS. This can be annoying especially if you have made changes to a few of the files or added a handful of files to the collection such as the latest downloaded images or a CD “rip”. Here, you have to answer a file-owerwrite prompt that the operating system puts up every time you write over an existing file as part of a copy process and this can be awkward if you did something like modify your files’ metadata or edited a photo, You could select the “Yes to all” prompts but this runs a slow copy process which transfers redundant data or work through each folder and file manually and find that you hadn’t reflected all the changes you had to reflect..
There is a free open-source application called “FreeFileSync” which automates the process of keeping your files that exist on two locations in sync. This is available for Windows, Macintosh OS X and Linux and can work with locally-mounted drives or SMB network-shared folders.
Here, you can set up a “there-and-then” sync job or create a sync job affecting certain files and folders on both the source and destination in a particular way. A sync job that you save can affect multiple pairs of files and folders thus avoiding the need to create one job for each folder pair.
Prerequisites
FreeFileSync must be downloaded and installed on your computer
You download FreeFileSync from FOSSHub or Download.CNET.COM and install it as you would for downloaded software for your operating system.
Identify on your computer where your media manager software is storing your music, photos and videos.
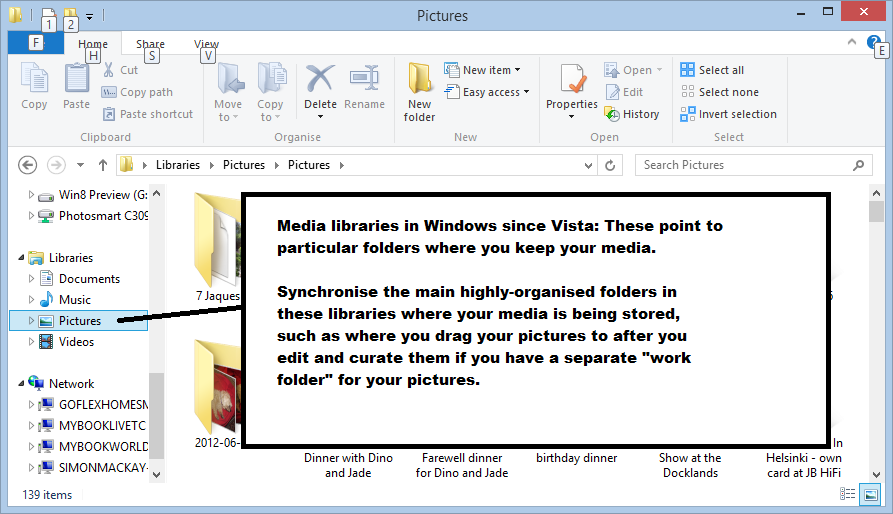
Media libraries in Windows 8.1
In iTunes, this is found under the “Advanced” tab in the Preferences menu. Windows Media Player and Windows Live Photo Gallery use the Pictures and Music or “My Pictures” and “My Music” libraries created by Windows. Other media-management tools may use a particular folder that you set in their options or preferences window as the place for their media library.
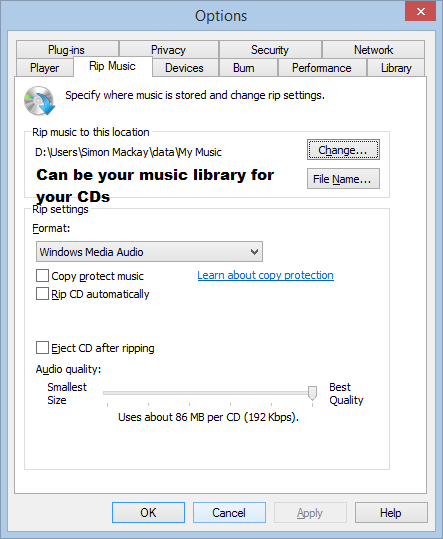
CD rip location in Windows Media Player
Most audio-based media management tools like iTunes and Windows Media Player typically use the library as their import folder for when you “rip” a CD or purchase music through their online store whereas a lot of photo and video tools may have you create a separate import folder away from your library for images and video you import from your camera or scanner. This then allows you toe edit the images and video before adding it to your library.
Identify and make available the “media” folders that you are using to store your media on your NAS.
A NAS that uses a DLNA media server and an iTunes media server typically references a folder tree like “Media”, “Shared Media”, “Shared Music” or something similar. These are typically at the “Public” SMB mount point and are accessible using SMB/CIFS as well as these media servers.
If your NAS uses one shared media folder, create a sub-folder for the music files, another for the images and home video and another for other video like “download-to-own” content.
Create a media sync job
Setting up FreeFileSync for media syncing
These actions are for a Windows computer and most NAS units
- Open FreeFileSync
- Click Program– New
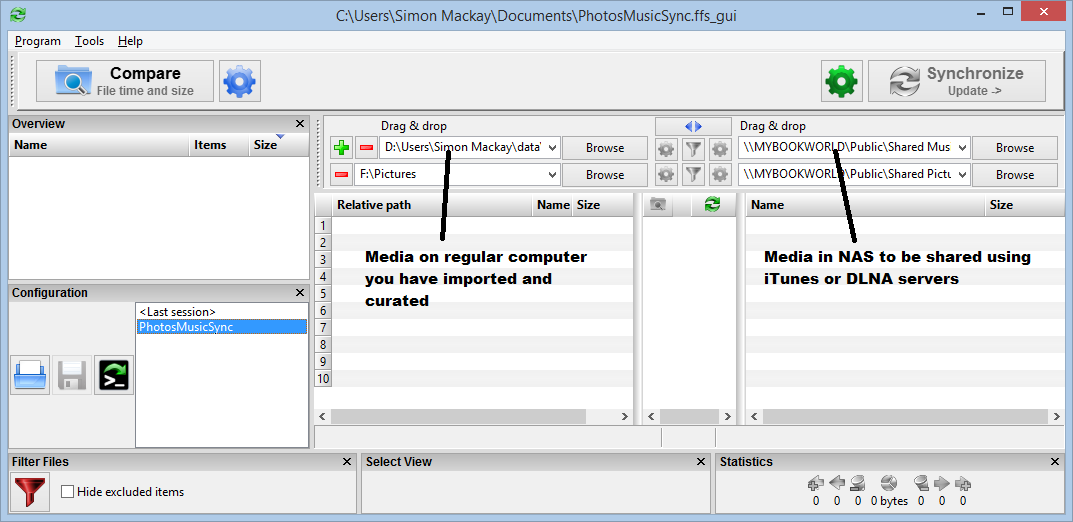
- For each root folder representing your media collection kinds,
a) Drag the root folder representing the media type on your computer to the left file list pane
b) Drag the destination media folder for the media type on your NAS to the right file-list pane
c) Click the + symbol to add extra media type pairs to your sync list. - Click the gear icon next to the Synchronize button to determine the kind of synchronisation to take place
In this case, you will have to select the “Update” option for this job. This effectively contributes new and modified files and folders that exist on the computer to the NAS without deleting any files that have been removed from the computer’s media folder. This is important if you just keep your files on your regular computer just to curate them before adding them to your media collection, or you “shift” older files to your high-capacity NAS to create space for newer files. - Click on the “Update” button to select this option.
- Click on the “Save As” option to save this sync job as a file. Give it a name like “MediaSync” or “MediaNAS” to reflect the goal of it syncing your media to the NAS.
Manually running this sync job
Here, you open FreeFileSync, select the name of the “media sync” job and click “Synchronize” to start the sync process.
When to run this
Run the :FreeFileSync” job whenever you have done significant work on your media library like importing new media or editing existing media including the metadata. This can also be done as part of a backup routine before you start off the main data backup on your PC.

