Category: Network tips

How to effectively establish that Wi-Fi-based mobile network
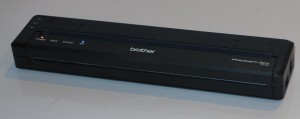
Brother PocketJet PJ-773 Wireless Mobile Thermal Printer

Brother PocketJet PJ-773 Wi-Fi mobile printer – one of the mobile peripheral devices pitched to smartphone and tablet users

A major trend that has become strong over the last few years is the arrival of mobile network devices that connect to each other and to client computer devices via Wi-Fi wireless networking technology.

These are represented in the form of:

  • mobile network-attached-storage devices
  • mobile printers
  • wireless speakers, and
  • mobile broadcast-LAN tuners that work with terrestrial or satellite broadcast systems,
Network setup for mobile NAS and smartphone

Network setup for Wi-Fi-based mobile peripheral devices

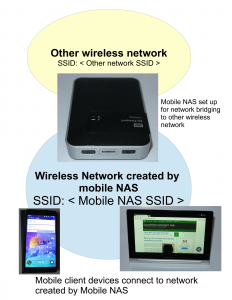
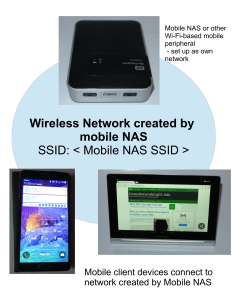
What is common about all of these devices, and is treated as a key marketing feature by their vendors, is that they can be set up to be their own access point with their own DHCP server as well as being client devices to existing wireless networks. Some of these devices like most mobile NAS devices are able to work effectively as bridges or routers between an existing wireless network and the network that they create.

This may work well if you are just using the one mobile peripheral device with your mobile client devices but may not work well when you intend to run two or more mobile peripheral devices. Here, you will end up switching between different wireless networks just to benefit from the different mobile peripheral devices.

Mobile NAS as bridge setup

Wireless NAS as a bridge between mobile client devices and another Internet-providing network

But you may want to run one or more of these wireless mobile devices together to serve multiple laptops, tablets or smartphones. Situations that may come about that will call for these setups would be where you are using a mobile NAS and, perhaps, a camera that has Wi-Fi functionality or one of the new Wi-Fi-capable mobile printers. This will call for you to create a proper mobile wireless network for all of these devices.

Use a router-class device as the main device

Here, you would have to run one wireless network device as a DHCP server and “master” access point and this function can be best served by a router-class device.

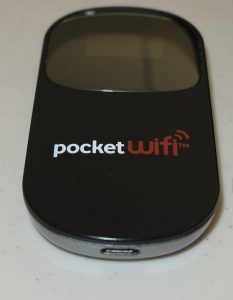
"Mi-Fi" portable wireless router

A typical “Mi-Fi” portable wireless router for a mobile-broadband service

The most common examples of devices of this class that apply to “on-the-road” use are the “Mi-Fi” mobile routers that work with a mobile broadband service or one of the travel routers pitched to work with a hotel’s wired Internet service. Some mobile NAS devices may also do this wireless-bridging functionality in an adept manner and could be the hub of your “travel network”. Similarly, one of the mobile-broadband wireless routers being integrated in to some new cars by the likes of BMW and Chrysler may also answer these needs.

You may think of using your smartphone’s Wi-Fi mobile-broadband-router functionality but this may encumber your smartphone for what you want to really use it for.

Some highly-sophisticated “Mi-Fi” and travel-router devices may also expose an Ethernet connection for LAN use, perhaps through an optional extended-functionality dock. This can come in handy if you want to increase your coverage area with another wireless access point or want to use devices like games consoles with your mobile network.

You may find that you don’t need to run the Internet connection on the Mi-Fi or travel router if you are simply establishing a link between multiple mobile peripheral devices and client devices and aren’t reliant on Internet functionality for their operation. Similarly, by having your mobile devices working this way, you avoid the need to authenticate with a Wi-Fi hotspot that implements Web-based authentication to do something like gain access to your mobile NAS’s data from your iPad.

Set up known wireless network parameters
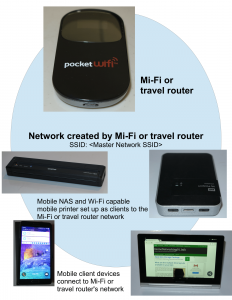
Mobile network wiht "Mi-Fi" router and 2 Wi-Fi-capable mobile peripheral devices

Mobile wireless network for two or more mobile devices and mobile client devices – uses a router-class device like a “Mi-Fi” router

When you set up your “Mi-Fi” or travel router, you make this device the hub of your mobile network and have every device “point” to this device’s local-network by associating with its SSID (wireless network name) and security parameters.

Most of the mobile network devices that work on an “open-frame” approach can be quickly associated to this “mobile hub” thanks to WPS-based push-button setup. For devices that don’t support this quick setup mode like most Apple devices, you will need to note down the “mobile hub’s” SSID and security passphrase. Some “Mi-Fi” devices that have a display may be able to show these details on their display, perhaps at the request of the user.

For that matter, a good practice would be to assign a unique SSID for your “mobile hub” device i.e. your Mi-Fi or travel router. This is important when you use these setups in campgrounds, caravan parks or hotels where many of these devices will be used at once.

All wireless devices to link with router-class device

It will also mean that the mobile NAS, mobile printer or other similar device has to work as a client device rather than as its own access point. This also applies to your computing devices like laptops, tablets and smartphones which also associate with the “mobile hub” device.

When positioning your mobile-network devices, make sure that they are in the range of your “mobile network hub” device i.e. the Mi-Fi or the travel router. All the wireless traffic that goes between these devices will pass through the “mobile network hub” device rather than between the devices themselves.

You may find that if you want to avoid draining your “Mi-Fi” router’s battery too quickly, it may be a good idea to have it run from a USB charger that runs from house current or your vehicle’s cigar-lighter socket. Similarly, a high-capacity USB power-pack can also earn its keep with these devices if you are away from power.

What I stand for when reviewing or researching mobile devices

When I review any device for this Website that is capable of being its own wireless network such as a mobile NAS or mobile printer, I test the device with my home network’s Wi-Fi wireless segment as if it is a client device. This is so I am sure they can work in this kind of setup as well as the highly-promoted “own access point” setup. As well, as part of researching a mobile device that uses Wi-Fi wireless technology as part of its link with client computer devices, I verify that it can work as part of an existing wireless-network segment as well as being its own segment.

Similarly, when I research a mobile router-class device like a Mi-Fi or travel router, I would expect the device to support WPS single-push connectivity along with other essential Wi-Fi connectivity and security standards. Similarly, such a device would have to be easy to configure including setting up the SSID and passphrase. As well, the Mi-FI device can’t be very thirsty with its battery if the goal is to have it as a “hub” device.

Conclusion

Once you are able to set up a mobile multi-device network, you can then be able to use it to store or print data while you are “on the road” without needing to constantly switch networks for each different task.

Preferring highest-throughput on your dual-band Wi-Fi setup

Article

Specify 2.4 or 5 GHz WiFi bands on Surface Pro 3 | Barb’s Connected World (blog)

My Comments

A problem that Barb Bowman had highlighted in her blog was that the Surface Pro 3 was preferring to connect to her Wi-Fi home network on the 2.4GHz band rather than the 5GHz (802.11ac) band that it was capable of. This may be a problem with a lot of dual-band 802.11n/ac devices.

Here, she had ran the same SSID and security parameters for both the bands on her network and the Surface preferred the 2.4GHz band. To work around this, Barb had used the Device Manager to force her Surface Pro 3 to stay on the 5GHz 802.11ac band. With this 2-in-1’s network adaptor, there was an “Advanced” option to lock on 2.4GHz or 5Ghz or simply switch between the bands. The problem would become worse when she took the Surface on the road because of having to head to the Device Manager to set these parameters.

Another way to work around this is to run separate SSIDs for each band, having the 2.4GHz and 5Ghz networks work as separate segments. Here, the network could be set up as MY-NETWORK for the 2.4GHz band and MY-NETWORK-54 for the 5GHz band. Most simultaneous-dual-band access points and routers allow you to set this up and your can prefer to connect to a particular band using your device’s network-selection function. If you wanted to allow automatic switching, you then just set both SSIDs up on your device for automatic connection.

On the other hand, it could be feasible for operating systems to have support for “preferred” bands or operating modes for wireless networks in a similar way to how you can determine in Windows whether a network is a public, home or workplace network and adjust its sharing behaviour according. This kind of manual override could allow a device to prefer the 5GHz band for better performance but fall to the 2.4GHz band if this band works better. 

You may have to pay special attention to your online services when you move location

Article

House

Keeping your details up to date when you move location may not be difficult

Moving houses can leave you disconnected | The Australian

My Comments

You may be moving house or business location for one of many different reasons but one common mistake many people make especially with their online life is not to factor it in when you do your move. This can lead to problems and customer-support calls when you have established yourself in your new location.

Your communications services

As soon as your move is imminent, make sure that your utilities including your communications services are set up to be connected and enabled at the new address by the day you move. If you can, make sure that you can keep the existing service going at your old address for the weeks that are bracketing the date of your move.

You may have to identify which of the communications services you can carry with you when you are moving. If this is a short move that is happening across town, you may be able to use the same services but longer-distance moves may require you to change operators. This is more so when you are moving in to an area where your current operator doesn’t have a footprint or cannot provide the service with the same level of continuity as before.

Your mobile phone may be a strong ally here

Your mobile phone may be a strong ally here

During the first week of your arrival at your new premises, you may have to spend some time “tweaking” your Wi-Fi network so that it is not clashing with your neighbours’ Wi-Fi networks. Here, you would have to change the channels that the router and/or access points work on, but you don’t have to change your SSID or security parameters.

Online services

As part of your move, you would be updating your contact details with your employer, your bank, the electoral registry, the taxman and similar organisations. But you may also need to manage other details like cloud-based storage services, online subscriptions and similar services. This may, for some services like social networks, require you to update your current physical address, email address or telephone numbers.

Some of these services may have particular dependencies like your email address or telephone number, especially for verification or authentication purposes. Here, they may allow you to supply multiple email addresses as “alternate” addresses and you can make use of this through the weeks or months that are bracketing your move date. As well, services that use an email address rather than a username as the login parameter may allow you to maintain this address as the login parameter even though you have changed email addresses.

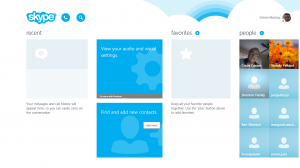
Skype with uncluttered Modern user interface

Skype can serve as a temporary telephone service

If your service is dependent on an email address, you may have to supply an email address that isn’t related to a fixed Internet service for the duration of the move. This can be an address related to a Website you create, your workplace’s email address if you work for the same employer or simply a Webmail address like Gmail.com or Outlook.com (formerly Hotmail) . This is important if the fixed Internet service doesn’t operate in the territory you are moving into or you simply want to use your move as an excuse to change Internet-service operators.

If your service is dependent on a phone number, you may need to associate it with a currently-operating mobile phone number. Here, you may be able to add your mobile number to the phone numbers associated with the service or replace any defunct numbers with your working mobile or VoIP number.

For that matter, Skype offers an inbound VoIP service for an extra cost so you can allow people to contact you on your Skype account and software by dialling the equivalent of a landline number that is in a locality of your choosing. But some localities like Germany may make this difficult to preserve the integrity of their landline numbering plan.

Other issues you may look at include the feasibility of having your email and phone calls diverted to your new phone number or email address or, in the case of an email mailbox associated with a fixed broadband provider, keeping that mailbox open for as long as possible independent of you maintaining the broadband service. Depending on the service provider, this may be provided for a modest fee or for free especially if you are moving or your premises is undergoing renovations.

Special cases

Moving to temporary accommodation

Rydges Melbourne

What if you have to move to a hotel or similar location as part of a temporary move?

Some of you may be moving to temporary accommodation like a friend’s home, a short-term rental or a hotel for a significant time. This may be due to various reasons like major repairs or renovations taking place on your home, a project that is part of your work or until you find permanent accommodation when you move in to a new area.

Here, you may have to see if you can gain access to your fixed broadband service’s mailbox or simply shift your mailbox over to a geographically-independent email service like a Webmail or workplace/business account. You could then implement your mobile or VoIP service as the phone number for your online services and use this to receive all your calls.

Some hotels and similar locations may support inbound direct dial to the room’s phone, typically with a standard phone number that has the room number as the last digits. Here, it is worth asking the Front Desk in these places about whether these places offer this service and the number you need to give out. This will play its part as a specific landline number for the duration of your temporary stay there and can work with those services that can work with landline voice services.

Moving overseas

Another special case would be to move to another country. This ma be typically due to work or similar placements or the desire to simply emigrate somewhere else.

This is more about uprooting all your online services. Here, you may have to establish a mobile service in your destination country with a number local to that place and use this as your primary phone service. This can be facilitated with various “SIM-only” plans that most of the local providers have.

As well, you would have to use the geographically-independent email mailbox as your email address. Here, you can keep most of the cloud-based services going using the email address, and you can implement app-based two-factor authentication for those online services that rely on your mobile phone number as the second factor if they support app-based authentication.

Conclusion

When you move between locations, you need to make sure you can move your digital life. This includes having an email address or phone number that you can gain access to through the move associated with your online services and updating your details with these services so you can gain access to them at all times.

As well,it is also about making sure you have continual access to your communications and Internet services whether through the previous provider or a newer provider.

Making cloud-based file-share services work with your DLNA-capable NAS

The typical media-sharing situations with cloud-based file sharing

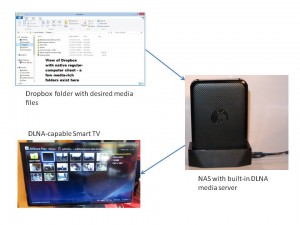
Dropbox folder to DLNA-capable TV availability concept

Dropbox folder to DLNA-capable TV availability concept

You attended your friend’s wedding and took a lot of choice pictures during the celebrations on that day. Now you import your pictures to your computer, use a media-management program to curate them all and manage them in to a folder tree representing that wedding and sync them to your DLNA-capable NAS for backup and availability on your fantastic smart TV.

But you want to share the images with the lucky couple without supplying a disc, or USB stick or dealing with unwieldy email attachments. You may want to post them on your Facebook or other Social Web presence or photo-share service. Here, you could use a cloud-based file-share service like Box.com or Dropbox to share these pictures so they have access to “original resolution” images to view, print out or take further.

Why “original resolution” images? Some of us want to be able to print out the pictures to put on the mantelpiece. As well, one of these pictures such as the one of the couple having the “obligatory kiss” as part of the wedding may be worth printing as a larger feature picture that is to be on the wall. Today’s cameras can yield image resolutions that are to a standard fit for printing but you need the high resolution available at the print shop.

Similarly, you may be pushing out visual-merchandising content to your two shops that you own and you want to use Dropbox as a reference point for this material. Then you want this material appearing on the TV screen attached to the DLNA-capable Sony BDP-S390 set up at each of these locations.

Using a cloud-based storage service like Dropbox as a file exchange

Typical this involves you having an account on one of these services, such as Dropbox. The reason I exemplify Dropbox in this article and others on cloud-based file-storage services is because of it being available across all regular-computer and mobile platforms as a native application along with it being available through a Web user interface thus making it suitable as a file exchange.

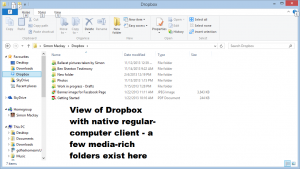
Dropbox native client view for Windows 8 Desktop

Dropbox native client view for Windows 8 Desktop

But if you use another cloud-based storage service, make sure that there is an application for your regular-computer platform that integrates this cloud-based storage service with the operating system’s file system as a folder tree. It also must be able to mirror the contents of your storage service’s account on your computer’s main secondary storage such as the hard disk as a way to gain quick access to the contents. As well, the storage service must have a native front-end program for at least the popular desktop and mobile computing platforms.

Then you upload a folder-tree full of the choicest images to your Dropbox and sharing that with the couple and others you want to share it with. Here, you have to know each recipient’s email address so you can send an invite to view the folder full of photos. Of course Dropbox identifies through the email those who already have Dropbox accounts and lets them know that the photos are available in their Dropbox view. But if a person doesn’t have a Dropbox account, they get an email invite to set up an account for free as part of the invitation to view the pictures.

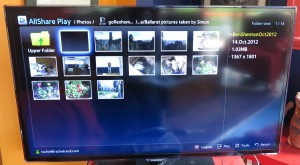
Media contents in Dropbox folder available on DLNA-capable Samsung smart TV

Media contents in Dropbox folder available on DLNA-capable Samsung smart TV

Here, they may want these pictures up on their Smart TV so they can show their family group the pictures that you took. Similarly, you have a Dropbox account and someone shared some of their choices pictures and videos with you. But you want them to be visible on your Smart TV for group viewing whenever you want.

The goal is not to share the entire contents of your Dropbox account to everyone because you may be simply using Dropbox as a data drop-off point for most of your personal and business data such as works-in-progress along with exchanging the media with your friends. Here, most Dropbox front-ends that are implemented by NAS untis typically operate on an “all-or-nothing” approach and don’t readily integrate the DLNA abilities that the typical NAS unit has nowadays.

Creating a DLNA-sharable folder for your Dropbox folder

Here, you could copy the Dropbox tree over to the NAS’s media folder. Some NAS units may allow you to add extra folders to the publicly-sharable mount point that you can share using DLNA. Here, you use the NAS’s Web control panel to add these extra root folders to the DLNA server’s folder list. In this case, you could create and share with your network a “Dropbox-Incoming” folder for this purpose.

In all cases, you need to have SMB/CIFS access to your NAS’s DLNA media directories. This would be achieved if you are already “dumping” media to your NAS and it is a good idea to create a shortcut to this on your operating system’s desktop.

You will need to perform these tasks using a competent file manager which is part of most regular-computer operating systems such as Windows, Apple Macintosh or Linux. Examples of this include Windows Explorer for the Windows environment or Finder for the Apple Macintosh environment. Things may become awkward if you are using a mobile operating environment like iOS or Android.

Manual sync methods

Using the Dropbox native front-end

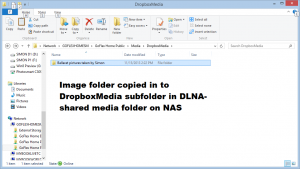
Dropbox folder copied to DLNA Media folder on NAS

Dropbox folder copied to DLNA Media folder on NAS

Make sure that you have the shell-integrated Dropbox front-end that you download from Dropbox installed on your regular (desktop or laptop) computer. This effectively integrates your Dropbox folder tree with your operating system’s folder tree and presents itself as though it is a member of Windows Explorer or Macintosh Finder. This includes making a file-by-file “mirror” of you Dropbox account’s directory layout and contents as part of your operating system’s directory tree.

Here, you use Windows Explorer or Macintosh Finder to copy the folders containing the media from Dropbox to your NAS’s DLNA media directory. You are not altering the contents of this folder in the Dropbox account but are copying it out to your NAS.

Do not move the files from the Dropbox folder because if you move them, you effectively delete them from everyone else’s Dropbox view.

In some cases, you may want to selectively copy images and videos from the Dropbox folder to your NAS for viewing on your DLNA media device. This may be important with a large media pool or a directory that contains office documents along with media files.

Using the Dropbox Web page

If you use the Dropbox Webpage to work your files, you download the folder that you want on your NAS as a ZIP file. Here, you right-click the folder (Ctrl-click with an Apple Macintosh that has a single button mouse) and select “Download” to cause the folder to be downloaded to your local hard disk as a ZIP file.

Then you use a file-decompression utility to expand the contents of this ZIP file to your NAS’s DLNA folder and make sure this is under a subfolder of its own in the DLNA folder.

Both these methods may allow you to “boil down” the folders so that you only have on your NAS the media files in that folder. This may involve a bit of hard work by you manually deleting the non-media files like executable programs, documents, PowerPoint presentations and PDF files.

Automatic sync method

Using FreeFileSync, Dropbox’s native front-end and your NAS to take advantage of a media pool

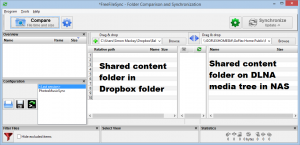
FreeFileSync sync job to automatically synchronise media from Dropbox folder to DLNA folder on NAS

FreeFileSync sync job to automatically synchronise media from Dropbox folder to DLNA folder on NAS

Some of you may set up on Dropbox an improved “media pool” where each of you can contribute photos and videos of a special event, something the lucky couple could do after a wedding for example. Or the proud parents may create a media pool of their best images and videos of their children for the doting relatives and friends to see. This could be something where relatives and friends can have “contribute” rights to so they can pool what the baby had done while in their care.

This could be set up instead of or alongside Facebook’s new photo-pooling feature so as to provide “best-quality” images, to support videos as well as not disenfranchising people who aren’t Facebook Friends of yours.

To do this, you install FreeFileSync on your regular computer which should also have the Dropbox front-end installed. As well, you create a subfolder in your NAS’s media folder accessible by its DLNA media server that represents this media pool. Then you set up up a manual or timed sync job in FreeFileSync which links to the Dropbox folder and the aforementioned subfolder on your NAS’s DLNA media folder.

Ideas to make Dropbox work this way

Your children’s life

As you have children, you will be taking photos of them and want to share some of these photos with your relatives and friends. As well, your relatives and friends take pictures of your children at events they attend or when they have your children in their care. Similarly, when you have their children in your care or attend their events, you end up taking pictures and videos of them.

Here, you could create a shared folder in Dropbox which has all the pictures that you and your relatives or friends copy pictures and videos to concerning your children during these times. Both you and these doting relatives and friends can then see the moments that are important.

That special celebration

One person that I know of used to create a “photo board” for their parties with their guests supplying pictures that they took to appear on this photo board. A Dropbox folder which you share with each of your guests can serve as the digital equivalent of this “photo board”.

For events like weddings where there is the likelihood of many celebrations along the way like the engagement party, bucks’ night and hens’ night, you could create a “master folder” with subfolders for each of the celebrations. This is so you can maintain a master theme for the group of celebrations while you have particular folders representing, for example, the wedding day.

They are in town

Your relatives or friends have come in to town to enjoy your town’s assets and catch up with you. Most likely you establish a Facebook album for the visit, knowing they are on Facebook. But you want them to have access to the higher-grade pictures, perhaps allow them to “pool” their pictures that they took and do more. Similarly, you want them to have these pictures end up on their NAS so they can view them on their DLNA-capable TV or print them out on their printer.

Here, you could create and share a Dropbox folder tree that represents this visit alongside the Facebook or Google+ albums that you set up with them. Then they take their pictures and videos and add them to this folder tree while you shoot your pictures and videos and contribute them to that tree. This could be done for each “phase” of the trip such as specific outings.

In memorium

You can use Dropbox and your DLNA-capable NAS to memorialise a relative or friend who has passed away. Here, you raid your physical photo albums and scan all of the best pictures or go through your digital photo collection and copy pictures of them in to a folder that is shared with contribute rights amongst the family and friends via Dropbox.

The pictures then are shared across Dropbox as a way of creating a group-based memorium of the deceased person

Business promotions

Having your DLNA-capable Smart TVs or Blu-Ray players play media off a DLNA-shared visual merchandising directory on your NAS can become a powerful business tool. Then you use a business-capable cloud service to keep your visual-merchandising material with it being synchronised to the DLNA-shared visual-merchandising directory can permit you to create the content from home or have others like PR teams and commercial artists contribute this content off-site with the goal of this material appearing on your displays.

Here, the sync routine could be set up on a daily or twice-daily basis for your on-site server or office computer so you always have fresh material available and on the screens regularly. This could be performed as a manual task or you could use FreeFileSync to synchronise the promotions folder on Dropbox to your NAS.

Conclusion

The new consumer and business cloud-based file sharing propagated by the likes of Dropbox, SkyDrive and Box.com can be easily integrated in to the DLNA Home Media Network once you use a NAS as your media server and can use a regular computer as part of the equation.

Using FreeFileSync to sync media files out to your NAS

You use a regular Windows or Macintosh computer to curate your pictures, music and video files and store these files on your computer’s hard disk. Then you buy a high-capacity network-attached storage device to make these files available on your home network at all times and also as a backup or “offload” measure.

Normally this will require you to use Windows Explorer or Macintosh Finder to copy the files out to the NAS every time you synchronise them out to your NAS. This can be annoying especially if you have made changes to a few of the files or added a handful of files to the collection such as the latest downloaded images or a CD “rip”. Here, you have to answer a file-owerwrite prompt that the operating system puts up every time you write over an existing file as part of a copy process and this can be awkward if you did something like modify your files’ metadata or edited a photo, You could select the “Yes to all” prompts but this runs a slow copy process which transfers redundant data or work through each folder and file manually and find that you hadn’t reflected all the changes you had to reflect..

There is a free open-source application called “FreeFileSync” which automates the process of keeping your files that exist on two locations in sync.  This is available for Windows, Macintosh OS X and Linux and can work with locally-mounted drives or SMB network-shared folders.

Here, you can set up a “there-and-then” sync job or create a sync job affecting certain files and folders on both the source and destination in a particular way. A sync job that you save can affect multiple pairs of files and folders thus avoiding the need to create one job for each folder pair.

Prerequisites

FreeFileSync must be downloaded and installed on your computer

You download FreeFileSync from FOSSHub or Download.CNET.COM and install it as you would for downloaded software for your operating system.

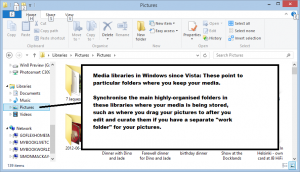
Identify on your computer where your media manager software is storing your music, photos and videos.

Media libraries in Windows 8.1

Media libraries in Windows 8.1

In iTunes, this is found under the “Advanced” tab in the Preferences menu. Windows Media Player and Windows Live Photo Gallery use the Pictures and Music or “My Pictures” and “My Music” libraries created by Windows. Other media-management tools may use a particular folder that you set in their options or preferences window as the place for their media library.

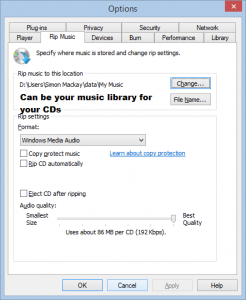
CD rip location in Windows Media Player

CD rip location in Windows Media Player

Most audio-based media management tools like iTunes and Windows Media Player typically use the library as their import folder for when you “rip” a CD or purchase music through their online store whereas a lot of photo and video tools may have you create a separate import folder away from your library for images and video you import from your camera or scanner. This then allows you toe edit the images and video before adding it to your library.

Identify and make available the “media” folders that you are using to store your media on your NAS.

A NAS that uses a DLNA media server and an iTunes media server typically references a folder tree like “Media”, “Shared Media”, “Shared Music” or something similar. These are typically at the “Public” SMB mount point and are accessible using SMB/CIFS as well as these media servers.

If your NAS uses one shared media folder, create a sub-folder for the music files, another for the images and home video and another for other video like “download-to-own” content.

Create a media sync job

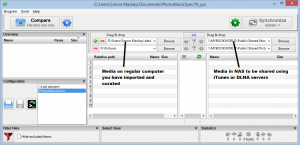
Setting up FreeFileSync for media syncing

Setting up FreeFileSync for media syncing

These actions are for a Windows computer and most NAS units

  1. Open FreeFileSync
  2. Click ProgramNew
  3. For each root folder representing your media collection kinds,
    a) Drag the root folder representing the media type on your computer to the left file list pane
    b) Drag the destination media folder for the media type on your NAS to the right file-list pane
    c) Click the + symbol to add extra media type pairs to your sync list.
  4. Click the gear icon next to the Synchronize button to determine the kind of synchronisation to take place
    In this case, you will have to select the “Update” option for this job. This effectively contributes new and modified files and folders that exist on the computer to the NAS without deleting any files that have been removed from the computer’s media folder. This is important if you just keep your files on your regular computer just to curate them before adding them to your media collection, or you “shift” older files to your high-capacity NAS to create space for newer files.
  5. Click on the “Update” button to select this option.
  6. Click on the “Save As” option to save this sync job as a file. Give it a name like “MediaSync” or “MediaNAS” to reflect the goal of it syncing your media to the NAS.

Manually running this sync job

Here, you open FreeFileSync, select the name of the “media sync” job and click “Synchronize” to start the sync process.

When to run this

Run the :FreeFileSync” job whenever you have done significant work on your media library like importing new media or editing existing media including the metadata. This can also be done as part of a backup routine before you start off the main data backup on your PC.