Tag: Windows Vista

Feature Article–DLNA Media Network Series: Getting Started With DLNA Media Sharing

Updated: 13 October 2013
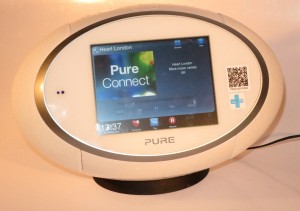
Pure Sensia 200D Connect Internet radioMost of us will end up with a large collection of picture, music or video files on our computers, especially if we use our computers as a large media library. It would be nice to have access to this content without having to copy it out to thumbdrives, SD cards or iPods before we can enjoy it.

As for music, this is more so as we buy music as digital-download files rather than buy physical media and copy it to our conputer’s hard disk. It will also become a trend if we visit video sites that offer video content on a download-to-own basis.

The instructions in this article are more focused with a person who is pressing a regular desktop or laptop computer running Windows, MacOS X or Linux as a media server and may be the way to go when you start out with DLNA especially if you are using a desktop comptuer.

Why share your music, pictures and video the DLNA way?

Sony BDP-S390 Blu-Ray Disc Player

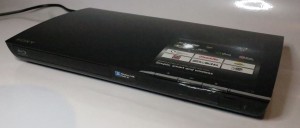
Sony BDP-S390 Network Blu-Ray Player – a Blu-Ray player that adds DLNA to an existing TV

An increasing number of dedicated network media client devices are on the market and nearly all of these devices work according to the UPnP AV / DLNA media-client standards.  Most manufacturers who are selling premium table radios are supplying at least one which can pick up Internet radio broadcasts through a home network and these sets are also capable of picking up media made available to them from a UPnP AV media server. We are also seeing an increasing number of wireless speakers that connect to your home network and receive music via Apple’s proprietary Airplay system or the common DLNA system. These units can be controlled by mobile devices equipped with controller apps.

Similarly, DLNA is becoming an important feature for any well-bred “smart TV” or similar video peripheral like a Blu-Ray player or home-theatre system that is connected to the Internet. The ubiquitous Xbox 360 and Sony PlayStation 3 games consoles that every teenage boy dreams of having both work according to these standards and this feature is becoming a requirement for up-and-coming TV-connected games consoles.

By using a DLNA-based setup, you don’t need to install different media-server programs for each network-media client that you happen to buy. In some situations, you may only need to run whatever is supplied with the computer’s operating system.

Setting up your network for DLNA media

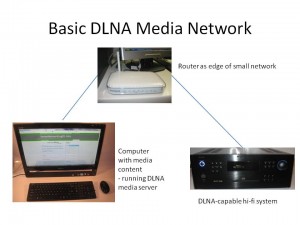
Basic DLNA Media Network

Basic DLNA Media Network

Most home, small-business and some branch-office networks don’t require any revision because they typically are one logical network that spans the premises with the router that exists at the network-Internet “edge” being the device that handles basic network housekeeping. This doesn’t matter whether the network has one or more media segments like WiFi wireless, Cat5 Ethernet or HomePlug powerline cabling.

You will need to know the ESSID and the WEP or WPA security key for your wireless network. This may be obtained through the router’s Web administration page or through your client PC’s wireless-network-setup parameters such as in Windows Connect Now. If you are connecting your DLNA media client to the network via wireless, you will need to make sure that the wireless access point or router is broadcasting the ESSID so you can pick it from a list using the device’s user interface and be sure you are “in reach” of the network. This practice would be important when you run a multi-access-point wireless network or simply to help with making sure that neighbouring wireless networks are set up properly. As well, you will need to be ready to enter the WEP or WPA security passphrase by “picking out” characters from a list using buttons on the device or its remote control.

Some networks such as the public-access networks provided by cafes and the like, including the headline “Wi-Fi Internet” that resort apartment developments provide won’t work well with DLNA. This is due to implementation of a Web-based login system as well as client isolation which doesn’t work with most DLNA-capable devices.

Setting up your PC jukebox or media server software for DLNA

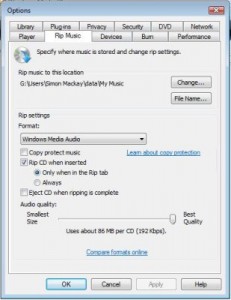
Settings for ripping CDs in Windows Media Player

Settings for ripping CDs in Windows Media Player

If you are running any Microsoft Windows version since Windows XP, you can use Windows Media Player 11 or newer versions as your media server. Before you start “ripping” CDs to the hard disk, make sure the program is set to rip without DRM (Copy Protect Music checkbox in the Rip Music options tab is cleared) and that it is set to rip CDs at 192kbps WMA or 320kbps MP3. The reason I would rip at these settings is to be assured of sound reproduction that is as close to the CD album as possible. You may use the MP3 codec for maximum compatibility or WMA for efficient storage if your DLNA media clients can handle WMA.

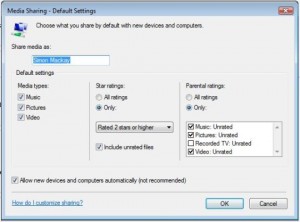
As well, you will have to set Windows Media Player 11 to automatically permit devices to benefit from its media library. This is done by going to “Library”, then selecting “Media Sharing” and clicking on “Settings”. The “Media Sharing – Default Settings” dialog box will open whereupon you make sure that the “Allow new devices and computers automatically” checkbox is selected.

If you don’t use any sort of ratings in your media as far as sharing is concerned, you may have to select “All ratings” in both the “Star Ratings” and “Parental Ratings” options. This will make sure all media is available for all of the devices.

Windows Media Player Sharing settings for DLNA

Windows Media Player Sharing settings for DLNA

For your pictures and videos, you will have to add the folder that contains your photos to Windows Media Player’s media library. Similarly, you will have to do this for your video folders.

Linux users have access to a large plethora of media-server software such as TwonkyMedia and TVersity as well as a large collection of open-source media-server software. You will still have to use a CD jukebox program set up to rip CDs at 320kbps MP3.

Apple and Windows users who use iTunes as their CD jukebox but will need to use either TwonkyMedia, PS3 Media Server or NullRiver MediaLink. They will need to make sure that the iTunes directory is the one to be provided by the media server. Again, iTunes will need to be set up to rip at 320kbps MP3 for best compatibility and quality. The program may support transcoding to lower bandwidth settings for use whenever music is being transferred out to an iPod.

Infact, I have written up some more detailed information about setting up an Apple Macintosh computer to work as part of a DLNA-based home media network because of the increasing popularity of these computers. The article, “UPnP AV (DLNA) for the Apple Macintosh platform”, covers other media server programs that exist for that platform.

The media server would need to be set up to work with the folders that are being used as the primary folders for music, photo and video storage.  I have explained how to go about this for your music, especially if you use iTunes or Windows Media Player. For your photos and videos, you simply add the folders used by your photo management and video management software to store your images.

As well, if you, a friend or associate uses SkyDrive, Dropbox or similar cloud-based storage services to share a media collection, you may need to copy the media that you received through the sharing to your media library to share them via DLNA. Similarly, images shared through the Social Web may need to be downloaded from the service to your media folder.

The DLNA media-server programs typically index music files according to artist, album, track, genre, and some may support separate identification of composers, contributing artists (important for soundtracks and compilation albums) and other metadata for pictures and videos. Some, like TwonkyMedia, allow for alphabetical clustering and other efficient sorting arrangements. This is typically because UPnP AV / DLNA allows for the server to determine how it presents the library to the client devices.

As far as playlists are concerned, they will typically be listed in a “Playlists” collection with each playlist being its own collection in that tree. By having a playlist as a collection of tracks rather than a reference to a playlist file, it means that the media clients don’t have to be compatible with the playlist file format that the jukebox program works with.

Some of the media servers like Windows Media Player 11 or TwonkyMedia support transcoding to common file formats for situations where a DLNA media client cannot handle a particular media type. This can come in handy for file types like WMA or high-definition audio files which aren’t handled by all UPnP AV media players.

Setting up the DLNA clients

Enrolling the DLNA clients in to your network

You will need to make your DLNA media client become part of the network. This can be a simple task of plugging it in to your Ethernet network segment or into your HomePlug powerline network segment using a HomePlug-Ethernet bridge.

Integrating wireless-enabled DLNA clients to the wireless network

If you are connecting your wireless-enabled DLNA media client to the WiFi network, you will need to configure it for this network. This will require you to enter the device’s setup menu and select the option pertaining to wireless network setup. Then you get the device to search for your network’s ESSID which is commonly referred to as the SSID, Network Name or something similar. Once your device has detected your wireless network, you will be prompted to enter the WEP or WPA security passphrase. At this point, enter the passphrase in to the device. These procedures will have to be done as mentioned in the “Setting up your network for DLNA media” section.

Nearly all of the recent DLNA network media clients may use a “quick set-up” method like Windows Connect Now or WPS. This will typically involve either transferring a USB memory key between a Windows XP or Vista wireless-equipped notebook computer and the device; or registering the device with the wireless router. This procedure may be as simple as pressing a “register” or WPS button on the router and the device or copying the device’s PIN number (which would be on the device itself or in a WPS setup option in the device’s setup menu) in to the wireless router’s setup menu.

If you use MAC-address filtering on your wireless router, you will need to register the DLNA media device as an “accepted” network device. This will require you to copy the device’s wireless MAC address, which will be on a sticker attached to the device itself, in to the router’s trusted MAC-address list.

Making sure the DLNA clients detect the media server

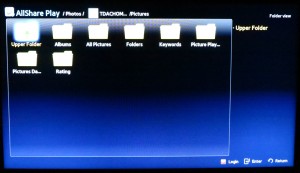
DLNA media directory provided by server PC

DLNA media directory shown on TV screen as provided by PC

You will need to make sure that the media server program is running on the PC that has the media that you are sharing. Most such programs may run a media server component as a background task while the computer is fully on but some may require the jukebox program to be running all the time. Similarly, you may bave to stop your computer going to sleep or hibernate mode under automatic control for this to work properly.

Another thing to check is the desktop firewall software. This should be set to allow the media server software outbound and inbound access to the network as a server. The Windows Firewall software that is part of all Microsoft desktop operating systems since Windows XP Service Pack 2 makes this easy by allowing immediate access to Windows Media Player or asking you if you want to allow the application to have network access. Other third-party firewalls may require the server application to be allowed Internet access by you adding the software to their application “white lists”.

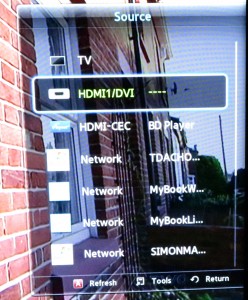
DLNA collections listed as sources on the TV

DLNA content collections listed as sources on a Samsung Smart TV

You may have to select “Network Music”, “PC Music” or something similar on most network-enabled music devices like Internet radios in order to gain access to the music library that you have made available.  Then you select the “hostname” of the PC, which may be commensurate to its standard computer name or its primary owner’s name. The DLNA client will then show the media type that it can work with. You then select that type and use the controls to select the media you are interested in.  Some devices like the recent crop of Samsung Smart TVs list each DLNA server on the home network they are connected to either as a source alongside the integrated TV tuner or external connections on that device.

Summary

Once you have your network and media-server computer set up properly, you can work with providing music and other media to network media receiver devices without much hassle.

Understanding the Browser-Choice Screen – Updated

News articles

Microsoft offers web browser choice to IE users | BBC Technology (UK)

Microsoft about to offer Windows users a browser choice screen | The Guardian Technology Blog (UK)

La concurrence entre navigateurs web relancée en Europe | DegroupNews (France – French language)

From the horse’s mouth

The Browser Choice Screen for Europe: What to Expect, When to Expect It | Microsoft On The Issues (Microsoft)

UPDATE: The Browser Choice Screen for Europe – Microsoft On The Issues (Microsoft)

European Union press release about the Browser Choice screen

Browser Choice Screen shortcut (available anywhere in the world)

http://browserchoice.eu

Advocacy site

OpenToChoice.org (Mozilla)

My comments and further information

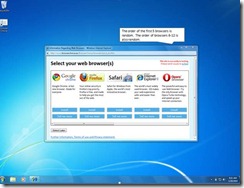
If you run a version of Windows XP, Vista or 7 that you bought in Europe and your default browser is Internet Explorer 8, you may be required to complete a “browser-selection” ballot screen, known as the Browser Choice screen, to determine which browser your computer should run as its default browser. It may not happen if you ran another browser as a default browser, then came back to Internet Explorer 8. It also will happen to European migrants who had brought out their Windows computers with them.

You will have to work through a “wizard” which has an introduction screen then the list of browsers presented in a random order. Once you choose that browser, it will be determined as your default Web-browsing tool every time you go to a Web page. If the browser isn’t installed on your system, the software will be downloaded from the developer’s site and installed in to your system. browser_choice_1_clip_image002_136F9F12

If you run Windows 7, the Internet Explorer “e” logo will disappear from the Taskbar, but you can still find it in your Start Menu. Then, you will be able to reattach it to your Taskbar by right-clicking on the program in the Start Menu and selecting “Pin to Taskbar”.

The Browser Choice screen will subsequently become available as another method of changing default browsers, alongside the options available when you install, update or run a Web browser.

There are some issues you may run into if you move from Internet Explorer 8 to another browser. One is that you won’t have your RSS feeds held in the Common Feed List which works as part of Windows Vista and 7. This may affect the addition of new feeds to programs that make use of the Common Feed List as their RSS data store. Similarly, Windows 7 users won’t benefit from having the tabs viewable in Aero Peek’s multi-window preview. This issue may be resolved with versions of the alternative browsers being built to work tightly with the host operating system’s features, which can be achieved with the Windows application programming interface information being made available by Microsoft.

At the moment, there isn’t a program that adds installed browsers to the shortcut menu when you right-click on a Web link. Such a program would benefit Web developers and bloggers who want to test a page under different browsers or people who want to “spread the Web-viewing load” amongst different clients.

Author recommendations (in no particular order)

I recommend any of these browsers because users don’t have to relearn the user interface if they switch between any of them.

Mozilla Firefox

Internet Explorer

Opera

Safari

Microsoft Internet Explorer antitrust case resolved by European Union

 EU resolves Microsoft IE antitrust case | Microsoft – CNET News

From the horse’s mouth

European Union

Microsoft’s press release

My comments on this issue

Previously, there was talk of Microsoft having to supply European customers with “browser-delete” options for copies of Windows 7 operating system where they would have to explicitly download their browser of choice and wouldn’t be able to “get going” with Internet Explorer. Now, there is the requirement to provide a “browser-select” screen when you can install any of 12 alternative browsers and nominate one of the other browsers as the default browser. This will have the browsers organised in a random order so as not to favour Internet Explorer or a “browser-skin” with hooks to the Internet Explorer code.

One main improvement that I had liked about this is that you can deploy more than one browser from the “browser-select” screen, which will please Web-site developers who want to test their site in other browser environments. Similarly this will please users who are testing browsers for a proposed usage environment or replicating problems encountered with a particular browser.

It will be feasible for a computer supplier to “run with” a different default browser yet consumers can choose whichever browser suits them better. This would be more so with operations like Dell or the small independently-run High Street computer shops who build computers “to order” for individuals, rather than suppliers like HP/Compaq or Toshiba who build systems to particular packages to be sold through electronics chain stores.

The only issue is whether an individual or organisation can determine a particular browser as part of a Windows-based “standard operating environment” when they specify their computer equipment and not have to pass through the “browser-select” screen. Also, what will be the expectation for any proposed computer fleets and “standard operating environments”? Will the company who buys the computer equipment be able to determine which is the default browser for their environment or will they be required to allow individual staff members / end-users to choose which browser they are to work with? The reason I am raising this issue is because in some countries within the EEA like France, there is an organised-labour culture where the trade unions can exercise a lot of influence over what goes on in a workplace.

Another issue that may need to be raised is whether the European-specific “browser-choice” arrangements will be available outside of the European Economic Area. This may be of concern to independent system builders who may want to assure customers of browser choice as a differentiating factor or local, state or federal government departments who may want to be assured of this for computers supplied as part of their IT programs operating in their area or as part of a legislative requirement for their area. It may also be of benefit to PC users who want to load their computers with many browsers so as to, for example, test a Web site under many operating environments.

RAW Image Support – W7/Media Center 32/64 bit « digitalmediaphile

RAW Image Support – W7/Media Center 32/64 bit « digitalmediaphile

http://www.fastpictureviewer.com/codecs/ 

My comments on these codecs

Barb Bowman (http://digitalmediaphile.wordpress.com) has found a useful resource on this website http://www.fastpictureviewer.com/codecs/ for those of you who want to keep the Windows platform relevant to your high-end digital photography needs.

Here, this site provides downloadable codecs and plugins that work properly with the RAW image files that are part of high-end digital photography. Some of these codecs may work directly with Photoshop for Windows or simply become Explorer codecs for use in thumbnails and Windows Live Photo Gallery.

The main thing I have liked about this is that the codecs don’t cost anything and, from Barb Bowman’s experience, aren’t likely to bog your computer down. This may avoid the need to just use the Apple Mac for your digital-imaging needs.

Feature Article – Repurposing that ex-business laptop computer for home use

Originally published at my previous Windows Live Spaces blog in May 2007
First published on this blog in November 2008. Updated 31 July 2009
 
If you are repurposing an ex-business laptop computer for home use, you need to make sure that it is safe as far as the computer’s former life is concerned and able to perform well in the home. Here, you would need to “detach” the computer from its former business life by removing line-of-business applications and data; and business-specific configurations like network, VPN and terminal-emulation setups used in the business. In some situations like ex-kiosk computers where the computer was heavily locked down, you may have to research the Internet to find out how to reset the BIOS settings so you can boot from the optical drive for example.
 
1. Make sure that you have the original media and licence information for the operating system and any other software to be used in the home context.
2. Visit the computer manufacturer’s Website and obtain the complete driver set for the computer’s current configuration. Copy this driver set to a CD-R or USB memory key. You might find it better to work the computer directly with the operating system’s abilities like Windows Zero Configuration rather than use the software supplied by the system manufacturer.
3 Do any necessary repairs to the computer like replacing damaged keyboards. This could be a good time to track down replacement batteries, AC adaptors or AC cords for the computer. If the computer doesn’t have built-in wireless or isn’t able to have wireless networking retrofitted at a later date, track down a wireless-network PCMCIA card or ExpressCard to suit your home network.
4. Format the primary hard disk and install the operating system and other software from the original media. Activate XP / Vista / Windows 7 and Office as applicable and deploy the driver set from the CD-R or USB memory key that you prepared in Step 2.
5. Register the computer with network services that are part of the home network like the network printer. If the printer is hosted by a Windows box, you may be able to set it up using “Point and Print” where you load the printer drivers from the Windows box.
 
As far as software is concerned, you can use a basic “office” package like Microsoft Office Home and Student Edition as well as Screen Paver (the shareware photo screen-saver that I use) and the latest version of AVG AntiVirus Free Edition or Avast AntiVirus Home Edition for your additional software. Most functionality is catered for by the software that is part of the operating system.
 
If you are working with a Windows-based computer, it may be worth downloading Windws Live Mail, Windows Live Messenger and Windows Live Photo Gallery from http://download.live.com . These programs provide the essentials for instant mesaging, desktop POP3 or IMAP mail, RSS-feed management and digital-image management.

Getting the most from Windows Vista

Over the past few weeks, I had received a recent-issue motherboard, CPU, graphics card and RAM as a gift from a friend who likes to “tinker” with computers. Then I had moved my Windows Vista-based installation to this installation and had noticed a significant difference in the performance of this operating system.

Previously I was running Windows Vista on a very old motherboard, CPU and graphics card and it was definitely sluggish. This was more so with how the system handled graphics and the older setup had a Windows Experience Index of 1.0 with the graphics card holding it down. The card was an older AGP-based card with an older ATI chipset that didn’t have drivers optimised for proper operation under Vista.

Now the system is reporting a 3.0 Windows Experience score with the ability to use the full Windows Aero Glass trim and quicker response from the display.

You are much safer buying a new computer if you want to work with Windows Vista. On the other hand, if you intend to deploy Vista to an existing computer, make sure that the system is running with hardware made since 2006. You have a greater chance of the computer performing properly for Vista and working with drivers that take advantage of this operating system.

Vista SP2 to land in April 2009-ish? – The Register

http://www.theregister.co.uk/2008/12/01/vista_sp2_april_rtm/

My comments

At least there is some accurate information regarding the arrival of Vista Service Pack 2 and what it will contain. This service pack could draw more people towards Windows Vista and offer something that can avoid the idea of going “back to XP”.

At least there are a few options that may benefit the laptop user and the modern WiFi-driven home computing environment. One would be to work hand in glove with WPS configuration as more routers come with “over-the-air” WPS configuration. As well, the Bluetooth Feature Pack which will offer what is expected of a Bluetooth setup will be available for people who buy Bluetooth functionality independent of the operationg system. This would encompass system builders; and those of us who provide Bluetooth functionality via an aftermarket device such as a USB dongle or move to Vista by buying it through the retail channel. The other desireable feature would be for the operating system to “natively” burn data to Blu-Ray discs; which would definitely come in handy with backing up hard disks or archiving old data.

In my honest opinion, this service pack can “tide us over” until Windows 7 comes on the scene as the next operating system.

Come on “I’m A PC”!

Feature Article – DLNA Media Network Series: Getting Started with DLNA Media Sharing

UPDATED 26 January 2010

Most of us will end up with a large collection of picture, music or video files on our computers, especially if we use our computers as a large media library. It would be nice to have access to this content without having to copy it out to thumbdrives, SD cards or iPods before we can enjoy it.

Why share your music, pictures and video the DLNA way?

An increasing number of dedicated network media client devices are on the market and nearly all of these devices work according to the UPnP AV / DLNA media-client standards. The ubiquitous Xbox 360 and Sony PlayStation 3 games consoles that every teenage boy dreams of having both work according to these standards. Most manufacturers who are selling premium table radios are supplying at least one which can pick up Internet radio broadcasts through a home network and these sets are also capable of picking up media made available to them from a UPnP AV media server. I have reviewed a few of these units in this blog lately, such as the Pure Evoke Flow and the Revo iBlik RadioStation. This same function is increasing becoming a product differentiation feature for most consumer electronics equipment like home-theatre receivers and flat-screen televisions.
 

004 - Denon S-52 network audio receiver playing Pink Floyd over the network

  
Denon S-52 Wireless Network CD Music Systm (DLNA enabled)
  
005 - Tivoli Networks Radio
Tivoli NetWorks Internet Radio (DLNA enabled)
 
By using a DLNA-based setup, you don’t need to install different media-server programs for each network-media client that you happen to buy. In some situations, you may only need to run whatever is supplied with the computer’s operating system.

Setting up your network for DLNA media

Most home, small-business and some branch-office networks don’t require any revision because they typically are one logical network that spans the premises with the router that exists at the network-Internet “edge” being the device that handles basic network housekeeping. This doesn’t matter whether the network has one or more media segments like WiFi wireless, Cat5 Ethernet or HomePlug powerline cabling.
 
You will need to know the ESSID and the WEP or WPA security key for your wireless network. This may be obtained through the router’s Web administration page or through your client PC’s wireless-network-setup parameters such as in Windows Connect Now. If you are connecting your DLNA media client to the network via wireless, you will need to make sure that the wireless access point or router is broadcasting the ESSID so you can pick it from a list using the device’s user interface and be sure you are “in reach” of the network. This practice would be important when you run a multi-access-point wireless network or simply to help with making sure that neighbouring wireless networks are set up properly. As well, you will need to be ready to enter the WEP or WPA security passphrase by “picking out” characters from a list using buttons on the device or its remote control.
Home Network with DLNA equipment
 

Network layout


Setting up your PC jukebox software for DLNA

If you are running Windows XP, Vista or 7, you can use Windows Media Player 11 or Windows Media Player 12 (in the case of Windows 7) as your media server. Before you start “ripping” CDs to the hard disk, make sure the program is set to rip without DRM (Copy Protect Music checkbox in the Rip Music options tab is cleared) and that it is set to rip CDs at 192kbps WMA or 320kbps MP3. The reason I would rip at these settings is to be assured of sound reproduction that is as close to the CD album as possible. You may use the MP3 codec for maximum compatibility or WMA for efficient storage if your DLNA media clients can handle WMA.
.Windows Media - CD ripping settings
 
As well, you will have to set Windows Media Player 11 to automatically permit devices to benefit from its media library. This is done by going to “Library”, then selecting “Media Sharing” and clicking on “Settings”. The “Media Sharing – Default Settings” dialog box will open whereupon you make sure that the “Allow new devices and computers automatically” checkbox is selected.
If you don’t use any sort of ratings in your media as far as sharing is concerned, you may have to select “All ratings” in both the “Star Ratings” and “Parental Ratings” options. This will make sure all media is available for all of the devices.
Windows Media - Media Sharing settings
For your pictuers, you will have to add the folder that contains your photos to Windows Media Player’s media library. Similarly, you will have to do this for your video folders.
 
 
Linux users have access to a large plethora of media-server software such as TwonkyVision and TVersity as well as a large collection of open-source media-server software. You will still have to use a CD jukebox program set up to rip CDs at 320kbps MP3.
 
Apple and Windows users who use iTunes as their CD jukebox but will need to use either TwonkyVision, Elgato EyeConnect or Allegro Media Server. They will need to make sure that the iTunes directory is the one to be provided by the media server. Again, iTunes will need to be set up to rip at 320kbps MP3 for best compatibility and quality. The program may support transcoding to lower bandwidth settings for use whenever music is being transferred out to an iPod.
 
Infact, I have written up some more detailed information about setting up an Apple Macintosh computer to work as part of a DLNA-based home media network because of the increasing popularity of these computers. The article, “UPnP AV (DLNA) for the Apple Macintosh platform”, covers other media server programs that exist for that platform.
 
 The media server would need to be set up to work with the folders that are being used as the primary folders for music, photo and video storage.  I have explained how to go about this for your music, especially if you use iTunes or Windows Media Player. For your photos and videos, you simply add the folders used by your photo management and video management software to store your images.
 
 
 The DLNA media-server programs typically index music files according to artist, album, track, genre, and some may support separate identification of composers, contributing artists (important for soundtracks and compilation albums) and other metadata for pictures and videos. Some, like TwonkyVision, allow for alphabetical clustering and other efficient sorting arrangements. This is typically because UPnP AV / DLNA allows for the server to determine how it presents the library to the client devices.
 
As far as playlists are concerned, they will typically be listed in a “Playlists” collection with each playlist being its own collection in that tree. By having a playlist as a collection of tracks rather than a reference to a playlist file, it means that the media clients don’t have to be compatible with the playlist file format that the jukebox program works with.
 
Some of the media servers like Windows Media Player 11 or TwonkyVision support transcoding to common file formats for situations where a DLNA media client cannot handle a particular media type. This can come in handy for file types like WMA which aren’t handled by all UPnP AV media players.
 

Setting up the DLNA clients

Enrolling the DLNA clients in to your network

You will need to make your DLNA media client become part of the network. This can be a simple task of plugging it in to your Ethernet network segment or into your HomePlug powerline network segment using a HomePlug-Ethernet bridge.

Integrating wireless-enabled DLNA clients to the wireless network

If you are connecting your wireless-enabled DLNA media client to the WiFi network, you will need to configure it for this network. This will require you to enter the device’s setup menu and select the option pertaining to wireless network setup. Then you get the device to search for your network’s ESSID which is commonly referred to as the SSID, Network Name or something similar. Once your device has detected your wireless network, you will be prompted to enter the WEP or WPA security passphrase. At this point, enter the passphrase in to the device. These procedures will have to be done as mentioned in the “Setting up your network for DLNA media” section.
 
Some DLNA network media clients may use a “quick set-up” method like Windows Connect Now or WPS. This will typically involve either transferring a USB memory key between a Windows XP or Vista wireless-equipped notebook computer and the device; or registering the device with the wireless router. This procedure may be as simple as pressing a “register” button on the router and the device or copying the device’s PIN number (which would be on the device itself or in a WPS setup option in the device’s setup menu) in to the wireless router’s setup menu.
 
If you use MAC-address filtering on your wireless router, you will need to register the DLNA media device as an “accepted” network device. This will require you to copy the device’s wireless MAC address, which will be on a sticker attached to the device itself, in to the router’s trusted MAC-address list.

Making sure the DLNA clients detect the media server

You will need to make sure that the media server program is running on the PC that has the media that you are sharing. Most such programs may run a media server component as a background task while the computer is fully on but some may require the jukebox program to be running all the time.
Another thing to check is the desktop firewall software. This should be set to allow the media server software outbound and inbound access to the network as a server. The Windows Firewall software that is part of all Microsoft desktop operating systems since Windows XP Service Pack 2 makes this easy by allowing immediate access to Windows Media Player or asking you if you want to allow the application to have network access. Other third-party firewalls may require the server application to be allowed Internet access by you adding the software to their application “white lists”.
You may have to select “Network Music”, “PC Music” or something similar on most network-enabled music devices like Internet radios in order to gain access to the music library that you have made available.  Then you select the “hostname” of the PC, which may be commensurate to its standard computer name or its primary owner’s name. The DLNA client will then show the media type that it can work with. You then select that type and use the controls to select the media you are interested in.

Summary

Once you have your network and media-server computer set up properly, you can work with providing music and other media to network media receiver devices without much hassle.