Category: Operating system issues

Some apps on your Android device crashing lately? WebView may be the culprit

Article

Android main interactive lock screen

Apps crashing frequently on your Android smartphone or tablet? Check out Webview – it may be the culprit.

Android apps like Gmail are crashing and ‘WebView’ is to blame | Engadget

My Comments

You may have found that with your Android phone some apps like news apps, email apps or online banking apps are crashing lately. It will also affect apps or games that use advertising and the app or game crashes when an ad appears.

This is to do with the Webview system app that allows a native Android app to utilise Google Chrome’s logic to show Web-based HTML content within the app’s user interface. But a recent version of this app has been found to be buggy and is responsible for causing these software crashes.

A temporary fix that has been put forward is to uninstall the latest Chrome updates on your Android device. Or you go to the Google Play Store or the Settings – Apps menu to uninstall Android System Webview.

But Google have lately worked on a bugfix for this problem and are now rushing this out as a software update for Chrome and Webview. These are expected to be delivered as part of the latest Google Play software updates and should be delivered by 24 March 2021. On some devices, you may find that these updates are delivered as separate packages.

Once these are updated, you shouldn’t find your apps that use Web-based content crashing frequently.

Identifying the end-of-support date for your Chromebook

Article

Dell Chromebook 13 press image courtesy of Dell Inc.

You can find out the end-of-support date for that Chromebook or other Chrome OS computer

How to check a Chromebook auto-update expiration date before you buy – CNET

Resource

Auto Update Expiration date for most Chrome OS computer models (Google)

My Comments

Google has defined for your Chromebook or other Chrome OS based computer an end-of-support date where they will stop providing software updates to that computer. This date, known as the Auto Update Expiration date, is agreed by Google and the device manufacturer due to Google not being able to guarantee Chrome OS support for particular hardware setups after that date.

This is important if you are passing on a Chromebook to someone else or buying one on the secondhand market. As well, there is a common issue especially with Chrome OS devices where manufacturers, distributors and retailers get rid of excess inventory representing last-year’s models during the peak shopping seasons.

You may find that some systems, especially those that are part of a “managed” Enterprise or Education setup may have longer support lives as far as software-quality updates are concerned. But this kind of extended support may only apply while the machine is part of that setup which can be of concerned when a school or workplace sells its Chromebook fleet as part of a tech upgrade.

Google maintains an ongoing list of Chromebook, Chromebase and Chromebox models that are in circulation and are approved by them on this page. If you are dealing with a Dynabook-branded device, you will have to look for the Sharp brand because Toshiba had sold their personal computing business to Sharp under the Dynabook brand.

But if you have access to the Chromebook in question, you can check the AUE date for that particular machine.

  1. Open the Settings menu by clicking on the time then click on the gear-shaped Settings icon.
  2. On the left navigation panel which you may have to bring up by clicking the three-bar icon, you should see the “About Chrome OS” information. Click that option to see more details about the current version and other details of your Chrome OS setup on your Chromebook.
  3. The Additional Details area in that screen, which you may have to click on, will show the AUE date for your particular Chromebook.

In November 2020, Google has realised that the Chrome OS platform is a viable third force when it comes to the regular computer. Here, one of the changes they are offering is that Google will assure longer support lives for newer Chromebooks typically in the order of 7 or 8 years. But they should also look at ways to extend this date for earlier Chromebooks that are in current usage.

Thunderbolt dock may be behaving erratically under Windows 10. What can you do?

Article

Dell XPS 13 8th Generation Ultrabook at QT Melbourne rooftop bar

Simply restarting your Thunderbolt-3-equipped computer may correct problems you have with any Thunderbolt 3 docks attached to it.

Microsoft Warns of Uncommon Windows 10 Thunderbolt Issue | Bleeping Computer

From the horse’s mouth

Microsoft Support

Devices connected through a Thunderbolt Dock stop working after the computer resumes from the S5 power state (Support article)

My Comments

You may find that your Thunderbolt-3-equipped computer may show up a problem with its Thunderbolt 3 connection if it is running a recent build of Windows 10.

This will happen when you are using a Thunderbolt 3 dock or a Thunderbolt 3 peripheral like a display or external graphics module that has dock functionality where you can connect multiple peripherals. As well, it may encompass Thunderbolt 3 devices that have user-removable or user-replaceable storage media like memory-card readers, SATA hard-disk interfaces or optical drives.

It will be common with those of us who have a laptop computer and establish one or more workspaces equipped with a full-sized keyboard, mouse and one or two large screens then use a dock for one-cable connection and disconnection. You may also be connecting one or more storage devices like USB hard disks, memory keys or optical drives to the dock for extra storage functionality.

The problem will manifest if you have Fast Startup enabled on your Windows 10 laptop. This mode, which will most often be set up by default and to come in to play when you close up your laptop, will dump from RAM to the internal hard disk or SSD what is needed to bring your computer to the login screen when you close the computer’s lid or quickly press the Power button.

The symptom will show up if you do the following practices regularly:

  1. connect the computer to the Thunderbolt dock, finding that all peripherals connected to the dock are present and functioning as far as Windows is concerned.
  2. power-down the computer by pressing the Power button for a long time or instigate a shutdown procedure from within Windows with the goal to have it fully turned off.
  3. disconnect the Thunderbolt dock from the computer once you see the screen go black
  4. let the computer completely power down
  5. connect the Thunderbolt dock to that computer and wait for it to stabilise
  6. turn on the computer like normal

Here, the peripherals connected to that Thunderbolt dock will register with Windows and be present in the operating system’s Device Manager. But they won’t function as expected like you won’t have any input from the full-sized keyboard or mouse nor would the storage devices be available for use by Windows and its applications.

This behaviour happens very occasionally and you may normally disconnect and reconnect the dock to force Windows to “rediscover” the associated peripherals.

But what can you do to rectify this problem? Here, it is a simple process of fully shutting down then restarting your computer using the Shutdown or Restart procedure in Windows without disconnecting the Thunderbolt dock. Here, you have to wait until all the lights on the computer are off, not just the screen, when you instigate the Shutdown procedure this time.

With this process, you are making sure that during the boot cycle, the Windows operating system is properly taking stock of all the peripherals that are connected to the Thunderbolt dock and making sure they are properly available “to the computer”. This includes enforcing the dock to reset itself and create a fresh inventory of what is connected to or integrated in it to present to the host operating system.

You may also find that fully restarting your computer if peripherals connected to a hub, dock or similar device aren’t working properly no matter the connection method or operating system.

Why is there an audio driver with your computer’s graphics chipset?

The HDMI and DisplayPort outputs make use of the display audio device driver for sound they send to the external display

Some of you may take stock of what device drivers and software exist on your Windows computer and may find two or more audio device drivers on your computer with one being referred to as an “HDMI” or “Display” audio driver. Such a driver will have a reference to the graphics chipsets that are installed in your computer. Why does this driver exist and how could I take advantage of this setup?

The standard audio setup

Most computers are nowadays equipped with an on-board audio infrastructure of some sort. This was initially a sound card but is nowadays an on-board audio chipset like Realtek or Intel HD Audio. Here, it would have its own digital-analogue audio circuitry and would be serving integrated speakers or audio equipment like computer speakers that are connected to the computer’s own audio jacks.

The better implementations would have an SP/DIF audio output which would serve an outboard digital-analogue converter or digital amplifier. In this case, the audio infrastructure would repackage the sound in to an SP/DIF-compliant form either as a PCM stream or a bitstream supporting Dolby Digital.

In this case, the above-mentioned sound infrastructure would work with its own driver software and be listed as a distinct audio device in Windows. With most of the recent laptops that have sound tuning provided typically by a name-of-respect in the professional-audio or hi-fi scene, this driver also has the software component that is part of this tuning.

HDMI and DisplayPort adds a point of confusion

Windows Sound Control Panel

HDMI output for monitor as a unique audio playback device in Windows

HDMI and DisplayPort display connections have the ability to transport a digital audio stream along with the video stream over the same cable. Therefore, display-chipset and graphics card manufacturers have had to support digital-audio transport for host-computer audio through these connections.

In some early setups, it required that the computer’s sound card or audio chipset expose a digital-audio stream via the HDMI or DisplayPort connection. With graphics cards, this typically required a wired connection between an SP/DIF digital output on a sound card or motherboard audio chipset and a digital input on the graphics card.

But recent implementations used a cost-effective digital-audio processor as part of the graphics infrastructure which simply repackages the digital audio stream from the host computer to a form that can be handled by the display or audio device connected via the HDMI or DisplayPort connection. During the initial setup of an HDMI or DisplayPort connection, it will be about determining what audio codecs, bit-depths and sampling frequencies the connected monitor, TV, home-theatre receiver or other audio-equipped device can handle.

Sony STR-DN1060 home theatre receiver press picture courtesy of Sony America

If you connect your computer to your monitor or TV even via the HDMI connections on one of these home-theatre receivers, you will be using the HDMI audio subsystem and display audio driver as outlined here

This also applies to computers and display setups that use the USB-C port as a “DisplayPort alt” connection like some of the laptops that have come my way for product review. But if you are using a USB-C expansion module that has audio connections, you may find that this device may use a USB-based sound chipset to serve those connections. Typically this chipset will use the USB Audio Device class drivers that are part of the operating system rather than the “display audio” drivers.

If you connect your computer to your display via an HDMI audio device like a home-theatre receiver, soundbar or HDMI audio adaptor, you will find that the audio device will be identified as the sound-output device for the “display audio” device.

In this case, you would see another audio device listed in your computer’s audio device list with a name that references your computer’s graphics chipset like Intel Display Audio or AMD HDMI Audio. The only audio-endpoint device that these drivers refer to are whatever audio device is connected to your computer’s HDMI or DisplayPort connection.

In-room AV connection panel

If you use the HDMI input on your in-room AV connection panel like this one at Rydges Melbourne, you would have to use the “display-audio” sound driver for your computer’s sound

Where you connect a computer to a speaker-equipped display or audio device that uses HDMI / DisplayPort alongside a traditional audio input connection like RCA or 3.5mm jack, the “display audio” driver would be used while you use the HDMI or DisplayPort connections. This also applies to the device connection panels you may find in your hotel room and you connect your laptop to the HDMI input on these panels. In this case, you have to use the “display audio” driver when you select the “virtual channel” or source associated with the HDMI input.

What do I do about the existence of these “display audio” drivers?

If you are trying to rationalise the driver software that exists on your computer, don’t remove the “display audio” or “HDMI audio” drivers associated with your computer’s graphics infrastructure. This is because if you connect a TV, monitor with speakers or home-theatre audio device to your computer via the HDMI or DisplayPort connections and you remove the “display audio” driver, the sound won’t play through devices connected via those connections.

Instead, keep these “display audio” drivers up-to-date as part of updating your computer’s graphics-infrastructure software. Here, it will preserve best compatibility for the communications, games and multimedia software and Websites you run on your computer if you are using audio-capable devices connected via HDMI or DisplayPort along with this audio-capable hardware hanging off these ports.

Also remember that if you are using an audio-capable display device connected via the HDMI or DisplayPort connections, you need to use the “diisplay audio” driver to hear your computer’s or application’s sound through that device. This may require you to have it as a “default sound playback device” for software that doesn’t support audio-device switching like Spotify or Web browsers.

Computer systems with multiple graphics chipsets

Computer systems that implement multiple graphics chipsets may also run multiple “display audio” drivers for each chipset. Here, the audio to be sent via the HDMI or DisplayPort output would be processed by the “display audio” chipset for the currently-used chipset.

Some setups may require you to manually select the “display audio” chipset that you are using when you are directing the sound via your audio-equipped display device. This may especially apply to the use of external graphics modules.

But on the other hand, a multiple-graphics-chipset computer may implement a virtual “display audio” or “HDMI audio” driver that automatically steers sound output to the HDMI or DisplayPort device via the currently-used graphics chipset without you needing to intervene. This kind of driver will be relevant with computers that implement NVIDIA Optimus or similar logic to automatically select the appropriate chipset depending on whether you are after high graphics performance or longer battery runtime.

A solution for “steering” Windows sound output towards the devices you want

You can steer particular applications’ sound through your laptop’s HDMI output using the display audio driver

When I installed the Windows 10 April Update (Build 1803) on my computer, I had found the improved sound-management ability that this operating system update offers can make better use of this arrangement. I chose to create a sound setup to steer multimedia to better sound outputs while keeping the audio prompts that Windows makes during errors towards a lower-quality output and documented how this is done.

Here, the “display audio” driver will earn its keep as a way to allow the speakers in your smart TV, home-theatre setup or audio-equipped monitor connected to your computer’s HDMI or DisplayPort output to be used only by the software that you want.

There are two situations that this will encompass. One is to have a laptop connected to the large TV or home-theatre setup for some Netflix binge-watching or full-on game-playing but you rather have Windows sound its notification sounds through the laptop’s own small speakers.

The other is where you use a monitor with not-so-great speakers as your primary display but want music or other multimedia to come out through a better sound system connected to your computer. It also includes desktop computers used in an AV playout role with a projector and PA system conveying the audio-video content to the audience but using a monitor with not-so-great speakers as the operator’s display.

The first situation involving a laptop would have the standard audio driver serving the integrated speakers set up as a “default” sound device while the Web browser, game or multimedia software uses the display-audio driver as the output device. The second situation using a monitor with not-so-great speakers would have the display-audio driver as the default driver while the Web browser or multimedia software handling the AV content to be played to the audience uses the audio driver associated with the better sound system.

Conclusion

Simply, the “display audio” or “HDMI audio” driver works with your computer’s graphics infrastructure as a separate audio driver to present sound from your computer to an audio-capable monitor or A/V device connected via its DisplayPort or HDMI connections.

Windows 10 answers the problem of system sounds playing through that good sound sound system

This arrangement documented here will work with Windows 10 computers running the April Update (Build 1803) version of that operating system or newer versions.

I have just applied the latest feature update to my Windows 10 installation on my regular computer and it has come across with a feature that most of you will want to benefit from when you use your computer to play audio or video content.

This feature update called Windows 10 April Update or formerly Windows 10 Spring Update (Build number 1803 in the System dialog) implements the ability to determine which sound device a program uses. Some Win32 (traditionally-developed) programs, namely well-bred media editing and management programs or VoIP programs have the ability for a user to determine which sound device they want that program to use. But the Web browsers, along with Spotify or TuneIn Radio and most of the Microsoft Store apps don’t offer this ability.

HP Elitebook 2560p playing through Naim DAC-V1 USB DAC

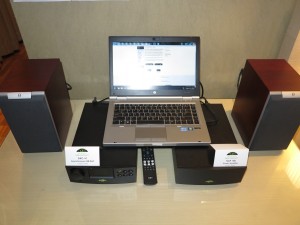
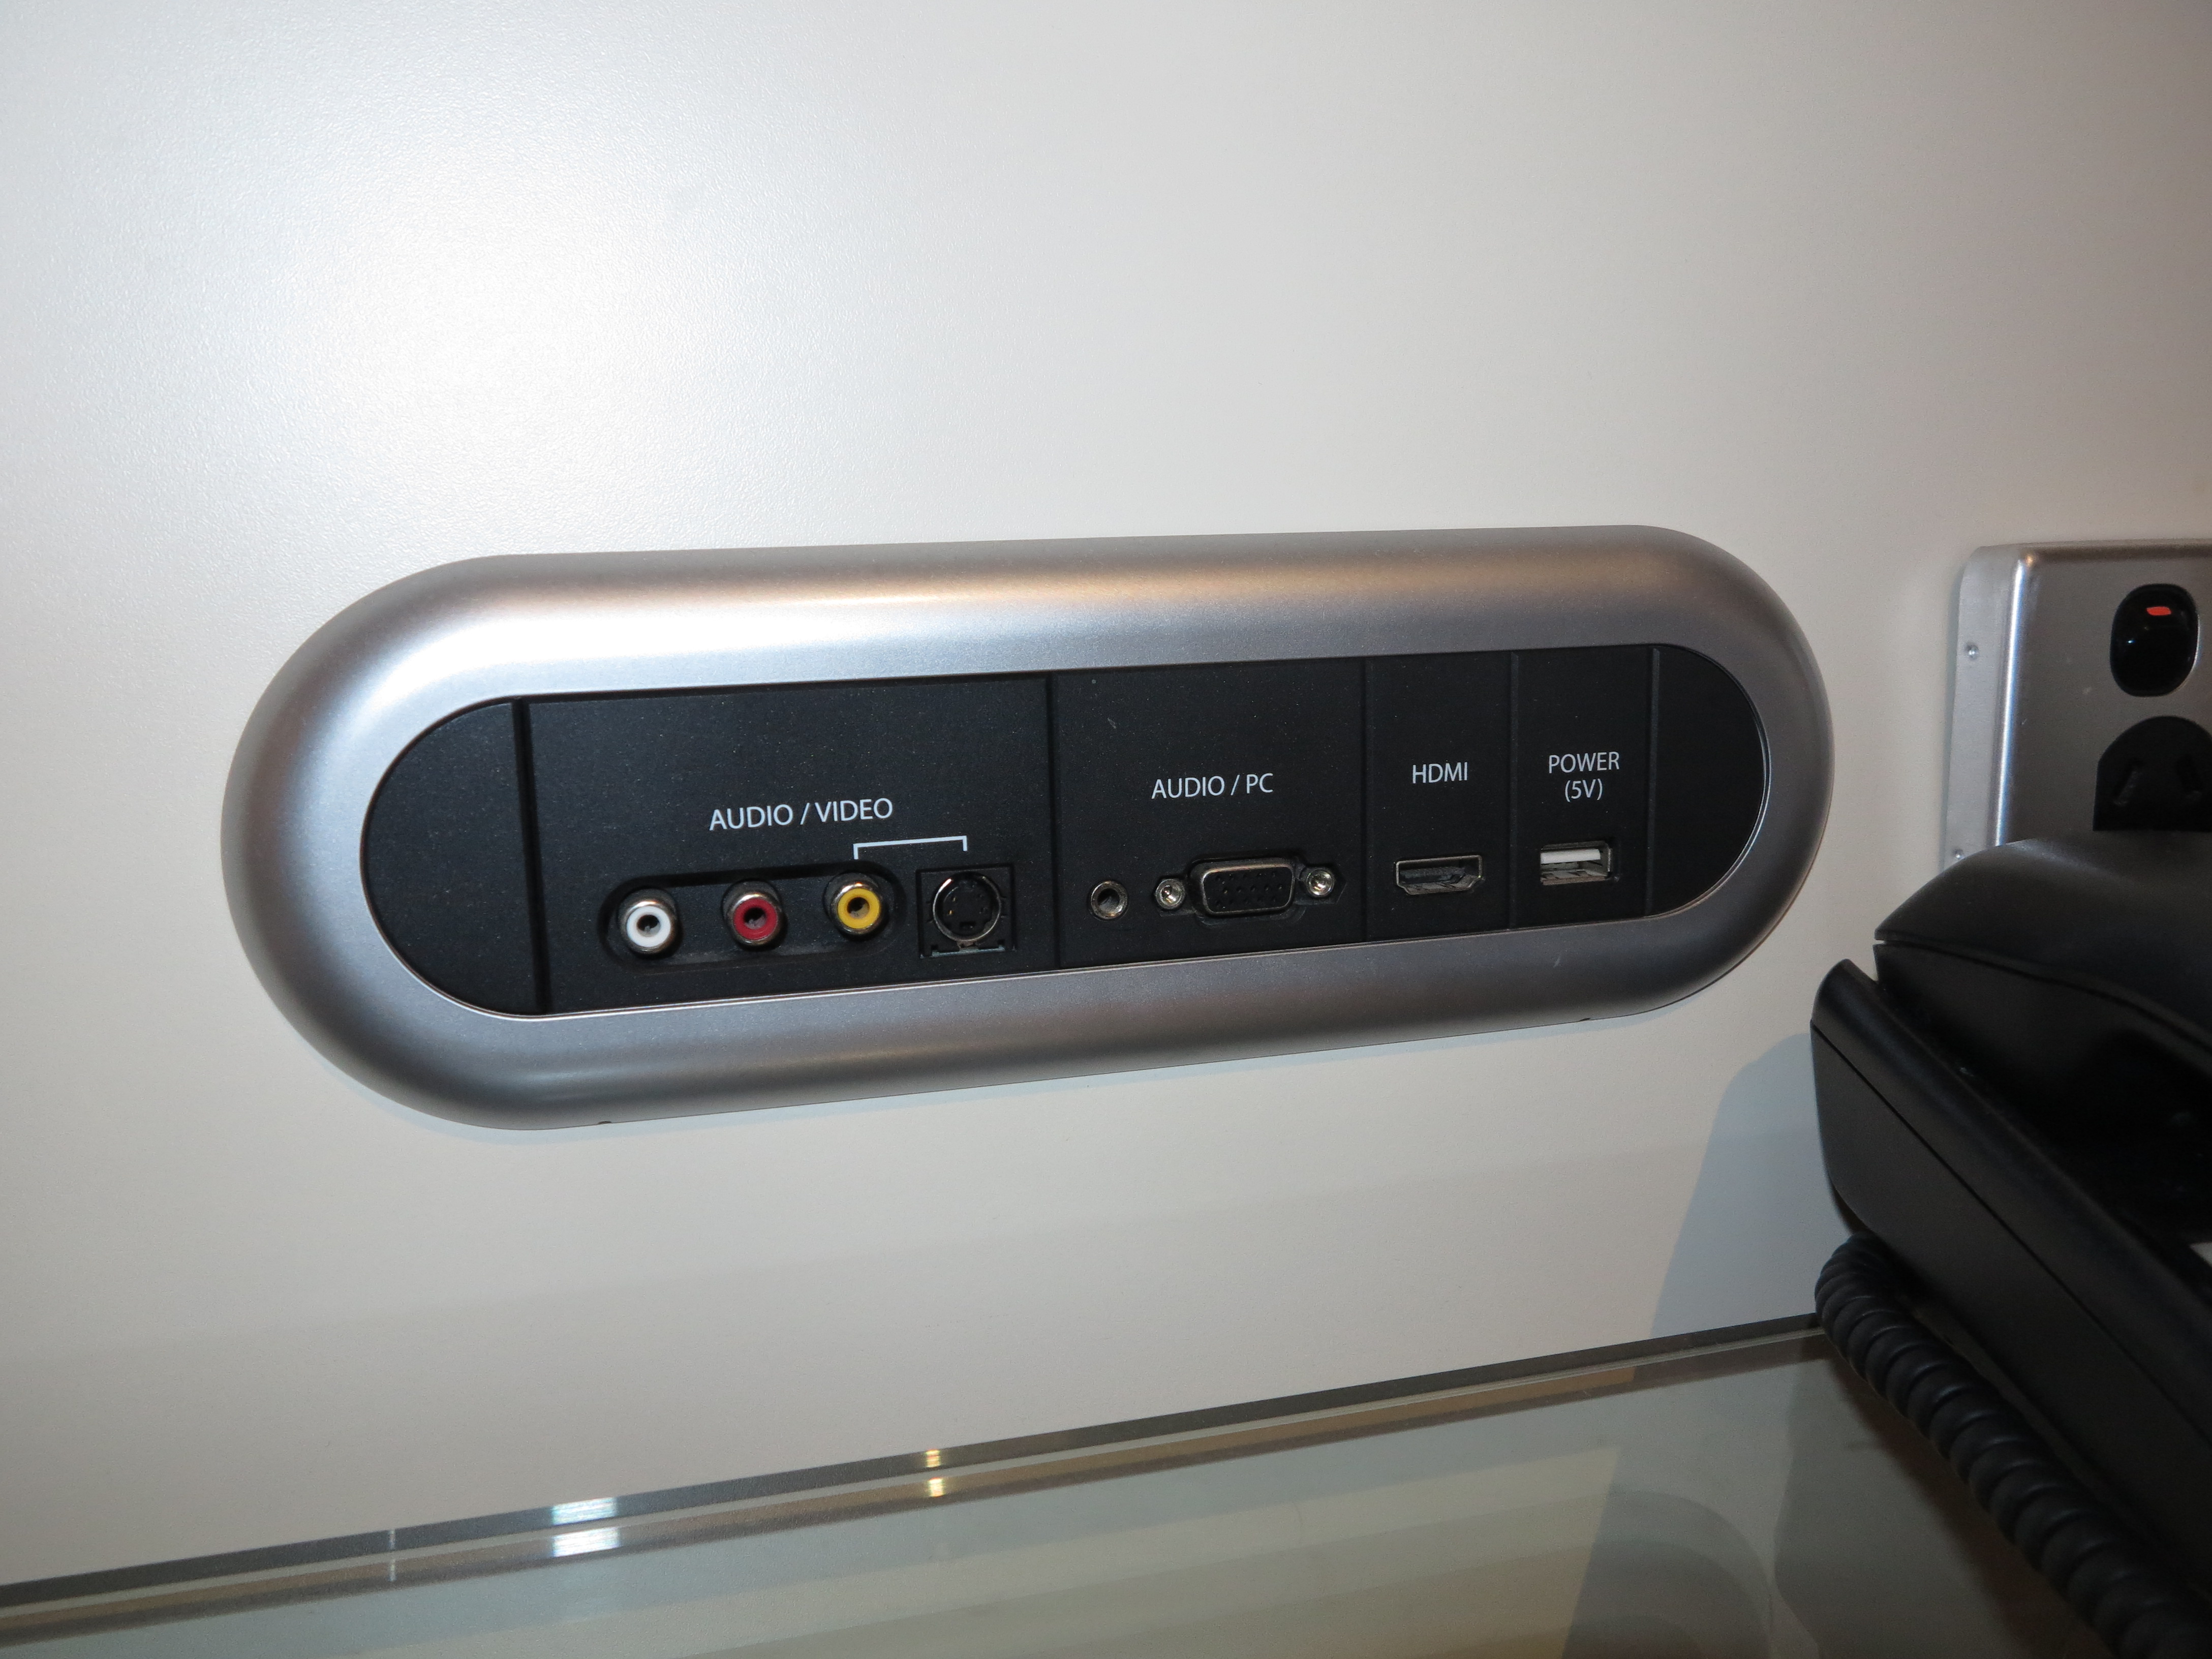
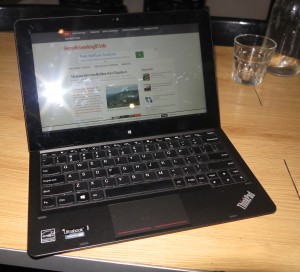
Windows 10 April Update allows the speakers in this USB-based audio setup to play only the music while the audio alerts play through the laptop’s integrated speakers

This means that you could set things up so that the system sounds like that Windows error “ding” or the email alert sound don’t blast through the good sound system but play through the cheaper speaker setup like your laptop’s speakers. It is while Spotify or that other audio program plays through the good speakers or hi-fi system. Similarly, you may want that YouTube video or the game you are playing to have its sound come through your big TV’s speaker but don’t like the idea of the Windows audio prompts being a distraction by barging through those speakers.

Praise and worship at church

You can set things up so that the playout computer doesn’t play Windows audio alert sounds through PA systems like this church’s setup

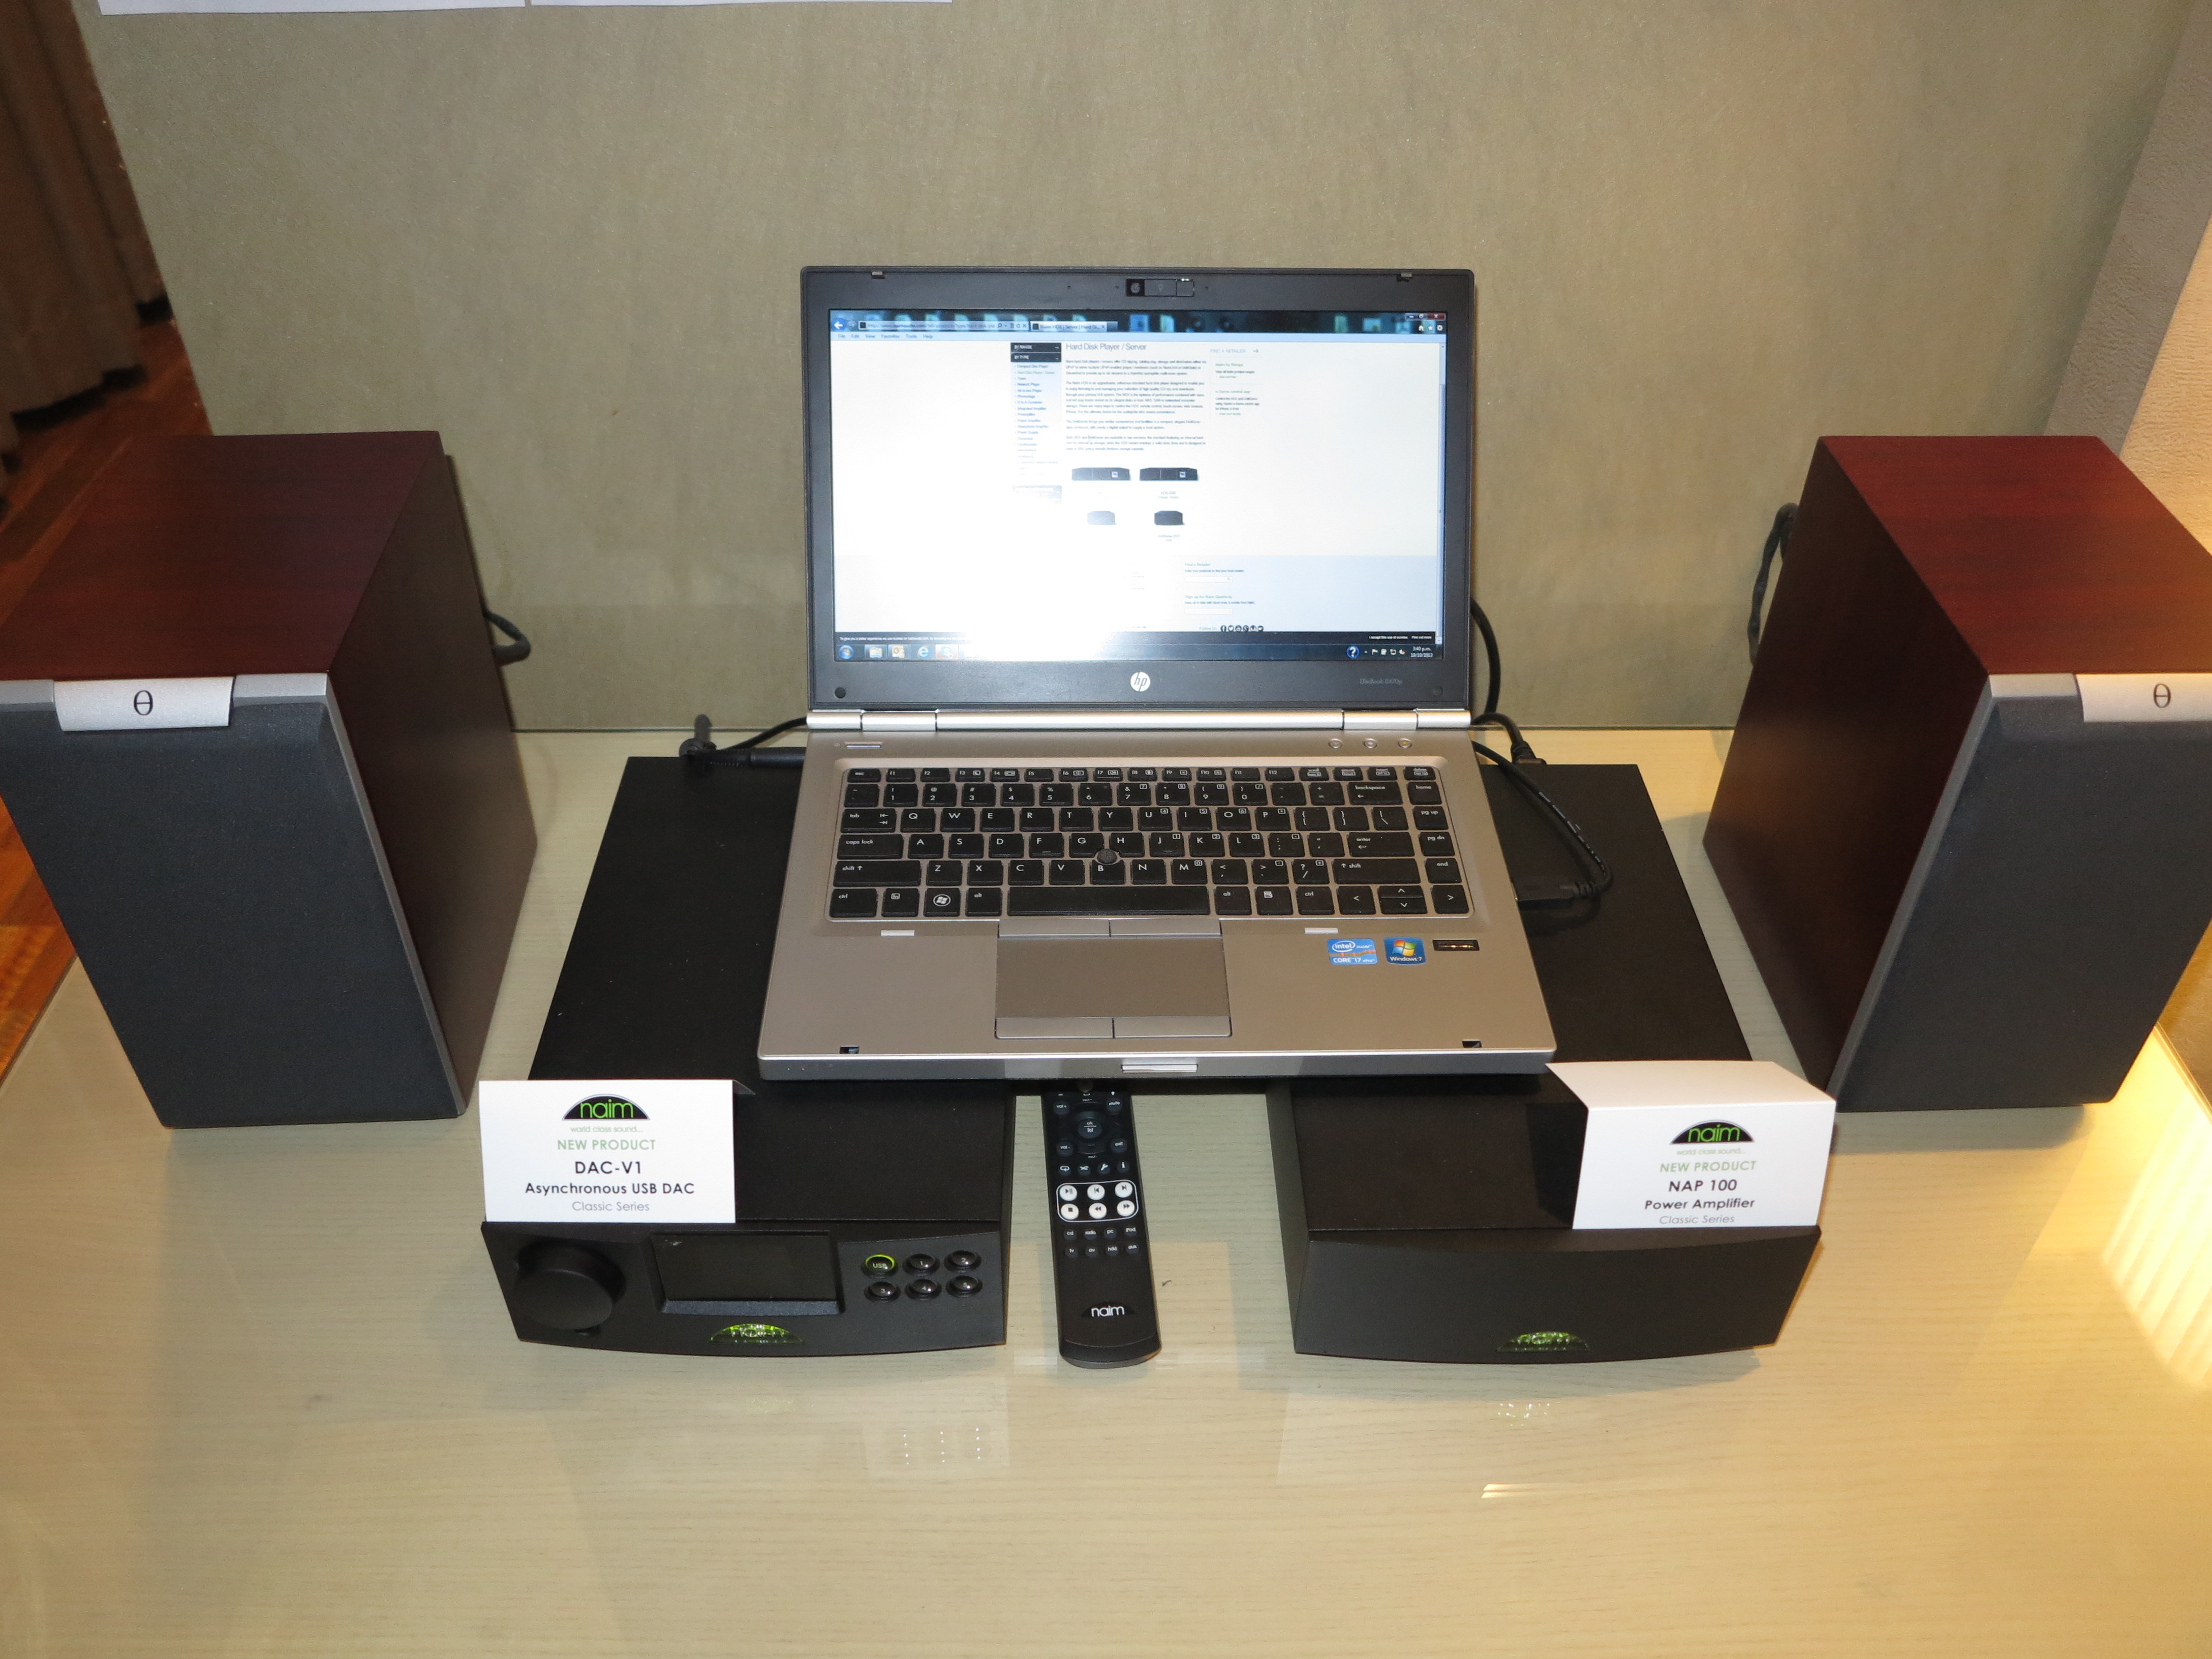
This feature will be essential for those of you who use your computer with a PA system as an audio/video playout device and end up using baseline software that doesn’t offer the ability to manage the audio devices the software plays through. Here, you avoid having those PA speakers “magnifying” the audio prompts that Windows makes when a dialogue box pops up or new email comes in. Similarly, you could then have one audio-output device like headphones or low-powered speakers serve as a “cue” device that you use to verify or line-up the content you want to

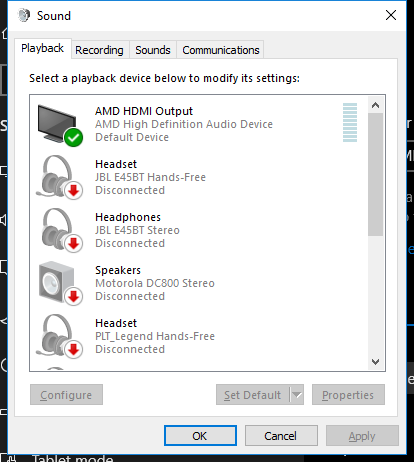
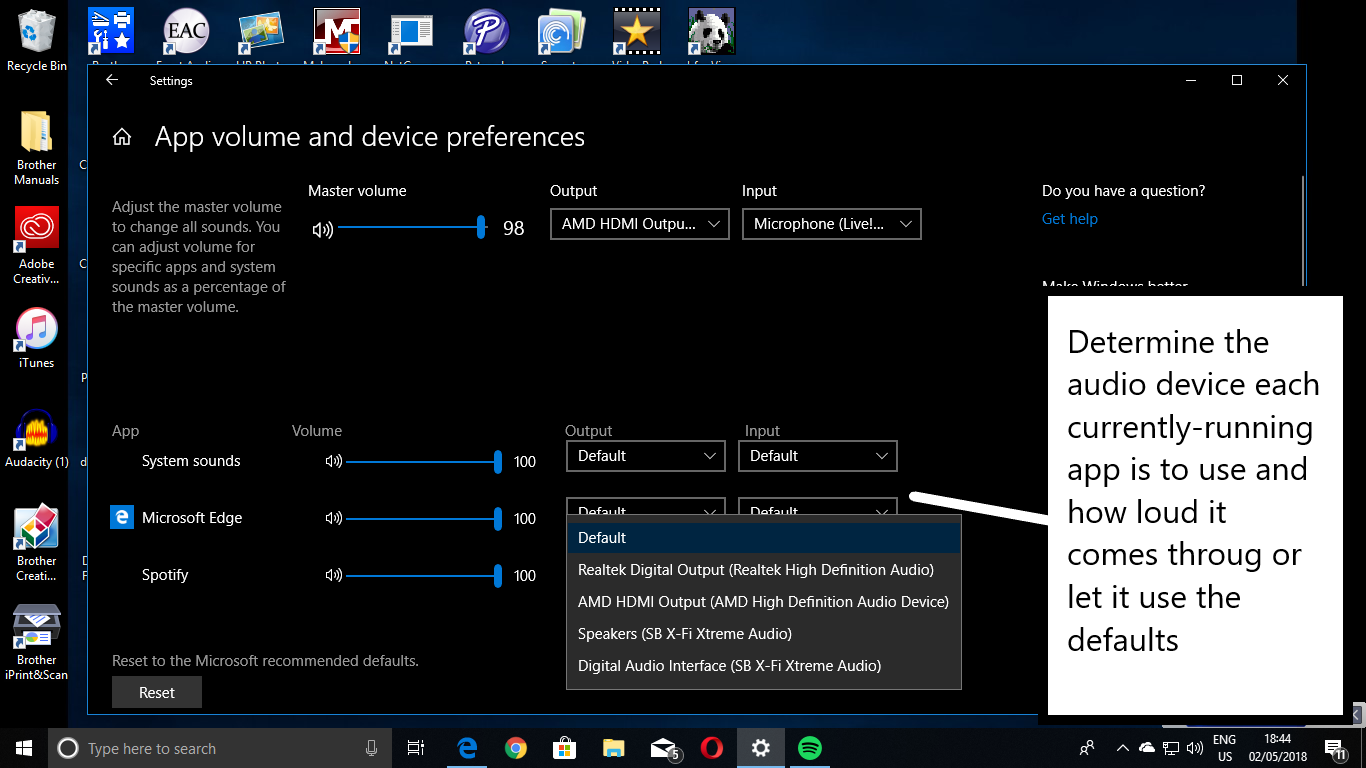
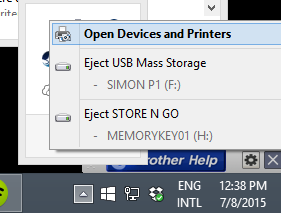
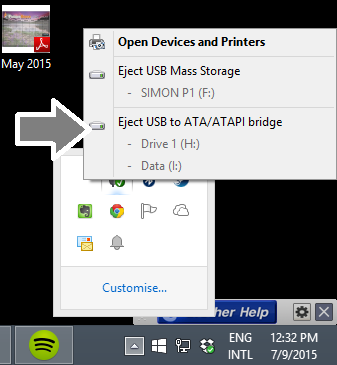
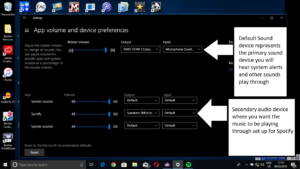
Sound devices that you can send an app’s sound output through

play before you have it playing through the main speakers.

How do you go about this?

You would need to make sure that your computer is running with another sound device that is attached to the good sound system. This could be a separate sound card, USB sound module or DAC, or a Bluetooth audio adaptor. If you have the computer connected to a sound system equipped with Bluetooth, USB or similar audio functionality, you have effectively set up the secondary sound device. It also applies if you have connected it to the big TV or home-theatre setup using an HDMI cable.

Identifying the sound devices

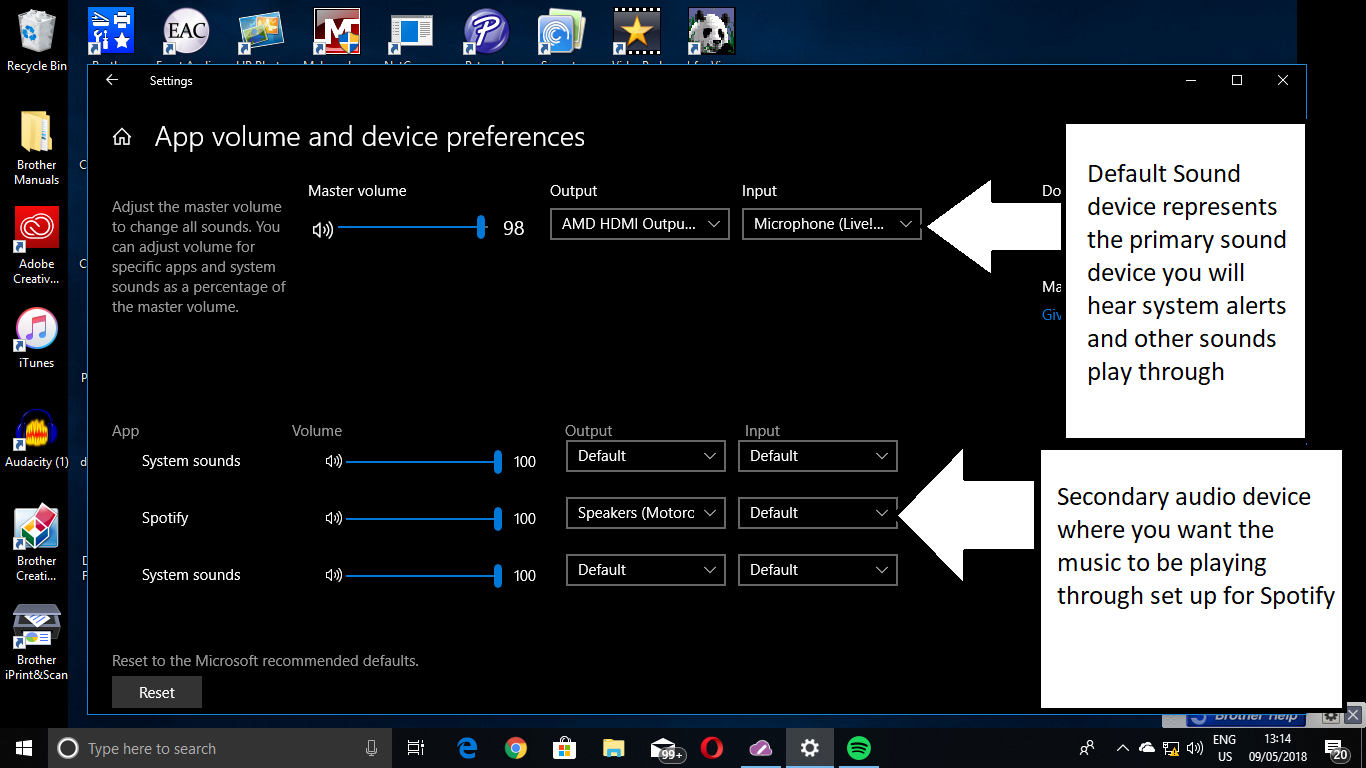
Then you identify the two different sound devices – the one that you want as your “primary” device for monitoring audio prompts that Windows provides and the “secondary” one you want your multimedia content to play through.

The sound functionality that is built in to a laptop computer or a desktop computer’s motherboard will typically be represented by something like a Realtek, Intel HD Audio or similar chipset name. In most cases, this integrated-sound chipset serve the internal speakers in a laptop or a pair of cheap computer speakers connected to the audio sockets on a desktop computer’s motherboard.

Sony STR-DN1060 home theatre receiver press picture courtesy of Sony America

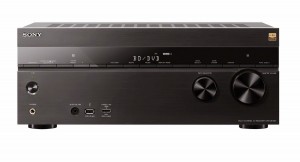
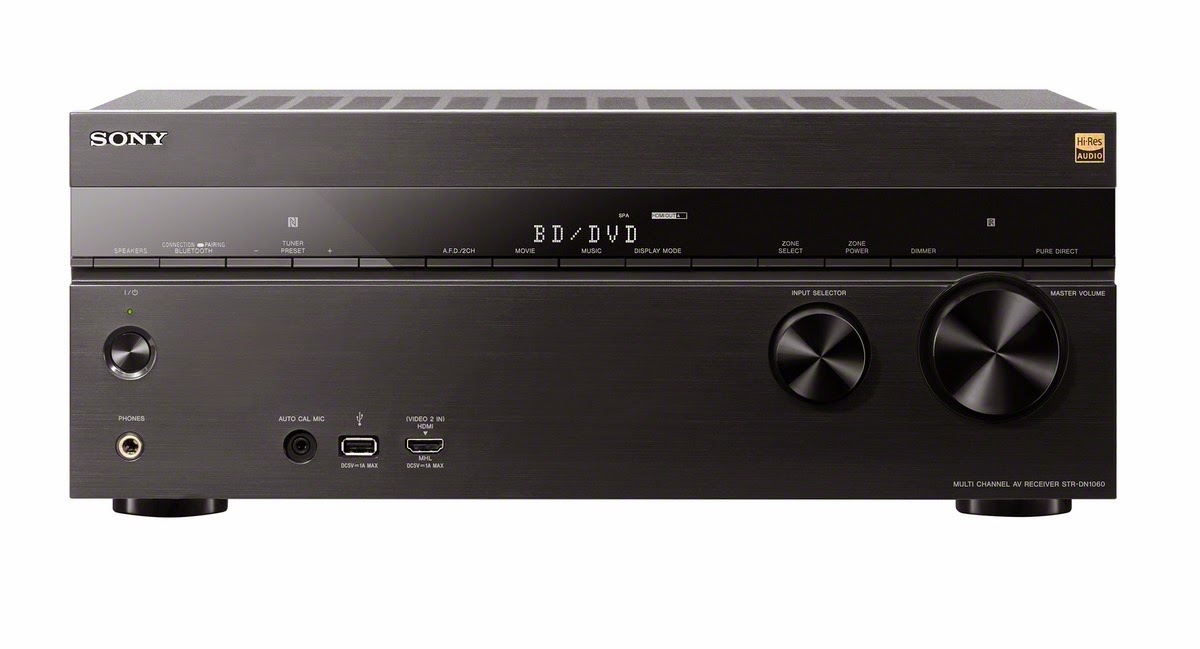
If you connect your computer to your monitor or TV through one of these home-theatre receivers using the HDMI connections on these sets, you will be using the separate HDMI audio subsystem facilitated by your computer’s graphics infrastructure for the sound that comes through the receiver

Display setups connected to your computer via HDMI or DisplayPort that have audio abilities will have those abilities seen as an audio function of the display infrastructure. Some of these cases like Intel integrated graphics chips will properly refer to the arrangement as “display audio” or “HDMI display audio” due to the function being separate from the computer’s main sound chipset. This arrangement also holds true if you are connecting HDMI audio devices like soundbars, HDMI audio adaptors and home-theatre receivers between your computer and your display using the HDMI cable.

Let’s not forget that USB or Bluetooth devices that use the Windows audio-device class drivers will still identify themselves by their device or chipset make and model. This is to avoid confusion that can exist if you connect multiple USB or Bluetooth audio devices to the same host computer.

Configuring your setup

Go to Settings (the gear icon in your Start menu) and click on the System option. Then click on the Sound menu on the left of the System menu page. Make sure the current sound device is the primary one that will drive your laptop, monitor or other cheaper speakers. Then click on “App volume and device preferences” to bring up the menu to determine which speakers Spotify or your other multimedia app will use.

If you added a new audio output device to your computer, Windows will automatically assume it is the default audio device. Here, if you want this device to be the secondary device, you would have to use the above-mentioned Settings – Sound panel to select the primary sound device to be the default device.

In my setup, I used my LG monitor which has an HDMI link and built-in speakers but yields laptop-quality sound as the primary sound device while a Motorola Bluetooth audio adaptor connected to an older boombox serves as the secondary sound device. Because I am using a traditional desktop PC, the Bluetooth link is facilitated through a USB Bluetooth modem.

Windows - System - Sound menu for app-based audio device selection

Spotify set up to play

Next to the app you wish to direct the sound output for, click on the drop-down box in the Output column. At the moment, this will say “Default”, but use this to select the output device you want to have the app come through such as the USB DAC or Bluetooth speaker.

Here, I tested the setup with a Win32 app in the form of the Windows Media Player and it does work properly even though that program provides the ability for users to determine the sound output device that they use. Then I tried it with a UWP (Microsoft Store) app in the form of Spotify’s Windows 10 port and this worked reliably. Subsequently, I also found that this setup worked with Google Chrome when playing a YouTube video. Through these tests, I made sure that the Windows sounds were playing through the primary speakers.

You may have to run totally different browsers if you want the sound from one Webpage to pass through one device while the sound from another Webpage passes through another. This can be of concern if, for example, you are running a YouTube playlist or something similar as background music while you are playing a Web-based social-media game.

Going back to normal operation

To get back to your normal settings, click the “Reset” button in the “App volume and device preferences” window to have all the sound sources work through your default devices.

You may find that some media content may stop if you switch audio devices while it is running. If you do use this ability to maintain a “cue” device and a “main” or “front-of-house” device for playout purposes, you will have to pause the media file before you switch audio devices or simply restart the media content after you switch.

Other abilities

There is the ability to determine which input device an app uses which can be good for Web-based, Microsoft Store or similar apps that don’t provide an option for you to choose which microphone device you are to use. This can come in handy if you want to use a more accurate microphone with Cortana, courseware apps or baseline notetaking apps rather than your 2-in-1’s built-in microphone.

In this case, you choose the Input device you want to use for each program or Web browser rather than choosing the Output device.

What improvements could be provided

This feature could be taken further through the use of a “Default Multimedia Audio Device” definition that is expressly used for media-player software and/or a “Default Game Audio Device” definition used for games.This could then allow a user to have an audio device work as the one to use for multimedia or gaming purposes while another is used for the system sounds. It can then lead to the ability to create an “audio device ladder” for each audio device class where connection of certain audio devices like headphones, HDMI-equipped TVs or USB DACs overrides other audio devices in a particular order.

Another issue that will crop up with this new ability that Windows 10 April Update provides is sending different audio content to different “jacks” served by the same audio infrastructure. It may come about through cheaper computer designs that only have one audio chipset for HDMI, internal-speaker and audio-jack output rather than allowing for a separate audio function that is part of a graphics infrastructure to support HDMI digital audio.

Conclusion

Now you are able to make sure that your Windows computer’s multimedia software can play through the speakers that would suit it best without having the various audio prompts that the Windows shell or office software creates blasting their way through those speakers.

Controlling Wi-Fi and Bluetooth on your iOS 11 device

Articles

If you can’t manage your iOS 11 device’s WiFi or Bluetooth from the Control Center, you may have to go to the Settings App.

iOS Control Centre’s Wireless Toggles Don’t Turn Off Wireless Radios | Lifehacker Australia

My Comments

Apple has just rolled out iOS 11 as an update for your iPhone’s or iPad’s operating system and, as expected with “.0” versions of operating systems’ major functionality updates, there will be a few bugs and issues here and there. This is typically due to Apple, like other software vendors, rushing the major-functionality version of the software out the door to satisfy the vendor’s marketing team’s needs. In this case, the goal here is to get the new iPhone X and new iPhone 8 range, which will be loaded with this operating-system version, ready to sell to the crowds queueing outside the Apple stores and mobile phone retailers on the day they are released i.e. 22 September for the iPhone 8 and 8 Plus, and 3 November for the iPhone X.

One of these is the inability to manage Wi-Fi and Bluetooth from the Control Center on your iOS device even though the buttons do exist there to enable and disable this function. Here, you may want to disable one or both of these functions for your privacy when in the vicinity of Wi-Fi networks you don’t trust, to save battery runtime when you are not connected to a Bluetooth peripheral or a Wi-Fi network or simply as part of troubleshooting a Wi-Fi network or Bluetooth peripheral connection.

The symptom shows up in the form where pressing the Wi-Fi or Bluetooth icons in the Control Center has no effect on the Wi-Fi or Bluetooth functionality. But you can work around this by going to the Settings app on your iOS device. Then you tap on WiFi or Bluetooth to select the appropriate function you want to control.

Disable the appropriate function by sliding the switch to the Off position whereupon you will see no references to Bluetooth or Wi-Fi activity and the green marker will disappear. Or enable the appropriate function by sliding the switch to the On position where you will see the green marker appear and references to the Bluetooth or Wi-Fi activity appear.

Of course, keep an eye on the Settings app for newer “point-release” versions of the iOS operating system and update your iOS device with these newer versions as they arrive. Here, these versions will typically rectify bugs, security exploits or weaknesses that become knowledge to Apple.

Microsoft cuts down the out-of-action time users face during the Windows upgrade cycle

Article

Windows will be improving the time it takes to upgrade the operating system

Microsoft is tweaking the Windows 10 upgrade process to reduce downtime | Windows Central

My Comments

A common situation that we face when we update or upgrade the operating system on our computers including our mobile devices is that the device is out of action for some time while the update take place.

Here, the holy grail for operating-system maintenance is that the updates take action once they are delivered rather than needing us to restart the device at all. In the context of business, this means that workers and business owners are able to stay productive without waiting for an update cycle to complete.

Most of these processes involve downloading the necessary files that contain the newest software code then performing fail-safe procedures. This is before the device is rebooted as a measure to make sure the extant software files are unencumbered before they are replaced with the freshly-downloaded files. Then the update procedure makes sure that everything is in place before allowing the user to interact with the system.

Microsoft identified some of the problems associated with the upgrade cycle associated with their Windows operating system and found that a lot of the preparatory work could take place before the system has to be rebooted.

Previously, the user-created configuration and other data had to be backed up and the operating-system files were prepared for installation after the computer was rebooted to instigated the software-update cycle for Windows. Now, from the Windows 10 Fall (Autumn) Creators Update onwards, these procedures will take place before the system has to be restarted. This is because most of these procedures are simply about copying files between locations on the System Disk.

The data-migration action will take place after the system is restarted and the user data will be restored once all the downloaded files are in place. Then the system will be restarted in order to make sure all the functionality is effective and, like with major functionality upgrades, the user may have to interact with the system further to enable this functionality.

The idea behind this move is to have all the preparatory work done while you are able to work with your computer so that it is out of action for a minimal amount of time.

The question here is whether this improved software-update process will take place for maintenance-level updates like the regular software patches and security updates that are delivered to keep Windows secure.

There is still the issue faced with all of the operating system update procedures, especially with significant updates or where mobile devices are concerned. This is where the update requires the device to be rebooted twice and spends some time out of action during that cycle. It also encompasses the requirement for regular computers to boot at least once while patches and security updates are being deployed.

But Microsoft’s step with improving the software-maintenance cycle for the Windows 10 operating system is getting us one step closer towards cutting down on the downtime associated with this process.

Making sure your business laptop’s fingerprint reader works with Windows 10

Fujitsu Lifebook S-Series SH771 ultraportable

You may have a problem with the fingerprint readers on these business laptops after you upgrade the operating system to Windows 10

Those of you who had purchased a business laptop equipped with a fingerprint reader may find that this feature doesn’t work with Windows 10. The situation can be very difficult if you had participated in the Windows 10 free-upgrade program that happened from 2015 to 2016 and you may have foregone the use of this security feature after that upgrade.

What can you do?

Remove the existing fingerprint-authentication software from the laptop

Use the Windows 10 Add/Remove Programs option to remove the fingerprint-reader software that the manufacturer supplied with your laptop computer. It may also mean that you have to remove the password vault program that came with your laptop computer and you were using to keep your Website passwords with.

The reality is that some of the business laptops came with software installations where a third-party fingerprint-management program was part of the package. This may be due to the fingerprint reader not having driver software that could work directly with Windows at the time the machine was released or the program offering more “enterprise-friendly” features than what Windows and a baseline password vault could offer for the business laptop’s user class.

If you still value the feature set provided by the fingerprint-management program or depend on its compatibility with certain other management software, it may be a good idea to look for and download the latest versions of that software.

Update the fingerprint-reader’s driver software

HP Elitebook 2560p business notebook fingerprint reader

The fingerprint reader on this HP Elitebook may be able to run the same driver software as one installed on some Lenovo ThinkPads

You would then have to update your fingerprint reader’s driver software to the latest version that can work with Windows 10. This is because the newer driver software takes advantage of the application programming interfaces associated with Windows 10’s Hello authentication mechanism.

Some laptops may require you to update their software relating to their BIOS / firmware and chipset before you progress any further. This is a process you would have to do from your laptop manufacturer’s support Website.

One way would be to open Device Manager in Windows 10 and identify then select the fingerprint reader’s entry in the device list. This will be listed under the Biometric Devices class of devices. Right-click that device and choose “Properties”. Click the “Driver” tab and select the “Update Driver” option to make sure it is up-to-date.

Or you could visit your laptop manufacturer’s support Website and download the latest version of the fingerprint reader’s driver software. Then you install that software, whereupon you may have to reboot your computer as part on the install process.

Sometimes a particular laptop manufacturer may not have the updated driver for the fingerprint reader that is integrated in to their business laptop. Here, you may have to do a Google search for details regarding the make and model of your business laptop and how to enable that machine’s fingerprint reader in Windows 10. This is because a particular fingerprint-reader subsystem may be used by two or more manufacturers in their product lines during a particular point in time. For example, the Lenovo website hosts the Validity Fingerprint Common Driver for Windows 10 which has been found to support most of the fingerprint scanners integrated in HP business laptops like the Elitebook 2560p.

On the other hand, you may find that the latest version of the driver software that they host is the Windows 8.1 version. Here, you can get by with this version for your Windows 10 computer thanks to the use of similar APIs.

Set your laptop up for Windows 10 Hello authentication

The next step will be to set up for Windows 10 Hello – the authentication framework that Windows 10 uses for advanced authentication methods like biometric authentication.

Here, you go to SettingsAccountSign In Options. Then you will have to create a PIN number, which is what you use when you log in to your machine. If you log in to Windows using your Microsoft Account credentials, you will need to create a PIN number, which will become a machine-specific alternative credential.

There will be an option to sign in with your fingerprint which will be enabled thanks to the newer drivers that you installed. Click on that button to sign in with the previously-mentioned PIN if you have created that or to create a new PIN number, before you enrol your fingerprints as your sign-in credentials.

If you still want to “swipe in” to your favourite Websites with your finger, you would need to acquire the latest version of the password manager that came with your computer like HP SimplePass, Softex OmniPass or a similarly-competent password vault that uses fingerprint recognition out of the box.

Conclusion

What this means now is that you don’t have to see the fingerprint scanner on your business laptop computer as being redundant just because you have upgraded your computer to Windows 10.

System recovery images–how about updatimg them

Lenovo ThinkPad Helix 2 connected to Wi-Fi hotspot at Bean Counter Cafe

The recovery image on these computers could be part of an update program to simplify refreshing them with the latest version of the operating system if they fail

Increasingly a lot of computer systems, especially laptops and tablets, are making use of so-called “recovery” images. This same practice also applies whenever an organisation is using a disk image with the operating system and applications that are the software component of a standard operating environment.

These are a disk image of all of the operating system and supplied applications that are delivered by the system manufacturer or value-added reseller and installed on the system when it is first set up. The computer makes use of these images if the computer has to be taken to “ground zero” due to a virus or corrupt data or before the user hands the computer to someone else. Newer operating systems use these images as part of a system refresh routine in order to remove corrupt data and bring stability to the computer’s configuration.

But what can happen is that as operating system and application developers keep refining their software, what exists on these system recovery images represents software that is way out of date. This reminds me of a support visit where Microsoft Word was continually crashing on a desktop computer and I had discovered that the computer was running an “out-of-the-box” version of Windows Vista which hadn’t had any service packs installed.

Typically, this will lead to reinstalling any and all patches and updates that were rolled out since the recovery image was created. But how can this be resolved?

One way would be for the manufacturer or value-added reseller to create a “recovery image service pack” and deliver that either as a USB stick or through an authenticated download to the computer users. Then the users install this service pack to replace the original recovery image to have an up-to-date reference image. This cond be created at regular intervals such as every six months.

Another way would be to create a dynamic system image that consists of the latest versions of the operating system and application files. The changed files can be added ot that image as part of installing the latest patches. Similarly, an “image update” app could check for newer hardware drivers for the hardware that is integrated with the computer system itself.

These issues may involve determining how installation and recovery disk images are built wiht a view to focus on the images referring ot major versions and editions of the software concerned along with any peripheral drivers. In the latter case, it may be about obtaining hardware-series-specific drivers rather than drivers that focus on that particular piece of hardware.

As well, with operating systems like Windows and OS X being offered with free major-version updates, the recovery image may also be about installing the latest major version of that operating system’s edition.

Why do you need to safely remove or eject removeable media?

USB memory key

USB storage device

As you use a computer, you will have to get in to the habit of removing or ejecting external or removeable media safely and in a proper way rather than just unplugging the device or pulling out the card.

What is this about safely removing or ejecting removeable storage?

Mainframe and similar large computer setups required the operating system to logically mount a tape or disk pack after the system operator installed the medium in the appropriate drive. This procedure makes the files on the medium available to the operating system and computer programs

USB external hard disk

USB hard disks are more critical with this procedure

Then when the medium was finished with, the system operator had to logically unmount the disk or tape which forced all files to he written back to the medium and the operating system to deem the files on the medium to be unavailable. This procedure was also simplified when the tape and disk-pack drives used electromechanical readiness detection like sensing when a lid or door was closed or a tape was past the heads to let the host computer know that they had media on board and were ready to work with it. It would then require the operator to logically mount the medium and make it available to the system’s programs, typically by typing a special “mount” command.

Desktop operating systems like MS-DOS did away with this to simplify the operating procedures for most people especially as they were used just by one user compared to the previous mainframe systems that were used by multiple concurrent users. It also allowed the use of low-cost disk and tape systems on these computers.

Here, these operating systems immediately wrote back all file changes to the disk when a file was created, modified or deleted. As well, if a program was after a file, it would perform a directory search to determine if the file was there on that disk and the operating system didn’t cache the removeable medium’s directory structure in to the host’s memory. In a lot of cases, the act of closing the disk drive’s door or inserting a 3.5” floppy disk cause the operating system to start reading the disk’s directory in to memory.

But the Apple Macintosh maintained a similar operating requirement to the larger computer systems where you had to logically remove a floppy disk or CD from the system typically by dragging the disk’s icon to the Trash before the computer ejected the disk. This was facilitated with these computers having floppy drives that implemented electromechanical load-eject mechanisms and no hardware “eject” button ever since the platform was created.

This was carried through with Zip drives and other similar removeable-media drives that used any form of electromechanical load-eject mechanisms. The presence of an eject button on these drives typically worked as a way of telling the operating system about an intent to remove the medium so it is logically unmounted and was also implemented with newer iterations of the MS-DOS / Windows operating system along with driver programs for earlier iterations of that operating system.

Similarly, those of you who have used the MiniDisc format, especially with an MD deck or a music system that has an integrated MD recorder, may notice this taking place when you are recording to these discs. What will happen with these decks is that a message will flash up on the unit’s display screen that it is writing all the changes to the disk when you press the eject button or power off the unit before the disk is available or the unit switches off. This makes sure that all of the recording and editing activity is properly committed to the disk and is intact.

Why was there a need to tell the operating system that you were intending to remove the medium

If removeable media is removed by surprise, there can be problems with the quality of the data that is written to the medium because the operating system and applications think that certain files on the medium are available to be worked with.

This can lead to corrupted files because all the changes to the file being worked on haven’t been written to the medium completely. There are also issues with the files being locked by programs that are writing back the necessary changes so that other programs can’t interfere with this process, and if a program hasn’t released these locks or committed all of the changes, the files may not be available for other programs to work with. In the worst cases, your computer can go in to a headspin if it is working with a file that exists one minute and doesn’t exist the next.

How do you safely remove USB removeable media?

Windows Explorer (File Explorer) eject option

Eject option in Windows Explorer

With a computer, you make sure that you have closed the files you are working on if you were using a program to work with them. Then you perform a safe-removal procedure that is dependent on your operating system.

Macintosh users simply drag the icon representing the removeable storage to the Trash icon at the bottom right of the Desktop screen. Then there will be a message to say that it is safe to remove the medium.

Windows users can do this in two ways. They can open Windows Explorer (File Explorer) or My Computer and right-click on the removeable storage which will be represented as its own drive letter. They then select the “Eject” option to begin safely removing the storage device.

Safely Remove Hardware icon in Notification area

Safely Remove Hardware icon in Notification area

The other method requires you to click on the Notification Area on the Taskbar and right-click on the “Safely Remove Hardware And Eject Media” icon. Here, you are presented with a list of USB storage devices that are connected to your computer. Click on the one you want to remove to begin safely removing it. In some cases, a physical device may represent two or more logical volumes (drive letters) because it has been partitioned as such. Here, you select the physical device’s name to safely remove that device.

Safely Remove Hardware devices list

Devices available to remove

USB-based removeable-media adaptors like floppy-disk drives, Zip drives and memory-card readers have the ability to safely remove a particular medium or the whole device. Here, you can click on the medium to remove the card or disk or click on the physical device name to remove the device before you unplug it.

Safely remove hardware devices list

Two logical devices in one physical device – the one that is written clearly is the one to remove

This is more important with those devices that handle multiple media types like some multi-slot memory-card readers or devices that have a combination of fixed and removeable storage options like some digital cameras and camcorders that have internal storage along with an SD or microSD card slot. In the latter situation, these devices would have fixed storage greyed out while the removeable storage is written in black.

I have prepared a PDF reference sheet about the procedure needed to safely remove your removeable media from your Windows computer. Download and print this and keep it by your computer if you or others need to know how to do this properly.

Android users would go to the Storage menu and select the “Unmount SD Card” option for the SD card or “Unmount Mass Storage” for storage devices connected to their mobile devices via USB “On The Go” connectivity.

Safe to remove notification

It is safe to remove

For other devices like A/V devices that write to an SD card or USB memory key, you would have to go to the device’s menu and select the “Unmount”, “Remove” or, more likely, “Eject” option. This process would be analogous to ejecting a tape, CD or MiniDisc so you can work with another medium.

Of course, powering off the equipment properly such as selecting a logical shutdown option would prepare any media or removeable devices attached to the equipment for safe removal.

Conclusion

Once you know how to properly and safely remove media or detach USB storage devices from your computer or similar device, you can avoid situations which can place your computer’s reliability or the data on that medium at risk.