Tag: Windows

Editing favourites with Microsoft Edge

Article

Edit URL item in Favourites context menu

Edit URL item in Favourites context menu

Windows 10 Tip: Edit any URL in your Microsoft Edge Favorites | Windows Experience Blog

My Comments

A situation that can affect many Web users is to have a “favourites” or “bookmarks” list with out-of-date links in it. This can be brought about by a Website moving to a new domain or its link directory being reorganised. The latter situation can be brought about due to implementation of a new content-management system or substantial renovations to the site layout.

Most Web browsers have the ability for you to edit a Web address in the Favourites or Bookmarks list, typically through you right-clicking on a link, selecting an “Edit” option, and manually editing the Web address.

But the Microsoft Edge Web browser that is part of Windows 10 didn’t have this kind of in-place editing functionality. It was in a vain attempt to achieve a reduced-clutter user experience for viewing Web pages on your Windows 10 computer. This would have caused you to navigate to the resource’s new location, add it as a Favourite then delete the old reference from the Favourites list.

Microsoft has added in-place link editing to their Edge browser that is delivered with the Windows 10 Fall Creators Update onwards. Now what you can do is to right-click on the resource’s link in your Favourites list, then select “Edit URL” in the context menu to make the Weblink for the resource editable.

If you are using a touch-only arrangement like a 2-in-1 convertible laptop in a “tablet”, “presentation viewer” or “tent” position, you need to dwell your finger or stylus on the Web resource’s link until a square or circle appears, then remove your finger to expose this context menu. There are some stylus implementations that may have a button that you use to enable the context menu.

But now you can revise that Web link in Microsoft Edge’s Favourites list without having to add the new link then delete the old link.

Why I refer to desktop and laptop computers as “regular” computers

Dell Inspiron 15 Gaming laptop

Why I refer to computers like this as “regular” computers

Through this Website, I refer to the desktop and laptop computers that run Windows 10 PC, macOS, desktop Linux or Chrome OS as regular computers and refer to these operating systems as regular-computer operating systems. This is in a manner to distinguish them from the smartphones or tablets that run iOS, Android or similar mobile-platform operating systems, or devices like Smart TVs, games consoles or vehicle infotainment systems that run a dedicated operating system.

It is based on the fact that these desktop and laptop computers have their design roots in the original personal computers that were built and sold from the late 1970s. Here, the goals were to concentrate all of your computing power to a box that existed at your workspace while you were using it with the system able to do whatever task you wanted it to do once you loaded the appropriate program.

Another factor that is also underscored is the way that the “regular” computer can be optimised to suit one’s computing needs more easily through the use of an operating system designed to be highly configurable from the outset. This includes the ability to choose computers with the right amount of performance for what you want to use them for, the ability to connect devices to them so they can answer your needs better or even modify them to suit newer needs.

It was compared to the previous idea of computing which was centred around large mainframes kept in special computer rooms and users interacting with them using “green-screen” VDU terminals. As well, they have been seen since that period as the example of what desktop or personal computing was about.

It is compared to the mobile-platform devices that had their design roots in the handheld mobile phones and PDAs that came through in the 1990s. Here, it was about a battery-operated device you could hold in your hand and carry personal information with you or use as a communications device.

It is also compared to the likes of games consoles, Smart TVs, set-top boxes and vehicle infotainment systems that are designed around a particular goal. These implement a particular operating system or variant of a desktop operating system highly shoehorned for high-reliability “always-alive” operation in their chosen primary task.

The reason I use the term “regular computer” rather than “personal computer” for this class of traditional computer design is because there may be an argument that the mobile-platform devices like today’s smartphones are more of a personal computer than the traditional devices. There is also the fact that businesses have purchased these computers and implemented them as the workspace-based all-in-one solution for your office tasks since the late 1980s.

Here, it is to distinguish these desktop and laptop computers, including the tablets and 2-in-1s, that are using the traditional computing architecture and running the likes of Windows, macOS or desktop Linux from the other classes of personal-computing devices that have become more popular.

Keeping hackers away from your Webcam and microphone

Article

Creative Labs LiveCam Connect HD Webcam

Software now exists so you can gain better control over your Webcam

How To Stop Hackers From Spying With Your Webcam | Gizmodo

My Comments

A privacy issue that is being raised regarding the use of cameras and microphones connected to your computer is the fact that malware could be written to turn your computer in to a covert listening device.

Those of us who use a traditional “three-piece” desktop computer and have a physically-separate external Webcam may find this an easier issue because you cam simply disconnect the camera from your computer. But the issue of your Webcam or your computer’s microphone being hacked to spy on you would be of concern for those of us who have the camera or microphone integrated in the computer as with portable or all-in-one equipment, or the monitor which is something that could be offered as a product differentiator by display manufacturers.

The simplest technique that has been advocated to deal with this risk is to attach an opaque sticker or opaque sticky tape over the camera’s lens. Some computer and monitor manufacturers have approached this problem using a panel that slides over the Webcam as a privacy shield. But you wouldn’t be able to control the use of your computer’s integrated microphone unless it had a hardware on-off switch.

Most of the mobile computing platforms require that newly-installed software that wants to use the camera, microphone, GPS device or other phone sensors have to ask permission from the phone’s owner before the software can be installed or use these devices. The Apple iOS App Store even vets software to make sure it is doing the right thing before it is made available through that storefront and this is also becoming so for software sold through the Google Play Android storefront and the Microsoft Store Windows storefront.

Lately there have been some software solutions written for the Windows and Macintosh platforms that allow you to take back control of the camera and microphone due to the fact that these regular-computer platforms have historically made it easier for users to install software from anywhere. But I would also suggest that you scan the computer for malware and make sure that all of the software on the computer, including the operating system, is up-to-date and patched properly.

One of these solutions is Oversight which has been written for the Macintosh platforms and can detect if software is gaining access to your Mac’s Webcam or microphone. It also can detect of two or more programs are gaining access to the Webcam which is a new tactic for Webcam-based spyware because it can take advantage of people using the Webcam for business and personal videocalls and record these conversations. The user has the ability to allow or block a program’s access to the Webcam or microphone.

For the Windows platform, a similar program called “Who Stalks My Cam” detects events relating to your computer’s Webcam such as software wanting to acquire material from it.  This has the abilities for you to stop a program that is using the Webcam running or to shut down the Webcam process. But there is also the ability to track processes that are running while the computer system is idle because some spyware processes can be set up to come alive when the system isn’t being actively used. The program even allows you to “whitelist” programs that you trust like over-the-top communications programs or video-recording software so that it doesn’t get in their way.

The ability to track usage of attached / connected cameras and microphones or similar hardware like GPS units by software running on your computer will end up becoming part of a typical desktop/endpoint security program’s feature set as people become concerned about the use of these devices by spyware. This is in conjunction with operating systems also hardening access to devices that can be used to spy on their users by implementing software certification, sandboxing, privileged access and similar techniques.

It is definitely another threat vector that we are being concerned about when it comes to data security and personal privacy.

Using audio-editor software to salvage legacy media

Linn Sondek LP12

You may want to get those old familiar records on to your computer to play on your home network

A task that you will want to do is to record content held on vinyl, cassettes and other legacy media to your computer. This may be to copy it to a CD or have as audio files that you can play on a computer, mobile device or through your home network. It is a task you will end up doing either for family-memory recordings or recorded material where there isn’t a chance of it being reissued on modern audio formats.

What do you need?

Here, you will need to use an audio-interface device such as a sound card or sound module to connect the turntable or tape player to the computer; along with an audio-editing program which records the sound and allows you to edit these recordings.

Creative Labs Sound Blaster Digital Music Premium USB sound module press image courtesy of Creative Labs

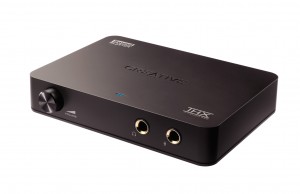
Creative Labs Sound Blaster Digital Music Premium USB sound module – useful for copying old media to your home network

Audio-interface devices need to be equipped with line-level input connections so you can connect them to an amplifier’s tape-recorder connections or to a source device like a tape deck that has these kind of connections. On the device’s side you will typically have a 3.5mm stereo audio phone jack that is typically highlighted in green or marked LINE IN or some better sound modules may be equipped with a pair of RCA sockets that are similarly marked.

If you are using a laptop computer, an “all-in-one” computer or a small desktop computer, it is a good idea to purchase a sound module that connects via USB, Thunderbolt or similar connectivity technology and use that as your audio-interface device because most of these computers don’t implement line-level input connections on their integrated sound hardware. Similarly, a dedicated sound card may work wonders for sound quality and computer stability if you are using a traditional desktop computer that can be outfitted with standard expansion cards.

Audacity audio-editor software recording

Audacity – a typical and common audio-editor program

One common software tool is the open-source Audacity program which is highly capable advanced tool but may take a bit of time learning. On the other hand, there is NCH’s Wavepad which comes across as a “free-for-personal-use” program for basic tasks or you can buy a fully-function program for under $100. This one does provide an interface that you can easily get a grip of for most editing tasks. It is also worth noting that you may have ended up with an audio-editor program if you bought an audio-interface device for your computer like a USB sound module; or it may have been bundled with a comprehensive multimedia package or perhaps your computer.

How do I go about this?

Create a software monitor path using your audio-editing software

Here, you create a “confidence monitoring” path to be sure that the sound that you want to record is getting from the source device to the software. This can be useful if you want to hear the source coming through that software or as a troubleshooting tool.

Audacity - audio inputs

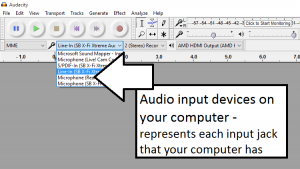
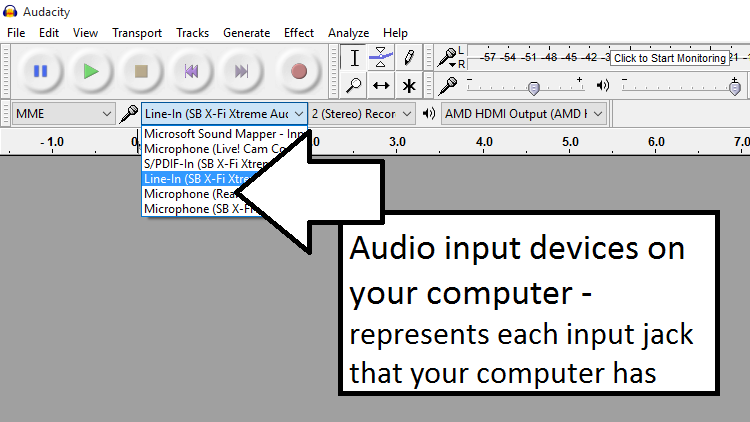
Audio inputs on Audacity

Select the “recording device” or “source input” that your source device or amplifier is connected to directly on the audio-editor software. Typically this refers to the actual jack on the sound-card or sound-module that your source device is connected to. Then you select the “playback output” or “playback device” directly on audio-editor software if the software allows you to do so.

Audacity - audio outputs

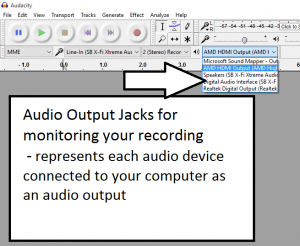
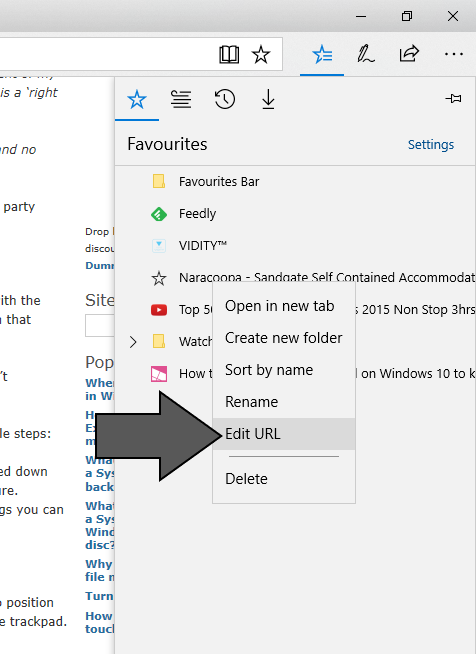
Audacity – audio outputs

If you use a hi-fi amplifier with a “tape-monitor” switch, connect the sound module’s audio input and output to the amplifier’s tape input and output connections. Then you select the source you want to record using the input selector and enable the tape-monitor function on the amplifier if you want the monitoring ability.

Some highly-sophisticated amplifiers have the ability to select which audio source is recorded by a connected tape deck such as through a “record select” switch, or there are amplifiers and receivers that have two tape loops but have a “dubbing” switch that determines how the sound flows between those connections. In the former situation, you may have to set the “record select” switch to the appropriate input and in the latter situation, you may have to select “Source” on the tape-dubbing switch unless you are recording from a tape deck connected to the other tape loop, where you would select that recording device using the tape-dubbing switch.

For the software, you would have to select the sound-module audio input connected to the tape output as the recording device and the sound-module audio output connected to the amp’s tape input as the playback device. Then you would have to enable software monitoring, also known as “software playthrough” in the audio-editing software to verify that the sound is coming through. On the other hand, modern Windows operating systems have the “Listen” tab in the Recording Devices Properties dialog box to allow you to “listen” to the source through your computer’s default audio-output device or an audio output device of your choosing, again useful for verifying your setup.

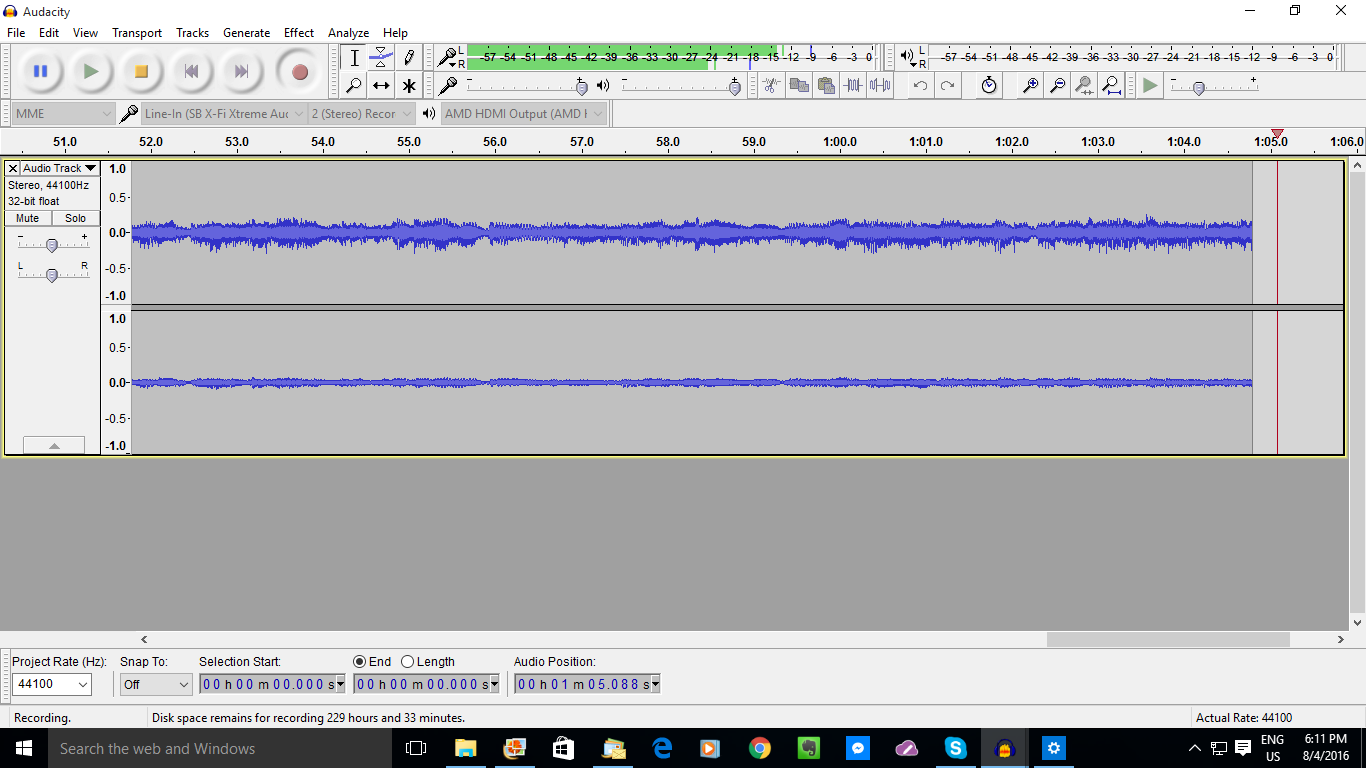
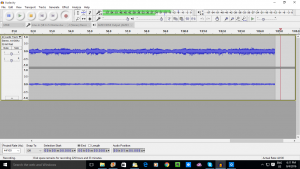
Setting recording level and parameters

Most of the software will have a level meter but this may require you to enable a “monitor” function on the software to see the meter in action. It is also the time where you can troubleshoot any connection problems.

VU meters on Philips DCC-900 in play mode

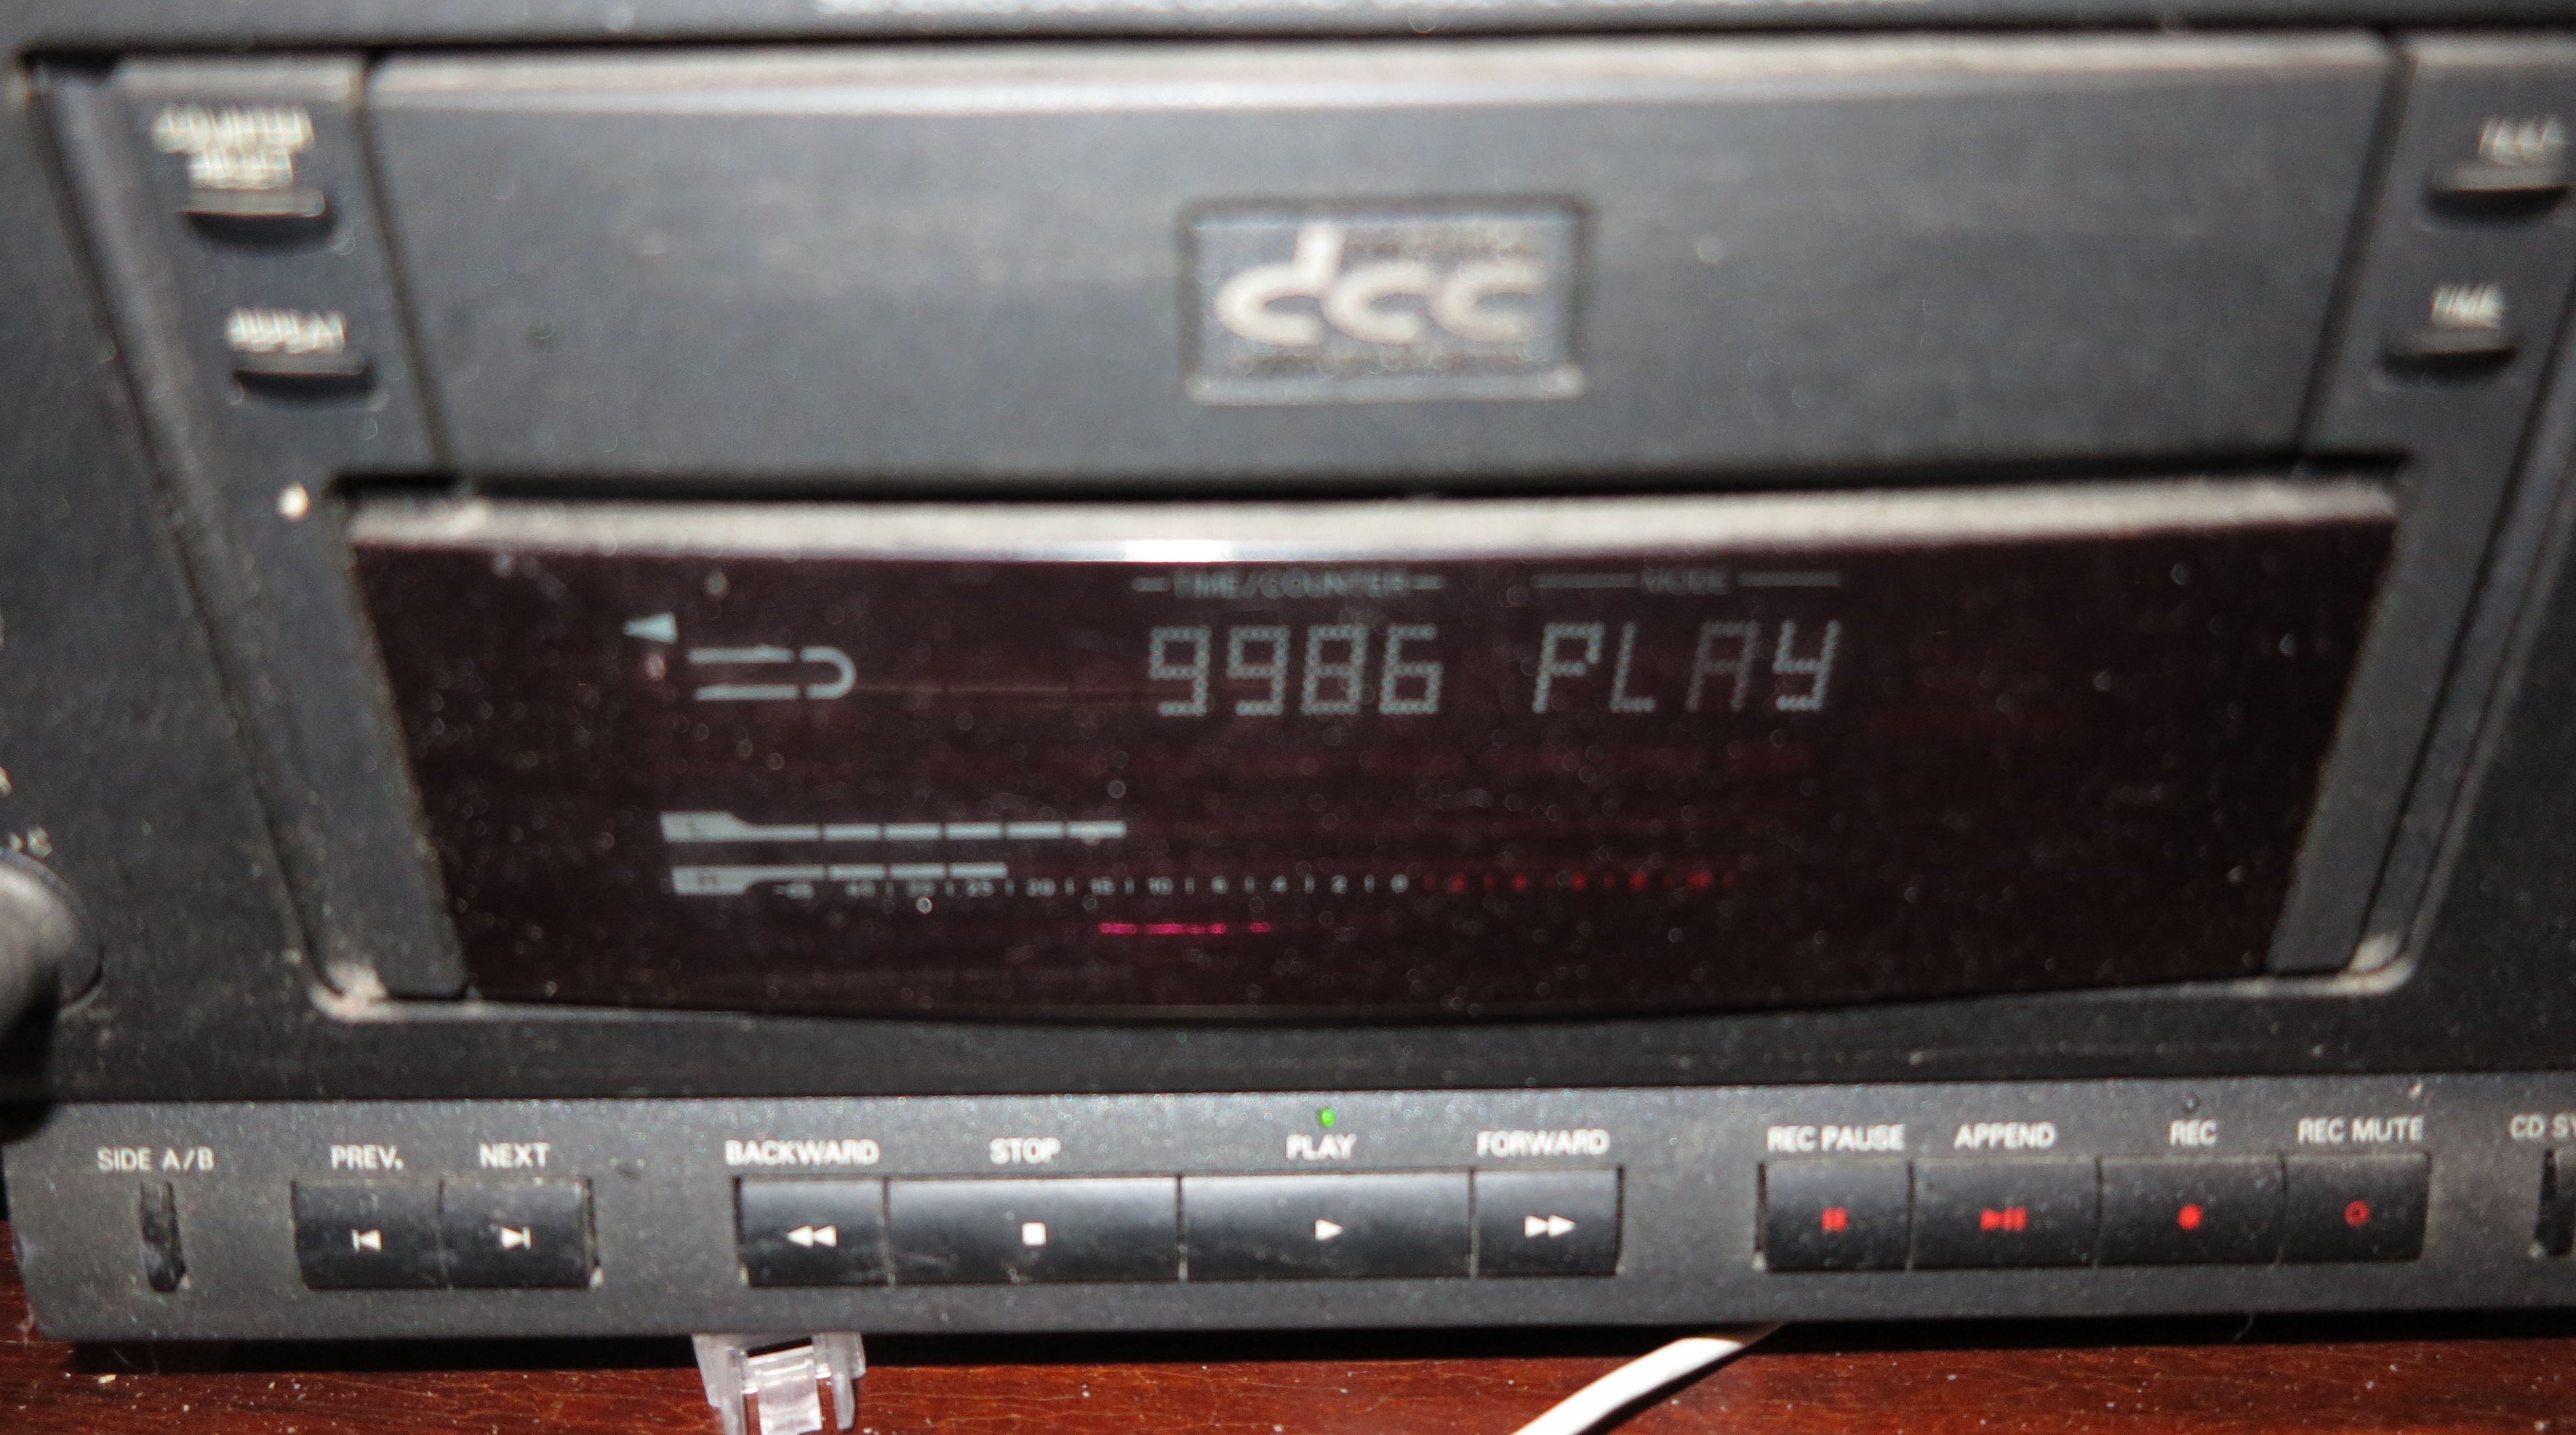
VU meters that indicate playback output level

If you are playing a a recording on a playback device equipped with VU meters that show the output level during play, check these meters for audio output coming from that recording. As well, if the equipment uses an adjustable level for its line-level outputs, adjust this control to at least 75% or 80% of its maximum level. Then you use the software’s level meters to determine the recording level, making sure you allow a bit of headroom on the meters. On the other hand, you may try adjusting the software’s recording level to maximum and winding back the source equipment’s output-level control to achieve the right signal level if the source equipment is connected directly to the audio-capture device.

As well, you set the digital-recording parameters to 16 bit quantisation and 44.1 kHz sampling rate for all legacy recording media if you use an analogue signal path. Also set up the recording parameters to record in stereo unless the recording was recording from a mono source or recorded with mono equipment, whereupon you set the parameters for mono recording. Using 44.1 kHz sampling rate works properly for burning to CD, or you could use 48 kHz if you are working towards using the material in a video project, but you can use either

You may find that using one of the audio filter functions on your amplifier like a “subsonic filter” may come in handy when recording vinyl for example. Similarly, using the Dolby noise-reduction function on your cassette deck may benefit the transfer process for a suitably-recorded tape.

Assuring proper computer performance

It may be a good idea to make sure that as few applications and tasks are running on your computer before you commence recording. This is because you need to dedicate your computer’s processor and RAM resources to the recording task and make sure that it will record reliably and properly.

This may involve closing email clients, games, office applications and Web sessions before you commence the recording session. Then, while you are recording, you make sure you aren’t using any other app on the computer that is doing the recording.

For laptops, it may be better to have them connected to AC power so that the recording session isn’t destroyed due to the battery dying. Sometimes, you may have to set your computer’s power-usage behaviour to “full-on” or “high-performance” for your recording job so that it doesn’t go to sleep during recording.

Recording

When you are ready to record, start the software recording then start your legacy media playing. Once the recording is complete, make sure that you save the sound file or project depending on the software so you don’t lose the recorded sound.

Use your turntable's cueing lever or button to lower the arm when you start playing that record

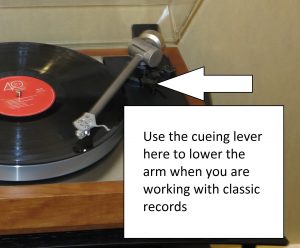
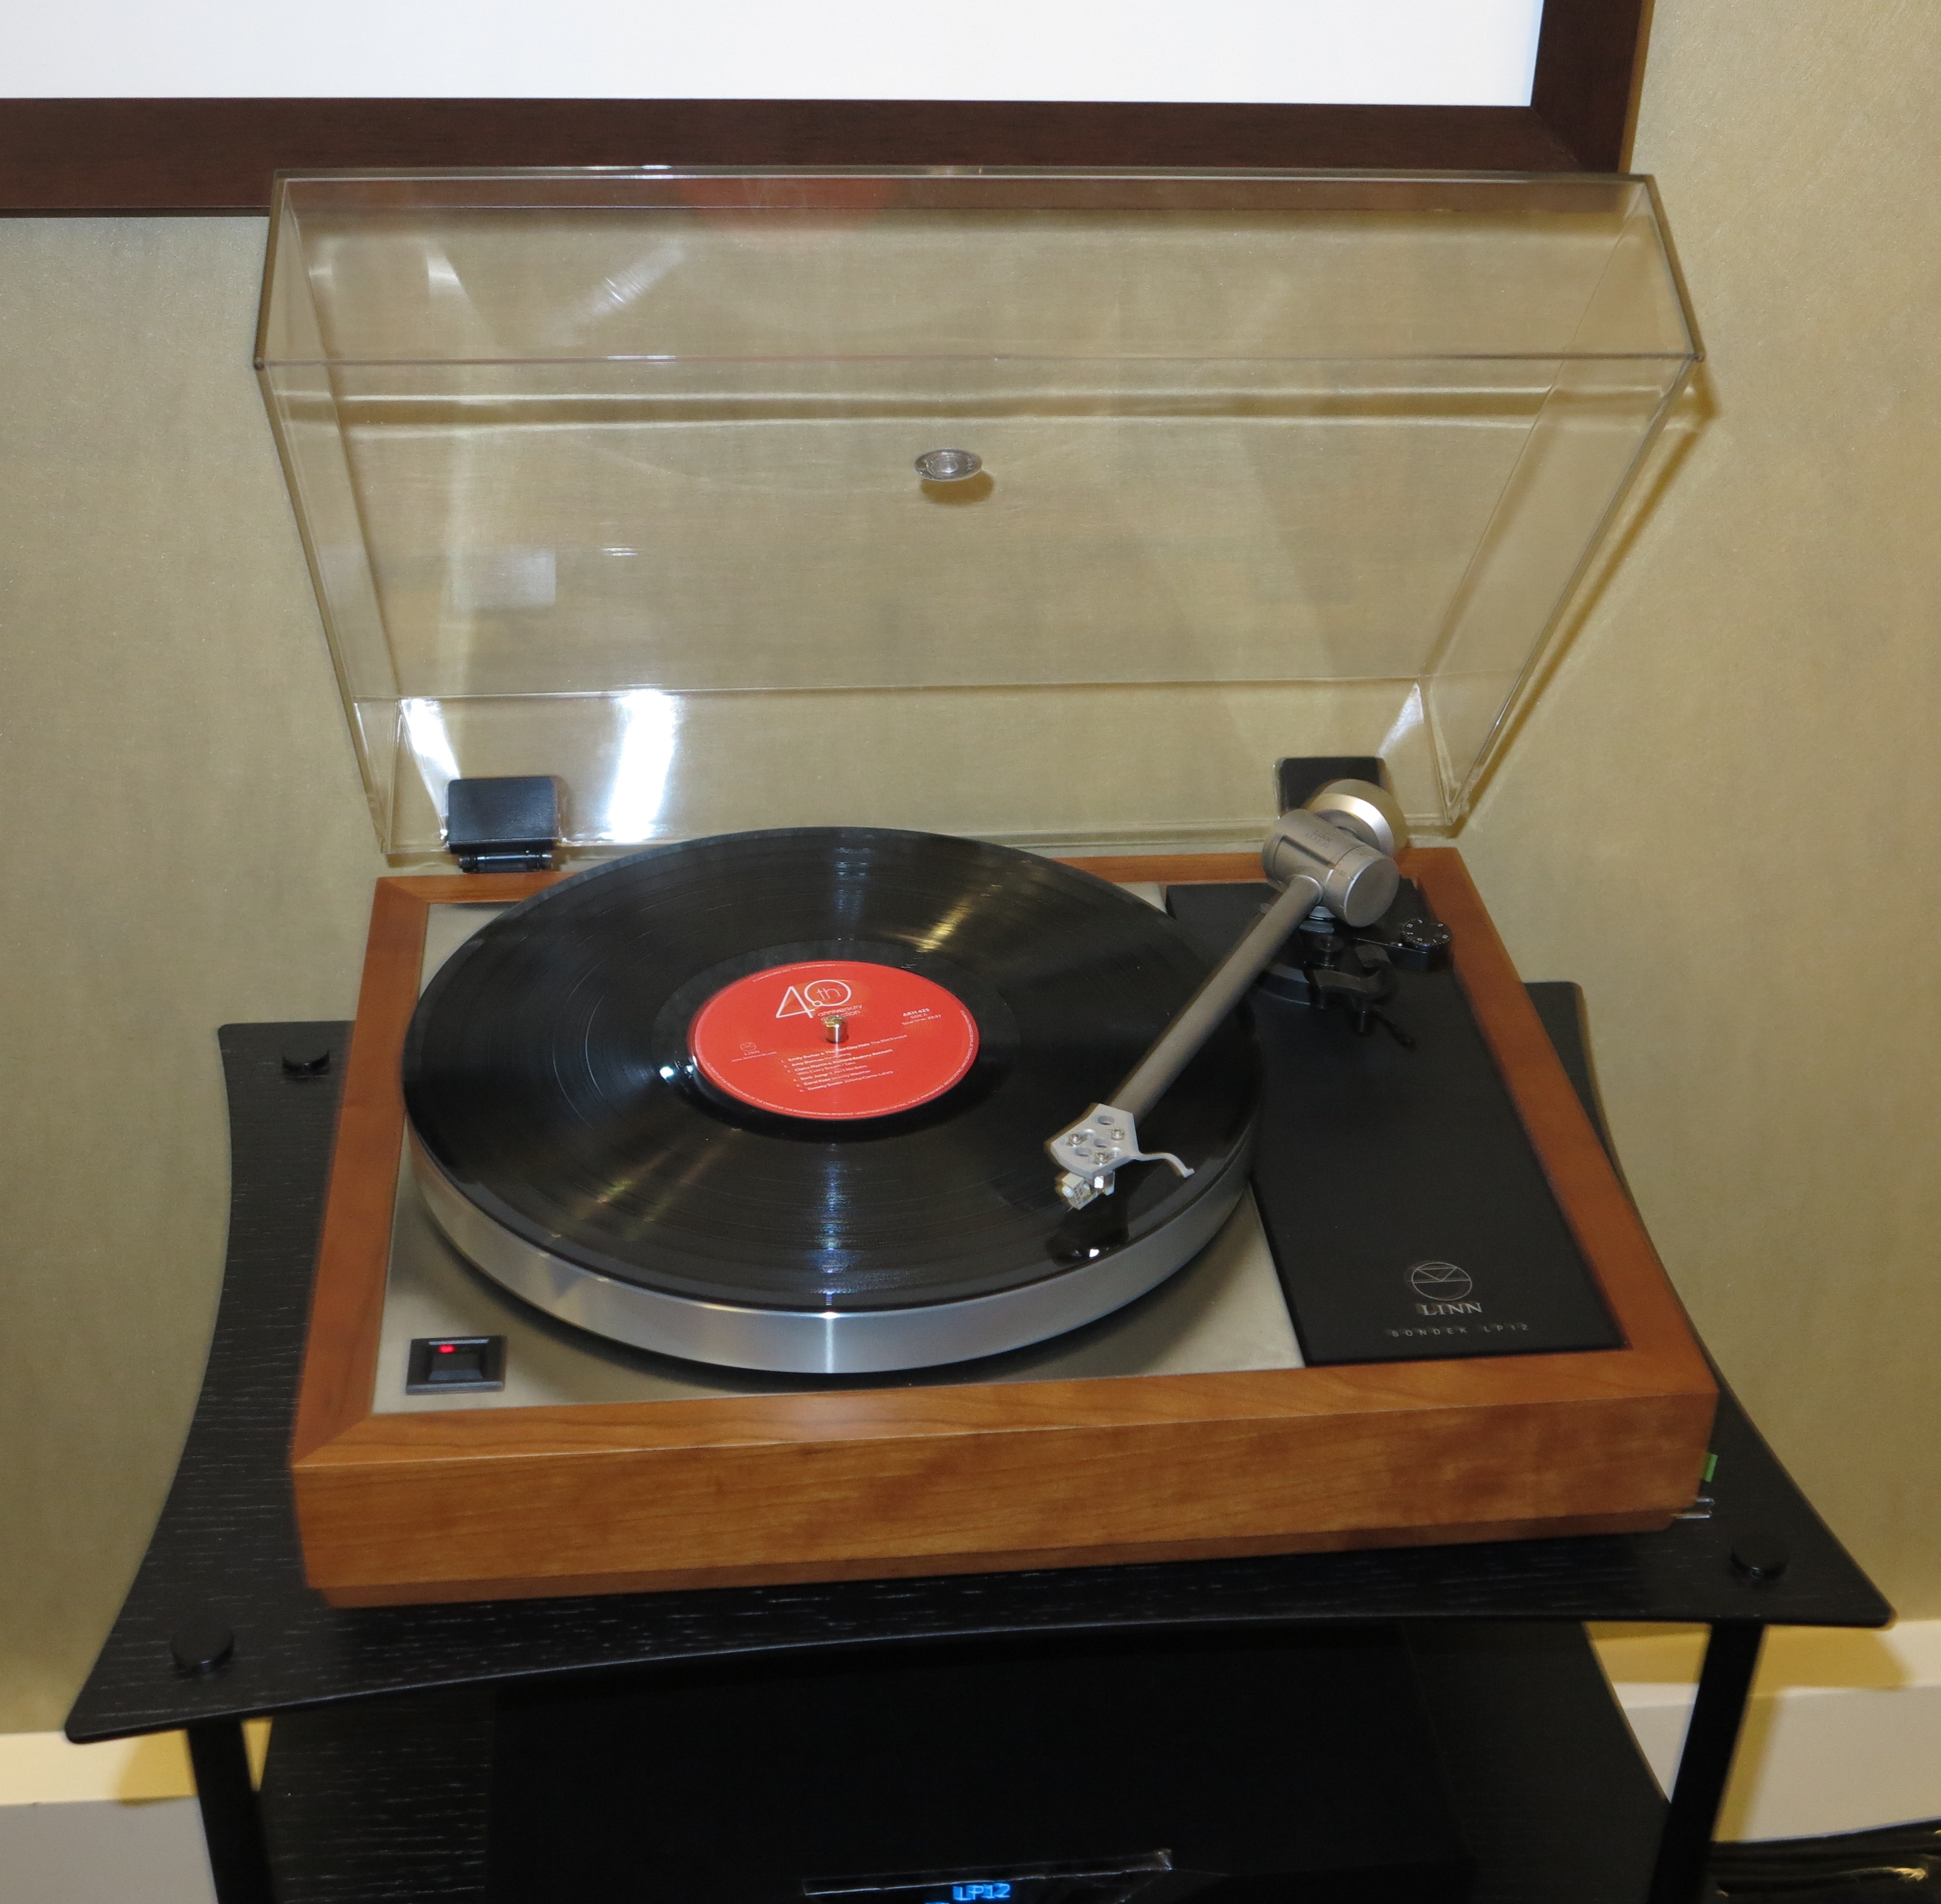
Use your turntable’s cueing lever or button to lower the arm when you start playing that record

If you are recording from vinyl using a manual or semi-automatic turntable, use the cueing function if it has one to lower the stylus to the record rather than actually lifting the arm on. It is typically represented by a lever at or near the arm’s pivot or some turntables have a button on the front of the base or near the front edge. This will protect the stylus from being chipped and avoids unnecessary loud clicks.

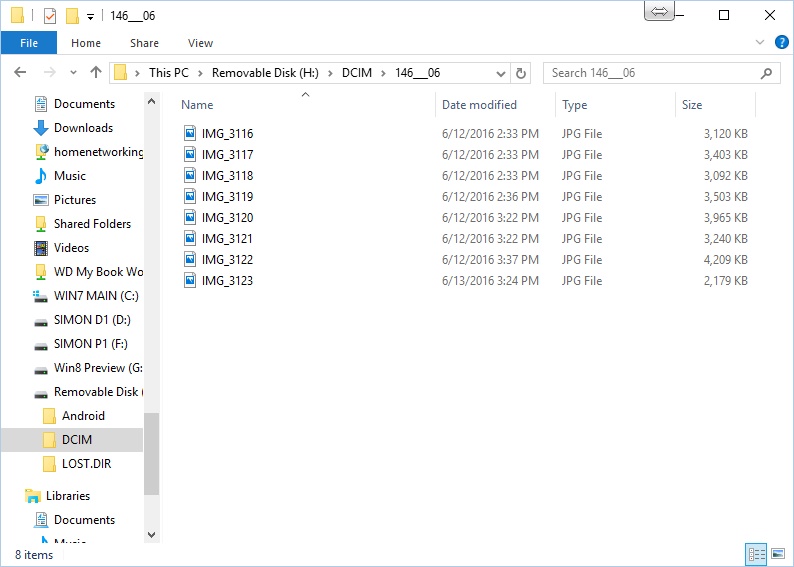
What you will end up with is a large WAV or AIFF uncompressed PCM file for the whole recording or a side of the recording if you record different files for each side or program.

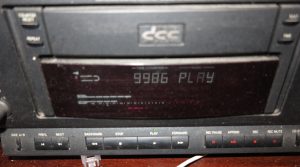
Changing the media during recording

If you have to attend to the medium such as to change sides on a record or tape, you could pause the software’s recording function before you turn the record or tape over. This has all of the album recorded as one file and may be found to reduce glitches.

On the other hand, you may want to stop and save the recording before you attend to the medium then start recording the other side to a new file. This can work well with most studio recordings which are centred around individual tracks or where each side represents a logical part in the recording.

Some audio-editing programs support a silence-based automatic pause or stop function so as to have the recording stop when the source material hits the end of the side.

Editing

Most such software offers the ability to edit a recording that you have made. This can range from simple “cut-and-splice” editing such as to split a recording in to multiple files, combine two recordings in to one recording or remove unwanted noise from a recording.  Anyone who has worked with open-reel tapes or MiniDisc will be familiar with these editing techniques. Your first recording will be a time to become familiar with how your software implements these editing techniques and the way you perform them.

Audacity and some other audio-editing tools allow you also to “mark up” a recording file with index markers kept as a separate file or as part of a logical “project” file. This may be used to facilitate exporting of the file as individual tracks, but allow you to use the effects to adjust the sound across the whole of the audio recording. On the other hand, you may use the cut-and-splice editing techniques to break up the audio files in to individual tracks.

These audio-editor programs also offer the ability to adjust the sound of the recordings courtesy of built-in “effects” or audio-processing routines. There are the elementary effects like equalisation (tone adjustment) or dynamic-range compression but a lot of the programs offer routines geared towards this activity like audio-level normalising, noise-removal and speed adjustment (handy for tapes that have been recorded on portable equipment with half-dead batteries, using a turntable that is only capable of working at 33rpm and 45rpm to work with 78s or salvaging open-reel tapes recorded at speeds not supported by the deck you are playing them on).

A good practice is to save your recording when you get your editing perfect. Sometimes you may want to save the recording as a copy if you are trying an edit or effect out so you don’t ruin your original recording or a successful edit or effect treatment. This may be an important practice as you become familiar with your editing software and will be of value if you are trying to “bring out” poorly-recorded material like cassette recordings made using portable recorders with their integrated microphones.

Editing techniques for legacy media transfer

A good editing technique would be to trim off silence at the start and end of the whole recording and excess silence that has existed between sides or programs of that recording.  For example, some recordings especially those that are on a tape have a longer silent period before the end of the side to preserve a logical program break but have extra space available on the medium for that side.

You could also be removing unnecessary clicks and pops, especially those that are loud and are typically of equipment being started or stopped.

As well, you use the normalising function to bring the tracks’ peak volumes louder but preserve any dynamic range that exists in the recordings. You may have to set up channel-independent normalisation if you have recorded form most consumer-focused equipment because there is a tendency to make one of the stereo channels stronger than the other.

Similarly, the amplify function can come in handy for those recordings that have come through very weak but this is simply about multiplying the volume in that recording and can lead to clipping and distortion if you aren’t careful.

Various filter and equalisation function can be of use to remove unwanted noise such as tape hiss or vinyl rumble. Here, you may have to save a “reference” version of your file and toy around with these filters if you are trying to remove the noise.

Exporting

Most audio-editing software allows you to export the audio content in to different file formats like MP3, FLAC, WMA or AAC compressed forms or a WAV or AIFF uncompressed form. Some of the programs even allow you to “burn” an audio CD from the files you create thanks to an integral CD-burning software engine.

If you use another program to burn audio CDs, make sure that you export your audio content to WAV or AIFF uncompressed PCM files with one file per track. These are the best-quality audio files you can work with when you are targeting these CDs.

Most exporting procedures also allow you to add metadata to CDs as CD-Text data or to files as integral ID3 data. Here, fill in as much metadata as you can about the recording and assign genres particular to the recording’s content. It is important when you copy the files to your DLNA media server or smartphone, or make use of CD-Text when you burn CDs.

Then, you can get away with exporting your legacy-media salvage effort to FLAC files which are a lossless file being handled by most good-quality audio equipment. Similarly, you could export the recording to a 320kbps MP3 file if you want widest compatibility with older MP3-playing equipment.

Conclusion

Once you use a suitably-capable audio interface device connected to your hi-fi equipment along with audio-editing software, you can use your computer as a tool for recording LPs that won’t ever be released anymore or salvaging family memories thus having them on your home network.

Showing photos on the large screen in your dual-screen setup

You may want to show pictures from a laptop to a big TV screen

You may want to show pictures from a laptop to a big TV screen

You have ended up with a collection of photos on your computer that you want to show using the video projector or large-screen TV. This may be like having that carousel of slides ready to show on the old slide projector – here you had this collection of slides ready after you came back from that trip or event.

This situation can apply to a range of use cases such as:

  • A person who is previewing pictures they have taken on a large screen so you can assess them in a better manner
  • Returning travellers who want to show their relatives or friends pictures they have taken during their travels
  • Businesses showing pictures of their latest products or pictures from a trade show
  • Churches who are showing their congregations the photos taken during outreach or missionary events

You may think that your presentation, AV-playout, worship-lyrics-projection or similar software may do the job for you but this will typically involve copying or importing each and every photo to a presentation and creating a presentation file which can be very inefficient. This is more so if you have had the images properly edited and sequenced so they are in a ready-to-show manner on another computer, then transferred them to the computer you are showing them with using some form of removeable media.

Similarly, you may be going through the pictures that you just took with your digital camera then imported to your computer and want to use the large screen such as your home or hotel-room TV so you can assess them more critically.

What do you need to be sure of

Windows folder with pictures in numerical sequence

Pictures in numerical sequence in known folder

The pictures, which are of a bitmap format that your computer’s  operating system can handle directly like JPEG or PNG, need to be kept in a known folder anywhere on your computer’s file system. This means that they can exist on your computer’s hard disk, on an optical disc that you or someone else “burned”, on a USB memory stick or an SD card such as what you took out of your camera. In some cases, it can also extend to online storage services if they are in sync and you are using native software to integrate them as part of the file system. As well, this may apply to your camera or smartphone if you have “tethered” it to the computer using a USB cable and it works to PTP requirements.

Photos on your camera's memory card

Pictures on your digital camera’s memory card or downloaded from your camera will be numbered in this order

The pictures will also be in a known numerical sequence. If they came off a digital camera or mobile phone, they will have a file name with a number that increases with every shutter-click. If you have edited them or had images from other sources, you will most likely make sure they are numbered to reflect the order in which they are shown as highlighted in the illustration.

What I refer to as the “large screen” in these instructions is a projector or a large-screen TV/monitor connected to your computer as a secondary display and what you want your pictures to be shown on. This display has to be configured to “extend” your computer’s main operating screen which I refer to as the “computer screen”.

Windows 7, 8.1 and 10 with Windows Photo Viewer

Here, you use Windows Photo Viewer which comes standard with Windows from version 7 onwards. This program can run a slide show based on image files without taking up too much computer resources/

  1. Open the folder where the pictures that you want to show are located
  2. Open the first picture in the folder or the first picture you want to show in the case of a large collection with Windows Photo Viewer 

    Image in Windows Photo Viewer

    First image of the collection opened in Windows Photo Viewer

  3. Click Play or press F11 to have the picture full screen on the computer’s screen. This will also start the pictures automatically advancing
  4. Pause this slide-show by right-clicking the currently-showing image and selecting Pause
  5. Press “Windows”-“Shift”-“Right Arrow” together to throw the image to the projector or large screen. This step is important or you won’t have it on that big screen.
  6. To manually advance the pictures, press the right arrow key to go forward or the left arrow key to go back. This option is useful when you are showing the pictures to accompany a presentation in order to avoid them being “out of sync” with the presenter, or if you are going through a collection of images like what you just took.
    When you have finished, press ESC on the keyboard to close the program
  7. To automatically advance the pictures, right-click the picture on the large screen and click Play or press F11 (auto advance). This is the option best used for images to be shown in the background.
    Image on screen

    One of the pictures now up on the screen after you follow this procedure

    You have the ability to vary the slide show will appear by clicking on “Shuffle” to have the slides shown in random order (useful when showing as background “wallpaper”) or to vary how long they stay on the screen by clicking the “Slow”, “Medium” or “Fast” options.
    Press “Windows” to regain control if you want to use the computer during an automatic slide-show. You will also see a square “picture” icon in the Taskbar on your computer screen, which is an indicator that Windows Photo Viewer is running.
    To stop, click on that “picture” icon that represents Windows Photo Viewer and press ESC on the keyboard

Once you know how to quickly run a slide show with a pre-edited collection of images and using software that doesn’t require you to “prepare” them for showing, you can make use of the large screen more easily to show those photos.

This article will be updated as I gain more knowledge on how to use other cost-effective or supplied software in other platforms to quickly show a bunch of image files on the large screen without having to prepare a presentation.

You can still claim the Windows 10 free upgrade after July

Article

Making Sure You Are Eligible For The Windows 10 Free Upgrade Before It Expires | Supersite For Windows

My Comments

Windows 10 Free Upgrade screen

This is where you will reserve your copy of Windows 10

Microsoft is terminating the free Windows 10 upgrade offer for Windows 7 and 8.1 users in July but you may be able to reserve that upgrade and “make hay while the sun shines”. This can be achieved by you clicking on the Windows 10 icon in the Notification tray and going through the processes as if to upgrade to effectively reserve that upgrade for your current hardware.

But if you want to stay with your current operating system, you would have to roll back the update so that you and your current computer are effectively registered with Microsoft as if you have taken advantage of the free upgrade. You can also supply the Windows Product Key for your existing operating system in order to reserve your copy of Windows 10.

Some of you who are in the market for a new Windows-based computer may want to skip this process and focus on benefiting from Windows 10 whenever you have your new computer. But if you are “spinning out” your older computer as, perhaps, a secondary computer existing on your home network while you are buying the newer unit it would be worth proceeding with the upgrade. On the other hand, you can download and apply Convenience Rollup Updates from Microsoft to effectively keep the older computer to a similar security standard as the newer equipment.

Similarly, you could download the Windows 10 Media Creation Tool from Microsoft which allows you to create an optical disc or a USB stick as an installation / upgrade media source, then use this tool to deploy the Windows 10 update on to your computer. You could do this as part of registering your computer with Microsoft to reserve the free upgrade.

Facebook Messenger goes native on Windows 10 desktop at last

Article

Facebook finally brings Messenger and Instagram apps to Windows 10 | CNet

Facebook Messenger for Windows 10 PC now live in the Windows Store | Windows Central

From the horse’s mouth

Facebook

Press Release

Windows Store link

My Comments

Facebook Messenger Windows 10 native client

Facebook Messenger – now native on Windows 10

Previously, I wrote about why desktop operating systems need to be supported with native-client apps for messaging platforms. Here I highlighted how the likes of ICQ, AOL Instant Messenger and Skype started off in the “regular-computer” / desktop operating system sphere and when the smartphones came on the scene, newer messaging platforms ended up being based on iOS and Android mobile platforms first.

Facebook Messenger Windows 10 live tile

Facebook Messenger live tile – now a message waiting indicator

The advantages that I highlighted included a stable client program that works tightly with the operating system; and the ability to work tightly with the operating system’s file-system. security and user-experience features extracting the maximum benefit from the user experience.

Now Facebook have answered this goal by providing a native client for Microsoft Windows 10 users, especially those of us using regular computers running this operating system.

Facebook Messenger Live Tile - Tablet mode

Facebook Messenger Live Tile – Tablet mode

This program ticks the boxes for a native client app by using its Notification Center to show incoming messages and chats; along with the ability to show messages as a Live Tile on your Start Menu. There is the ability to upload photos, videos and GIFs from your computer’s file system, which can be a bonus when you have downloaded your pictures from your good digital camera and worked on them using a good image-editing tool.

Of course, you have the features associated with your iOS-based or Android-based Facebook Messenger experience such as knowing when your correspondents are “up-to-date” with the conversation. As well, you have that similarly uncluttered experience which makes it easy to navigate your chats while it doesn’t take up much room on your screen when it is in the default windowed state.

Microsoft makes a step to all-platform online gameplay

Article

Microsoft is stepping towards online gaming's holy grail - a federated cross-platform online gaming experience

Microsoft is stepping towards online gaming’s holy grail – a federated cross-platform online gaming experience

Microsoft will allow Xbox gamers to play against PS4 and PC players } The Verge

Microsoft wants PS4 and Xbox One to connect online | CNet

My Comments

Most core games which have any form of multi-machine multiplayer competition, whether online or across a local network, require all games machines involved in the competition to be on the same platform.

That means that a Windows-based regular-computer user couldn’t play against an XBox or a PS4 console. In a lot of cases, the online component of a game was managed via a platform-specific online-competition platform like PlayStation Network or Steam. In the case of consoles, you had to determine which console platform your friends were using and buy a console commensurate to that platform.

Now Microsoft has raised the question of platform-agnostic multi-machine competition by encouraging their game developers to enable this feature. This is because Microsoft effectively is associated with two platforms i.e. the Windows-based regular computer or PC as a games platform and the XBox family of games consoles. But they are inviting Sony, Nintendo, Apple and others to create the necessary cross-platform bridges to allow this kind of play. This includes allowing a player to discover other players to compete with as well as managing the state of play during a game or tournament.

If this worked, it could allow a person to choose whatever console they wanted to play especially if a title is released across multiple platforms. Similarly, this could allow for options like local-network play, whether peer-to-peer or server-based, including local-online hybrid play such as local tournaments or teams. For games developers, they don’t have to decide whether to set up their own online gaming network if they want cross-platform play.

Another issue that could be highlighted here is the ideal user interface for different game genres including the common user interfaces that the platforms use. The article cited the situation where a regular-computer with its keyboard (W-A-S-D keys) and mouse may have the advantage over a gamepad that typically comes with a console when it comes to playing certain games like first-person shooters or strategy games.

This could be used either to open up the idea of games written to be played across multiple platform types and user interfaces, including those that give players an advantage if they play a part of the game on different devices. On the other hand, there could be the feasibility for games consoles to work with mice and keyboards connected via (preferably) Bluetooth or USB.

What Microsoft is doing is to raise the issue of creating platform-agnostic core game play rather than requiring gamers to be tied to a particular platform.

Rotating videos shot with smartphones

When you shoot video using a smartphone or tablet held in the vertical (portrait) position, it will come out vertical and you may have to rotate your head to watch it comfortably on most display situations. Even if you use a camcorder or high-end digital camera to shoot your video footage, you may find that you have shot some footage at an awkward angle and may want to correct that.

But you can rotate the video footage so it appears right-way-up when you play it. Here, the video will come out in a “pillar-box” form when played full-screen with black borders on each side of the vision.

You can do this with both the main regular-computer operating systems using either an application that comes with the operating system or available as a free download from the vendor.

Apple Macintosh

Current versions of QuickTime Player for OS X have the ability to rotate the video and save a rotated copy.

To do this, open the video in QuickTime Player, then select “Rotate Video” under QuickTime Player’s Edit Menu to get it the “right way up”. Once you are satisfied, press Command-S on the keyboard to save a rotated copy of the clip.

Windows

If you download Windows Movie Maker, which is part of the free Windows Live Essentials package available from Microsoft, you can use this elementary video editor tool to rotate your video clips.

Here, you import your video clip to Windows Movie Maker, then you rotate your video clip using the Rotate buttons on the toolbar. Once you are satisfied, save a copy of the clip in any of the formats that Windows Movie Maker supports.

Conclusion

At least Apple and Windows offer inclusive solutions to correct your video footage that you take with your smartphone so you can make it comfortably watchable.

Web page on a big screen–How?

Facebook and Dropbox desktop

You may want to use the large screen to show people how to use social media to promote their business

Do you want to show that Web-based resource to a large group of people?

You may want to do this as part of training for concepts like social media, Web analytics and the like. Perhaps, you may want to show a particular blog post to a group or even show pictures and video from a Website or video platform but the device doesn’t have native support for that.

There are two different methods of going about this:

  • Mirroring – you see the same display on both the device’s screen and the large screen
  • Extended or Dedicated View – you can see what you want to show on the large screen but have a minimal control view on your

I will be listing the options available to you by the different equipment combinations.

Using your home or other small network

This involves using devices that connect to your computer via your home or other small network.

The common requirement for these setups is that the set-top device connected to your display and your host computer must be on the same logical network. It doesn’t matter what medium (Wi-Fi wireless, Ethernet or HomePlug powerline) is used to connect the host computer or the set-top device to your network.

This setup may not work properly if you are attempting to use a public-access network to connect your set-top device or host computer and this network implements Web-based authentication.

iOS + Apple TV

Equipment Requirements:

  • Relatively recent iOS devices (iPad 2 onwards, iPhone 4 onwards, iPod Touch 5th generation onwards) running iOS 6 or newer
  • Apple TV (3rd generation onwards)

    AirPlay devices discovered by iPad

    AirPlay devices discovered by iPad – when you tap AirPlay icon

Mirror your iPad’s display

  1. Go to Shortcut menu (tap Home button twice, slide to right)
  2. Click AirPlay button and select Apple TV
  3. Select Mirroring
  4. Bring up Web page using Safari

Dedicated Display

This requires you to use one of two apps that you buy from the iTunes App Store: AirWeb ($1.99) or AirBrowser ($6.49). These are Web browsers which present the page on to the display that is connected to the Apple TV device and use your device as a tool to navigate the Web page.

Apple TV - Mirroring on - iPad

Set up iPad for mirroring to Apple TV

AirWeb simply has your iOS device work as a mouse with the external display serving as a screen while the more expensive AirBrowser offers a more polished response and has more capabilities.

Apple Macintosh + Apple TV

Equipment Requirements

  • Apple Macintosh to run MacOS X Mountain Lion (10.8) or newer
  • Apple TV 3rd generation onwards

To connect your Apple Macintosh to your Apple TV

  1. Click AirPlay icon on the Menu Bar at the top of your screen
  2. Click the “Connect To AirPlay Display” option and select the Apple TV device you want to use
    This procedure makes the AirPlay-connected Apple TV device work as an extra monitor similar to if you had connected another monitor or projector to your Mac.

Mirrored Display

  1. Select the Mirroring option to show your system’s Desktop display on the big screen
  2. Open the Web page using your preferred browser

Extended or Dedicated Display

  1. Select the Extended Desktop option
  2. Open the Web page using your preferred browser and drag it to the new screen

Google Chromecast + Google Chrome on Windows or MacOS

Equipment Requirements:

The computer you are using to bring up the Web pages with has to run the latest version of Google Chrome browser and have the Google Cast extension installed.

Mirrored Display

  1. Click the Cast square at top right corner on Chrome in Windows
  2. Using the drop-down menu, select the “Cast this screen / window” option

Dedicated Display

  1. Start Chrome and browse to the Webpage you want to show on your large display
  2. Click the Cast icon on the tab and choose the Chromecast you want to show it to

Google Chromecast + Chromecast App on Android

Equipment Requirements

Your Android smartphone or tablet has to run the latest version of the Chromecast app, which you can download from the Google Play store.

Mirrored Display

  1. Run Chromecast app on Android device
  2. Click on the Navigation drawer (hamburger icon) on the Chromecast app’s user interface
  3. Select the Cast Screen option
  4. Select the Chromecast that you want to use, The Android device’s screen will appear on your larger screen
  5. Use Google Chrome or your favourite Android Web browser to load your site

Dedicated Display

Like the iOS platform, you will have to install a browser that shows its output on the external screen. Here, your Android device will be the control surface while you see the Webpage on your large screen.

For Android users, you will need to purchase and install the Web2Cast app which costs $1.99.

Directly-connected screen

These setups require you to connect your host computer directly to the display device, preferably via HDMI. It is a task you can perform easily with the regular-computer platforms i.e. Windows, Macintosh or Linux because this practice is performed more commonly in offices for multi-screen displays or to show presentations using a projector.

Therefore the procedure to use a directly-connected external display to show that Web page comes across as being simple.

The setup procedures are very consistent across the different major versions of these operating systems.

If you are using some “all-in-one” desktop computers, you may find that an HDMI port may be used as an input port or output port. This functionality is typically to allow one to use the computer’s display and speakers with another video peripheral like a games console or set-top box. Here, make sure that this port is set up to become an “output” port for use with external displays when you are showing a Web page on a larger screen that is connected to this HDMI port.

Windows computer

Equipment preparation

Display setup for a secondary display as a dedicated screen - Windows 7

Display setup for a secondary display as a dedicated screen – Windows 7

Connect the external display to Windows computer and make sure that Windows detects the presence of the display. Here, you may have to use Display Settings to verify that this display is properly detected. You may also have to make sure the external display is switched on and the correct input is selected.

Mirroring

  1. Right click on the Desktop and select “Display Settings
  2. Select Duplicate These Displays to see same screen
    Most laptops may allow you to invoke this setup by pressing Windows+P together
  3. Load the Webpage on your preferred Web browser and browse it as normal

Extended Display

  1. Right click on the Desktop and select Display Settings
  2. Select Extend These Displays
  3. Drag the screen which represents the external display, which should be marked as 2, to the top or right of your main screen. This is a way to help you remember that you are setting up a “big screen”.
  4. Load page on your preferred Web browser, and drag to “big screen” before you browse it.
    Windows 10 makes this process easier by allowing you to click the square “All tasks” button where there will be icons representing both the screens. Then you just drag the Web browser to the “other” screen

MacOS X

Equipment Preparation

Like with Windows, connect the external display to your Mac and make sure that MacOS X detects the presence of this display. As well, make sure that the correct source is selected on your display.

Mirrored Display

  1. Click the System Preferences menu in the Apple menu
  2. Select the Displays menu in the View menu
  3. Check Mirror Displays to show the Desktop on big screen
  4. Open the Web page in your preferred browser

Dedicated Display

  1. Click the System Preferences menu in the Apple menu
  2. Select the Displays menu in the View menu
  3. Uncheck Mirror Displays for extended desktops
  4. Drag the newly-created screen to the top of your existing screen and make sure that your existing screen is kept as the primary screen. This is a way to help you remember you are setting up and using a “big screen”.
  5. Open the Web page in your preferred browser and drag it to the external display.