Tag: Apple Macintosh

Feature Article–DLNA Media Network Series: Getting Started With DLNA Media Sharing

Updated: 13 October 2013

Pure Sensia 200D Connect Internet radioMost of us will end up with a large collection of picture, music or video files on our computers, especially if we use our computers as a large media library. It would be nice to have access to this content without having to copy it out to thumbdrives, SD cards or iPods before we can enjoy it.

As for music, this is more so as we buy music as digital-download files rather than buy physical media and copy it to our conputer’s hard disk. It will also become a trend if we visit video sites that offer video content on a download-to-own basis.

The instructions in this article are more focused with a person who is pressing a regular desktop or laptop computer running Windows, MacOS X or Linux as a media server and may be the way to go when you start out with DLNA especially if you are using a desktop comptuer.

Why share your music, pictures and video the DLNA way?

Sony BDP-S390 Blu-Ray Disc Player

Sony BDP-S390 Network Blu-Ray Player – a Blu-Ray player that adds DLNA to an existing TV

An increasing number of dedicated network media client devices are on the market and nearly all of these devices work according to the UPnP AV / DLNA media-client standards.  Most manufacturers who are selling premium table radios are supplying at least one which can pick up Internet radio broadcasts through a home network and these sets are also capable of picking up media made available to them from a UPnP AV media server. We are also seeing an increasing number of wireless speakers that connect to your home network and receive music via Apple’s proprietary Airplay system or the common DLNA system. These units can be controlled by mobile devices equipped with controller apps.

Similarly, DLNA is becoming an important feature for any well-bred “smart TV” or similar video peripheral like a Blu-Ray player or home-theatre system that is connected to the Internet. The ubiquitous Xbox 360 and Sony PlayStation 3 games consoles that every teenage boy dreams of having both work according to these standards and this feature is becoming a requirement for up-and-coming TV-connected games consoles.

By using a DLNA-based setup, you don’t need to install different media-server programs for each network-media client that you happen to buy. In some situations, you may only need to run whatever is supplied with the computer’s operating system.

Setting up your network for DLNA media

Basic DLNA Media Network

Basic DLNA Media Network

Most home, small-business and some branch-office networks don’t require any revision because they typically are one logical network that spans the premises with the router that exists at the network-Internet “edge” being the device that handles basic network housekeeping. This doesn’t matter whether the network has one or more media segments like WiFi wireless, Cat5 Ethernet or HomePlug powerline cabling.

You will need to know the ESSID and the WEP or WPA security key for your wireless network. This may be obtained through the router’s Web administration page or through your client PC’s wireless-network-setup parameters such as in Windows Connect Now. If you are connecting your DLNA media client to the network via wireless, you will need to make sure that the wireless access point or router is broadcasting the ESSID so you can pick it from a list using the device’s user interface and be sure you are “in reach” of the network. This practice would be important when you run a multi-access-point wireless network or simply to help with making sure that neighbouring wireless networks are set up properly. As well, you will need to be ready to enter the WEP or WPA security passphrase by “picking out” characters from a list using buttons on the device or its remote control.

Some networks such as the public-access networks provided by cafes and the like, including the headline “Wi-Fi Internet” that resort apartment developments provide won’t work well with DLNA. This is due to implementation of a Web-based login system as well as client isolation which doesn’t work with most DLNA-capable devices.

Setting up your PC jukebox or media server software for DLNA

Settings for ripping CDs in Windows Media Player

Settings for ripping CDs in Windows Media Player

If you are running any Microsoft Windows version since Windows XP, you can use Windows Media Player 11 or newer versions as your media server. Before you start “ripping” CDs to the hard disk, make sure the program is set to rip without DRM (Copy Protect Music checkbox in the Rip Music options tab is cleared) and that it is set to rip CDs at 192kbps WMA or 320kbps MP3. The reason I would rip at these settings is to be assured of sound reproduction that is as close to the CD album as possible. You may use the MP3 codec for maximum compatibility or WMA for efficient storage if your DLNA media clients can handle WMA.

As well, you will have to set Windows Media Player 11 to automatically permit devices to benefit from its media library. This is done by going to “Library”, then selecting “Media Sharing” and clicking on “Settings”. The “Media Sharing – Default Settings” dialog box will open whereupon you make sure that the “Allow new devices and computers automatically” checkbox is selected.

If you don’t use any sort of ratings in your media as far as sharing is concerned, you may have to select “All ratings” in both the “Star Ratings” and “Parental Ratings” options. This will make sure all media is available for all of the devices.

Windows Media Player Sharing settings for DLNA

Windows Media Player Sharing settings for DLNA

For your pictures and videos, you will have to add the folder that contains your photos to Windows Media Player’s media library. Similarly, you will have to do this for your video folders.

Linux users have access to a large plethora of media-server software such as TwonkyMedia and TVersity as well as a large collection of open-source media-server software. You will still have to use a CD jukebox program set up to rip CDs at 320kbps MP3.

Apple and Windows users who use iTunes as their CD jukebox but will need to use either TwonkyMedia, PS3 Media Server or NullRiver MediaLink. They will need to make sure that the iTunes directory is the one to be provided by the media server. Again, iTunes will need to be set up to rip at 320kbps MP3 for best compatibility and quality. The program may support transcoding to lower bandwidth settings for use whenever music is being transferred out to an iPod.

Infact, I have written up some more detailed information about setting up an Apple Macintosh computer to work as part of a DLNA-based home media network because of the increasing popularity of these computers. The article, “UPnP AV (DLNA) for the Apple Macintosh platform”, covers other media server programs that exist for that platform.

The media server would need to be set up to work with the folders that are being used as the primary folders for music, photo and video storage.  I have explained how to go about this for your music, especially if you use iTunes or Windows Media Player. For your photos and videos, you simply add the folders used by your photo management and video management software to store your images.

As well, if you, a friend or associate uses SkyDrive, Dropbox or similar cloud-based storage services to share a media collection, you may need to copy the media that you received through the sharing to your media library to share them via DLNA. Similarly, images shared through the Social Web may need to be downloaded from the service to your media folder.

The DLNA media-server programs typically index music files according to artist, album, track, genre, and some may support separate identification of composers, contributing artists (important for soundtracks and compilation albums) and other metadata for pictures and videos. Some, like TwonkyMedia, allow for alphabetical clustering and other efficient sorting arrangements. This is typically because UPnP AV / DLNA allows for the server to determine how it presents the library to the client devices.

As far as playlists are concerned, they will typically be listed in a “Playlists” collection with each playlist being its own collection in that tree. By having a playlist as a collection of tracks rather than a reference to a playlist file, it means that the media clients don’t have to be compatible with the playlist file format that the jukebox program works with.

Some of the media servers like Windows Media Player 11 or TwonkyMedia support transcoding to common file formats for situations where a DLNA media client cannot handle a particular media type. This can come in handy for file types like WMA or high-definition audio files which aren’t handled by all UPnP AV media players.

Setting up the DLNA clients

Enrolling the DLNA clients in to your network

You will need to make your DLNA media client become part of the network. This can be a simple task of plugging it in to your Ethernet network segment or into your HomePlug powerline network segment using a HomePlug-Ethernet bridge.

Integrating wireless-enabled DLNA clients to the wireless network

If you are connecting your wireless-enabled DLNA media client to the WiFi network, you will need to configure it for this network. This will require you to enter the device’s setup menu and select the option pertaining to wireless network setup. Then you get the device to search for your network’s ESSID which is commonly referred to as the SSID, Network Name or something similar. Once your device has detected your wireless network, you will be prompted to enter the WEP or WPA security passphrase. At this point, enter the passphrase in to the device. These procedures will have to be done as mentioned in the “Setting up your network for DLNA media” section.

Nearly all of the recent DLNA network media clients may use a “quick set-up” method like Windows Connect Now or WPS. This will typically involve either transferring a USB memory key between a Windows XP or Vista wireless-equipped notebook computer and the device; or registering the device with the wireless router. This procedure may be as simple as pressing a “register” or WPS button on the router and the device or copying the device’s PIN number (which would be on the device itself or in a WPS setup option in the device’s setup menu) in to the wireless router’s setup menu.

If you use MAC-address filtering on your wireless router, you will need to register the DLNA media device as an “accepted” network device. This will require you to copy the device’s wireless MAC address, which will be on a sticker attached to the device itself, in to the router’s trusted MAC-address list.

Making sure the DLNA clients detect the media server

DLNA media directory provided by server PC

DLNA media directory shown on TV screen as provided by PC

You will need to make sure that the media server program is running on the PC that has the media that you are sharing. Most such programs may run a media server component as a background task while the computer is fully on but some may require the jukebox program to be running all the time. Similarly, you may bave to stop your computer going to sleep or hibernate mode under automatic control for this to work properly.

Another thing to check is the desktop firewall software. This should be set to allow the media server software outbound and inbound access to the network as a server. The Windows Firewall software that is part of all Microsoft desktop operating systems since Windows XP Service Pack 2 makes this easy by allowing immediate access to Windows Media Player or asking you if you want to allow the application to have network access. Other third-party firewalls may require the server application to be allowed Internet access by you adding the software to their application “white lists”.

DLNA collections listed as sources on the TV

DLNA content collections listed as sources on a Samsung Smart TV

You may have to select “Network Music”, “PC Music” or something similar on most network-enabled music devices like Internet radios in order to gain access to the music library that you have made available.  Then you select the “hostname” of the PC, which may be commensurate to its standard computer name or its primary owner’s name. The DLNA client will then show the media type that it can work with. You then select that type and use the controls to select the media you are interested in.  Some devices like the recent crop of Samsung Smart TVs list each DLNA server on the home network they are connected to either as a source alongside the integrated TV tuner or external connections on that device.

Summary

Once you have your network and media-server computer set up properly, you can work with providing music and other media to network media receiver devices without much hassle.

Formatting external hard drives to native file systems may allow them to work optimumly

Article

Using external drives to save space on your Mac? Format them first. | MacFixIt – CNET Reviews

My Comments

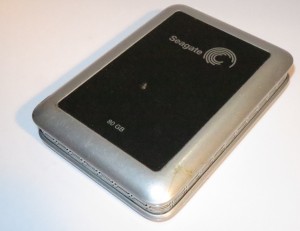
External hard disk

A typical external hard disk

This article highlighted the benefits of formatting external hard disks that are to be connected to an Apple Macintosh as HFS+ file-system disks. This advice hails well for formatting an external hard disk to an operating system’s native file-system such as NTFS for Windows or ext3 for Linux. This is because most of the external hard disks come preformatted to FAT32 more as an interchangeable file system that can be used on Windows, Macintosh and UNIX/Linux.

In the context of an external hard disk that you attach to a network-attached storage device for extra capacity, it may be worth looking through the instruction manual for your NAS or router to find the optimum file system. Some of the NAS units may work with ext3 or NTFS as the file system whereas most, including the routers with NAS functionality will stay with FAT32.

But this situation would apply to external hard disks that are primarily connected to the host computer all of the time rather than the “portable” hard disks that are likely to be moved between different computers and file systems. It wouldn’t hold well with thumb-drives and memory cards that you would expect to move between various computer devices including specific-purpose devices because most of these devices would only know the common FAT32 file-system.

This advice is best applied with an external hard disk that you have just purchased rather than one that contains all of your data because a format routine can wipe all of the data that exists on the hard disk.

What to do if the App Store gives your Mac the Dreaded Beach Ball

Article

Tackle a hung App Store update in OS X | MacFixIt – CNET Reviews

My Comments

You have that Macintosh computer running with Apple’s App Store as your preferred download spot for programs. But you notice that the Mac is not being its usual self while you are running an App Store update or download. It starts to show that dreaded “beach ball” for ever during the update process while nothing is happening. This means that the App Store client application is hanging and effectively slowing down the rest of your system.

The main problem that can lead to this typically are about the App Store working with corrupted files in its folders as what happens with any computer programs. This encompasses where the installation packages are held after they are downloaded as well as any temporary files that the App Store creates. The folders will exist on the “Macintosh HD” secondary storage location which is the main storage location for all of your Mac’s programs and data.

Here, when you notice this behaviour, you would have to “force-quit” the App Store application. Either this is done by selecting “Force Quit” from the Apple menu or pressing CommandOptionEsc on the keyboard. You could also “force quit” from the Dock by using Option-Right-Click on the unresponsive application’s icon. After you have done this, the Mac should be more stable by now.

Dealing with the corrupted data

Installation package folder

Then you would have to use Finder to clear out the App Store Updates folder which is at Macintosh HD/Library/Updates. This is where the software update or download packages are held by the App Store before being installed. Once you clear this folder out, it means that the App Store application can draw down fresh “known-to-be-good” install packages from the iTunes App Store.

Temporary and “work” files created by the App Store

Another location that you may have to clear out are the App Store Caches. These represent the temporary files that the App Store application creates as it goes about its work.

Here, you run Terminal and type in: “open $TMPDIR../C” to expose the “cache” folders where data that the App Store needs for speedy operation exists. In this window, look for folders that begin with “com.apple.appstore” and remove these folders.

You also go back to Terminal and type in “open $TMPDIR../T” to expose the temporary-file folders. Here, you look for the folders that begin with “com.apple.appstore” and remove them.

The App Store will take longer to start as it re-builds the cache and temporary files with the fresh “known-to-be-good” data.

Permissions fix for the system resources

This is another area that could house corrupt data and could generally affect your Mac’s stability. It is because the information about the permissions required by the applications to use system resources is kept as data on the Macintosh HD.

Here, you use the Disk Utility to do this task. You select the Macintosh HD in this program’s sidebar and click “Repair Permissions” in the “First Aid” tab to start it repairing any corrupt system-permissions data.

Tips to avoid this problem

If you are using a Wi-Fi wireless LAN connection or a mobile-broadband connection, and you intend to do a lengthy App Store update, make sure that you are getting a consistently strong signal from the wireless network. This is because a poor or inconsistent wireless signal could lead to an increased risk of failed downloads.

As well, it may be a good idea to have your MacBook connected to external power while you are doing a lengthy update. This avoids the risk of a failed download occurring because the battery is on the way out.

Here, you could confine the App Store software updates to your home or workplace so you can be sure of a smooth update scenario.

E-tax to be available for Australian taxpayers running Macintosh computers

Article

E-tax for Mac | 2013 ATO tax returns | $5.2m to put e-tax on Mac

My Comments

Previously, the Australian Tax Office had offered their E-Tax desktop tax-preparation software just for Windows PCs. This put Apple Macintosh users at a disadvantage if they wanted to use this software to prepare their tax returns, with them running Windows virtual-machine software like Parallels or the BootCamp dual-boot software for this task.

Now they have worked towards porting the current version of the E-Tax software to the MacOS X platform so a Mac user can do the tax preparation using the software as if it is part of the operating system.

But there is a general direction towards Web-based tax preparation rather than the desktop software. This is mainly to encompass other environments like desktop Linux, lightweight OS systems like ChromeBook, along with mobile / tablet setups.

This could be augmented with common file formats representing common taxation documents, mainly to allow preparation of these documents using business bookkeeping software. It may come in to its own with people who prepare their own taxes or have an accountant do this work.

At least this is a positive step to allowing us to work with accounts and taxes in an online manner no matter the kind of IT equipment we use.

Viber now competes with Skype as a free desktop softphone program

Article – From the horse’s mouth

Viber – Free calls, Free text messages, photo and location sharing

My Comments

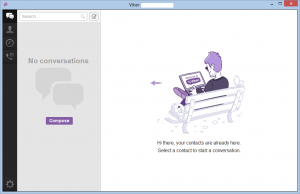
Viber 3.0 Desktop Client for WindowsPreviously, we have known of Viber as an “over-the-top” VoIP telephony program that offers a free telephony and SMS path for smartphone users. This has been of strong appeal to overseas travellers who want to escape the horrendous roaming charges that most mobile operators are charging people who use the phone out of their home country.

Now Viber have reached version 3.0 and released a desktop version of the softphone which will run on Windows or Macintosh regular computers. This has provided features like desktop-to-desktop videocalls and the ability to transfer a call between the regular computer and a mobile device. This is a sign that Viber has matured and started to approach Skype.

But for Viber to answer Skype, they have to offer IP-based videocalls on mobile clients. Similarly, they would need to provide the client software “knowhow” to enable the user interface to work on devices other than platform-based regular or mobile computing devices. This is somewhere where Skype has a considerable strength in with the Samsung and Sony smart TVs, the Panasonic Blu-Ray players, the desk phones, and the Logitech TV Cam HD Skype camera.

It can be easy to state that Viber’s free IP telephony model isn’t sustainable but they could offer services like partnership with some of the carriers like the French “n-box” carriers. They can also offer paid-for off-ramp services where a Viber customer could dial a regular phone that isn’t part of the Viber ecosystem. It can extend to a software-based “trunk” or “tie-line” for IP-based business phone systems as a subscription-driven business-to-business service.

Now that Viber has hit the stage of maturity, we could be seeing the opening of lively competition on the “over-the-top” IP-based voice and video telephony front for both consumers and small businesses.

Thunderbolt now exists as an expansion module connection courtesy of Belkin

Article

Belkin’s Mythical Thunderbolt Express Dock Is Finally Here | Gizmodo

Belkin’s Thunderbolt Express dock is finally shipping, offers its ports for $299  | Engadget

My Comments

I have made a bit of coverage of expansion modules aka docks for use in “expanding” the connection opportunities that are available for laptop computers. These were mainly connected to host computers via the USB 3.0 connector and provided video connections, audio connections along with Ethernet and / or extra USB connections for these host computers, with some of the boxes having removable storage of some form like an optical disk drive or an SD card reader.

Now, Belkin have set up another path between the host computer and the expansion module / dock by exploiting the relatively new Thunderbolt connection primarily used on Apple Macintosh computers. Here, the MacOS user could connect 3 USB 3.0 peripherals, a Firewire peripheral along with a DisplayPort display. There is even an integrated sound module which has an input and output that uses 3.5mm stereo jacks, while the user can connect to a Gigabit Ethernet network segment.

For the Mac user, this may be seen as another more reliable way to “skin a cat” especially when it comes to adding extra deskbound capabilities to that MacBook Air or MacBook Pro.

Touchscreen interfaces becoming more relevant for regular computing

Article

Touchscreens | Apple | Mac | PC | Macbooks | Photos

My Comments

Increased relevance to regular desktop computing

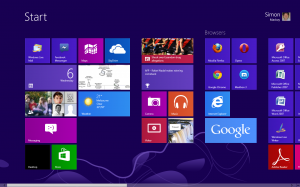
Windows 8 Modern UI start screen

Windows 8 “Modern UI” start screen – optimised for touchscreens

Since Windows 8 with its “Modern” user interface came on to the scene late last year, the touchscreen has been valued as a part of the regular computer rather than an option for some business computers or for use with mobile computing devices like tablets and smartphones.

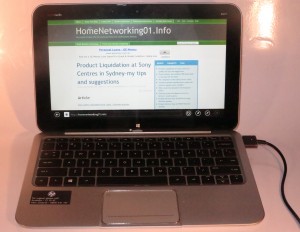
Here, the touchscreens in this computing context are seen as a complementary third method to control the computer. It comes in handy with coarse navigation of the user interface, especially with selecting options or working “at-a-glance” dashboards like the “Modern” UI that is your start point in Windows 8. You can also flick across material you are reading or viewing such as text you are “skimming” or a PowerPoint presentation. This is something I have experienced for myself when I reviewed the Fujitsu TH550M convertible, the Sony VAIO J Series all-in-one and the HP Envy X2 detachable-keyboard “hybrid” tablet. The HP, for that matter, was the first touchscreen computer that I reviewed with Windows 8.

HP Envy X2 Detachable-Keyboard Hybrid Tablet

HP Envy X2 detachable-keyboard hybrid tablet computer

As we already know, the consumer tablet computers like the Apple iPad drew us towards the touchscreen paradigm. But Windows 8 plus some variants of desktop Linux had integrated touchscreen computing from the ground up rather than as an afterthought.

Apple missing out on the touchscreen trend with the Macintosh

The article that I cite raised the issue that Apple weren’t equipping the Macintosh regular-computing platform with touchscreens even though other platforms that serve the same usage style were equipped with this feature. This is because they see the regular-computing platform of being comparatively little value to the iOS mobile-computing platform. It is similar to how they added on the mouse and the 3.5” floppy disk to the Apple II platform in 1987 even though the Macintosh, which was the “new baby” with both these options commercialised these features from the day it was launched in 1984.

On the other hand, Apple could enable the MacOS X operating system with touch control as part of a major upgrade then roll out the functionality in to the MacBook and iMac lineups as well as offer a Desktop Display with touch abilities.

Other gaps in the touchscreen computing trend

Speaking of this, there aren’t many add-on touchscreen monitors available at a reasonable price for use with the regular “tower” desktop. This is more so with monitors sold through larger technology chains that pitch at the small business or the consumer. Typically, you may find that these places offer a touchscreen monitor that is a smaller size and pitched for the POS system, thus sold at a price that is considered ridiculous for regular desktop computing.

Personally, I would rather see more of the touchscreen monitors being available at a slight premium above a non-touch variant of a particular monitor screen size and resolution. Here, one could set up a multi-screen arrangement with one touch-enabled monitor and use the touch-enabled monitor as, for example, a persistent “Modern UI” control screen. This could then lead to a gradual upgrade path for those of us who want the “all-touch” user interface across the multiple screens.

Conclusion

Of course, these comments may be too early to make as Windows 8 and the “open-frame” computing crowd makes the touchscreen display mature quickly and more software authors integrate touch in to their software and games.

Your new MacBook Air or MacBook Pro being thirsty on the battery? Check for software updates

Article

Apple releases fix for increased power consumption in new MBP and MBA | ZDNet

From the horse’s mouth

Apple – Software Download (direct)

My Comments

You may have just bought the Retina-based MacBook Pro or a Macintosh laptop over the past year but have noticed that you always have to run it on AC power rather than on battery. In some cases, you may have noticed that the fan in the computer is running more than it should.

This has been discovered by Apple as a firmware bug and they have prepared a software update to rectify this problem. This bug is allowing the CPU in the MacBook to run harder than it really needs to, thus allowing it to draw on more power and yield more heat. The software update also improves operating-system compatibility with certain USB devices which may also help with the stability of the system.

This software update is available at Apple’s Website or through the Software Updates panel in MacOS X Lion. Infact, if you have just bought a Mac laptop, I would recommend that you visit the Software Updates option and deploy this and other important updates to your Mac.

Now you can have your Leopard-based Apple Macintosh secure from the current threats

Article

Apple issues Leopard update with Flashback removal tool – Engadget

Downloads

Apple

Java security update (targets Flashback Trojan)

Adobe Flash security update

Adobe

Latest Flash Player update

My Comments

Owning an older Macintosh computer that is running MacOS X Leopard but isn’t powerful enough to be upgraded to Snow Leopard or Lion? Or you haven’t upgraded your Mac to Snow Leopard or Lion due to keeping a LocalTalk peripheral in service using that link.

You may fear that this situation may make you vulnerable to the recent security scares involving Trojan-Horse programs written in cross-platform code that is targeting the Macintosh platform. Now Apple has remedied that problem by releasing two patches targeting this version of MacOS X.

The Java security update checks for and removes the Flashback Trojan from your Mac, but also disables Safari’s Java plug-in. If you need to use Java in Safari, you would need to visit the Preferences menu by going to Safari>Preferences or pressing [Command] and [,], then clicking the “Enable Java” option.

The Adobe Flash update will disable the out-of-date version of Adobe Flash Player end encourage you to visit Adobe’s Website in order to download the latest version of the software. Here, you make sure that you are downloading for MacOS X 10.4 – 10.5 to get the latest version for your MacOS X Leopard computer.

Apple has now released a software fix for the Flashback trojan

Articles

A look at Apple’s Flashback removal tool | MacFixIt – CNET Reviews

Apple releases fix for Flashback malware | Engadget

Downloads – Apple’s support Website

Java Update for MacOS 10.6

Java for MacOS Lion

My Comments

Apple has reacted to the groundswell of concern about the recent Flashback malware and have issued updates to its Java runtime environment for both MacOS Snow Leopard and Lion.

Here, they have implemented a check-and-remove routine for this Trojan as part of the installation routine for the new Java runtime environment. For most Macintosh users, this will simplify the process of removing any existence of this malware as well as keeping this runtime environment up-to-date.

The CNET article also gave a detailed review of what goes on as well as how to fix situations if the installation takes too long and the procedure hangs. As I have posted previously, Apple could improve on the issue of providing system maintenance and desktop security software so that Mac users can keep these systems in good order.