Tag: Web browsers

Editing favourites with Microsoft Edge

Article

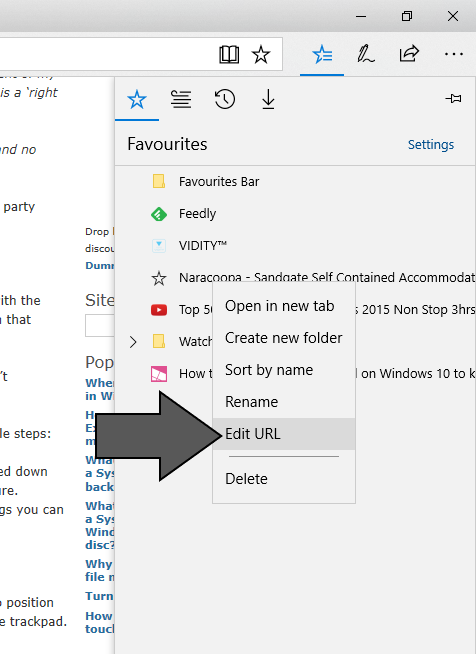
Edit URL item in Favourites context menu

Edit URL item in Favourites context menu

Windows 10 Tip: Edit any URL in your Microsoft Edge Favorites | Windows Experience Blog

My Comments

A situation that can affect many Web users is to have a “favourites” or “bookmarks” list with out-of-date links in it. This can be brought about by a Website moving to a new domain or its link directory being reorganised. The latter situation can be brought about due to implementation of a new content-management system or substantial renovations to the site layout.

Most Web browsers have the ability for you to edit a Web address in the Favourites or Bookmarks list, typically through you right-clicking on a link, selecting an “Edit” option, and manually editing the Web address.

But the Microsoft Edge Web browser that is part of Windows 10 didn’t have this kind of in-place editing functionality. It was in a vain attempt to achieve a reduced-clutter user experience for viewing Web pages on your Windows 10 computer. This would have caused you to navigate to the resource’s new location, add it as a Favourite then delete the old reference from the Favourites list.

Microsoft has added in-place link editing to their Edge browser that is delivered with the Windows 10 Fall Creators Update onwards. Now what you can do is to right-click on the resource’s link in your Favourites list, then select “Edit URL” in the context menu to make the Weblink for the resource editable.

If you are using a touch-only arrangement like a 2-in-1 convertible laptop in a “tablet”, “presentation viewer” or “tent” position, you need to dwell your finger or stylus on the Web resource’s link until a square or circle appears, then remove your finger to expose this context menu. There are some stylus implementations that may have a button that you use to enable the context menu.

But now you can revise that Web link in Microsoft Edge’s Favourites list without having to add the new link then delete the old link.

You don’t need to use an iOS or Android smartphone to manage Amazon Echo

Article

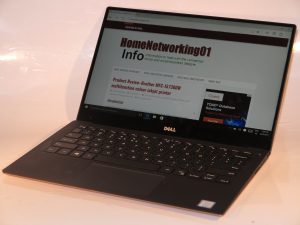
Dell XPS 13 Kaby Lake Ultrabook

You can set up an Amazon Echo with just this kind of computer

How to set up a smart home using Windows 10 and Amazon Echo | Windows Central

My Comments

If you are dabbling with the idea of a voice-controlled smart-home assistant, you may find that some of these setups are dependent on you running an app on an iOS or Android mobile device to set them up or manage them. There are some users out there who may not be able to or want to use a mobile device that works on those two platforms.

For example, there are people like a lot of the older generation who prefer to work with a baseline mobile phone or a landline phone service as well as a regular computer for the communications and personal IT needs. There are also some of us who run a smartphone that is based on Windows 10 Mobile or a similar platform.

This is not so with the Amazon Echo and most other devices that work on the Amazon Alexa platform. When they are in action, they are not dependent on you running a mobile-platform app to have them work properly, rather you just talk to Alexa, the voice-driven home assistant. It is also underscored by the fact that you could purchase the Amazon Echo Dot module which works with a set of powered speakers or a stereo system equipped with an AUX or similar line-level input for US$49.

Most of this interaction in managing your Amazon Echo devices is through the Alexa website (http://alexa.amazon.com), which you can visit using any Web browser.

Adding Amazon Echo devices

Amazon Echo on kitchen bench press photo courtesy of Amazon USA

This Echo doesn’t need to be managed by an iPhone or Android smartphone

Other Alexa-based devices may work through a different setup procedure, perhaps through an on-device Website, Android / iOS mobile app or the device’s control surface.

  • If you are adding an Echo device, you just need to log in with your Amazon account credentials. Then plug in and turn on your Amazon Echo device.
  • The ring light on your Amazon Echo device will glow orange while it is listed on the abovementioned Web site. This is also because the Echo device is pre-registered to your Amazon account when you bought it through Amazon.
  • You may then have to click the “Set up a new device” option to start enrolling it with your home network. On the other hand, you may just need to proceed to the next step.
  • Then you hold down the Action button on the Echo device for five seconds. This is whereupon you will see a list of Wi-Fi networks that the Echo can connect to.
  • Here, you select your home network’s SSID (Wi-Fi network name) and click Connect. You may be asked for your network’s Wi-Fi password which you subsequently enter to come on board. There is an option for this to be saved securely to your Amazon account, which can come in handy if you are dealing with multiple Echo devices.
  • Once the ring light is blue, feel free to talk to Alexa.

Managing Skills and Smart Home devices

The Amazon Alexa Website is also where you can manage what your Amazon Echo or Alexa-compliant device does.

The Skills option allows you to add “skills” which provide an audio-based link to various smart-home hardware and online services. This can also include the ability to book a Uber or other taxi/hire-car service that has a suitable Alexa Skill for example.

As well, some smart-home devices that you add to your home network whether directly or via a hub cam be detected by the Amazon Echo through the “Smart Home” option in the Alexa Webpage.

To get the best out of this resource, create a Favourite / Bookmark in your Web browser or a desktop or similar shortcut in your operating system to the Amazon Alexa Website so you know where to go if you want to manage that Echo or add that Alexa Skill.

But you are not needing to use a mobile-platform app to have your Alexa-based devices how you want, rather simply using your favourite Web browser on your favourite computer device.

Web page on a big screen–How?

Facebook and Dropbox desktop

You may want to use the large screen to show people how to use social media to promote their business

Do you want to show that Web-based resource to a large group of people?

You may want to do this as part of training for concepts like social media, Web analytics and the like. Perhaps, you may want to show a particular blog post to a group or even show pictures and video from a Website or video platform but the device doesn’t have native support for that.

There are two different methods of going about this:

  • Mirroring – you see the same display on both the device’s screen and the large screen
  • Extended or Dedicated View – you can see what you want to show on the large screen but have a minimal control view on your

I will be listing the options available to you by the different equipment combinations.

Using your home or other small network

This involves using devices that connect to your computer via your home or other small network.

The common requirement for these setups is that the set-top device connected to your display and your host computer must be on the same logical network. It doesn’t matter what medium (Wi-Fi wireless, Ethernet or HomePlug powerline) is used to connect the host computer or the set-top device to your network.

This setup may not work properly if you are attempting to use a public-access network to connect your set-top device or host computer and this network implements Web-based authentication.

iOS + Apple TV

Equipment Requirements:

  • Relatively recent iOS devices (iPad 2 onwards, iPhone 4 onwards, iPod Touch 5th generation onwards) running iOS 6 or newer
  • Apple TV (3rd generation onwards)

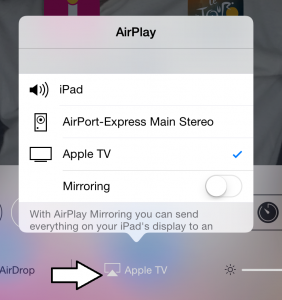
    AirPlay devices discovered by iPad

    AirPlay devices discovered by iPad – when you tap AirPlay icon

Mirror your iPad’s display

  1. Go to Shortcut menu (tap Home button twice, slide to right)
  2. Click AirPlay button and select Apple TV
  3. Select Mirroring
  4. Bring up Web page using Safari

Dedicated Display

This requires you to use one of two apps that you buy from the iTunes App Store: AirWeb ($1.99) or AirBrowser ($6.49). These are Web browsers which present the page on to the display that is connected to the Apple TV device and use your device as a tool to navigate the Web page.
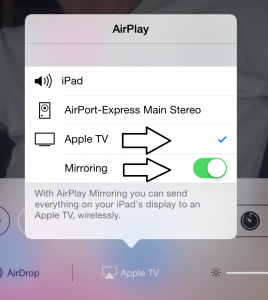
Apple TV - Mirroring on - iPad

Set up iPad for mirroring to Apple TV

AirWeb simply has your iOS device work as a mouse with the external display serving as a screen while the more expensive AirBrowser offers a more polished response and has more capabilities.

Apple Macintosh + Apple TV

Equipment Requirements

  • Apple Macintosh to run MacOS X Mountain Lion (10.8) or newer
  • Apple TV 3rd generation onwards

To connect your Apple Macintosh to your Apple TV

  1. Click AirPlay icon on the Menu Bar at the top of your screen
  2. Click the “Connect To AirPlay Display” option and select the Apple TV device you want to use
    This procedure makes the AirPlay-connected Apple TV device work as an extra monitor similar to if you had connected another monitor or projector to your Mac.

Mirrored Display

  1. Select the Mirroring option to show your system’s Desktop display on the big screen
  2. Open the Web page using your preferred browser

Extended or Dedicated Display

  1. Select the Extended Desktop option
  2. Open the Web page using your preferred browser and drag it to the new screen

Google Chromecast + Google Chrome on Windows or MacOS

Equipment Requirements:

The computer you are using to bring up the Web pages with has to run the latest version of Google Chrome browser and have the Google Cast extension installed.

Mirrored Display

  1. Click the Cast square at top right corner on Chrome in Windows
  2. Using the drop-down menu, select the “Cast this screen / window” option

Dedicated Display

  1. Start Chrome and browse to the Webpage you want to show on your large display
  2. Click the Cast icon on the tab and choose the Chromecast you want to show it to

Google Chromecast + Chromecast App on Android

Equipment Requirements

Your Android smartphone or tablet has to run the latest version of the Chromecast app, which you can download from the Google Play store.

Mirrored Display

  1. Run Chromecast app on Android device
  2. Click on the Navigation drawer (hamburger icon) on the Chromecast app’s user interface
  3. Select the Cast Screen option
  4. Select the Chromecast that you want to use, The Android device’s screen will appear on your larger screen
  5. Use Google Chrome or your favourite Android Web browser to load your site

Dedicated Display

Like the iOS platform, you will have to install a browser that shows its output on the external screen. Here, your Android device will be the control surface while you see the Webpage on your large screen.

For Android users, you will need to purchase and install the Web2Cast app which costs $1.99.

Directly-connected screen

These setups require you to connect your host computer directly to the display device, preferably via HDMI. It is a task you can perform easily with the regular-computer platforms i.e. Windows, Macintosh or Linux because this practice is performed more commonly in offices for multi-screen displays or to show presentations using a projector.

Therefore the procedure to use a directly-connected external display to show that Web page comes across as being simple.

The setup procedures are very consistent across the different major versions of these operating systems.

If you are using some “all-in-one” desktop computers, you may find that an HDMI port may be used as an input port or output port. This functionality is typically to allow one to use the computer’s display and speakers with another video peripheral like a games console or set-top box. Here, make sure that this port is set up to become an “output” port for use with external displays when you are showing a Web page on a larger screen that is connected to this HDMI port.

Windows computer

Equipment preparation
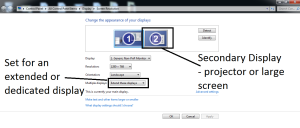
Display setup for a secondary display as a dedicated screen - Windows 7

Display setup for a secondary display as a dedicated screen – Windows 7

Connect the external display to Windows computer and make sure that Windows detects the presence of the display. Here, you may have to use Display Settings to verify that this display is properly detected. You may also have to make sure the external display is switched on and the correct input is selected.

Mirroring

  1. Right click on the Desktop and select “Display Settings
  2. Select Duplicate These Displays to see same screen
    Most laptops may allow you to invoke this setup by pressing Windows+P together
  3. Load the Webpage on your preferred Web browser and browse it as normal

Extended Display

  1. Right click on the Desktop and select Display Settings
  2. Select Extend These Displays
  3. Drag the screen which represents the external display, which should be marked as 2, to the top or right of your main screen. This is a way to help you remember that you are setting up a “big screen”.
  4. Load page on your preferred Web browser, and drag to “big screen” before you browse it.
    Windows 10 makes this process easier by allowing you to click the square “All tasks” button where there will be icons representing both the screens. Then you just drag the Web browser to the “other” screen

MacOS X

Equipment Preparation

Like with Windows, connect the external display to your Mac and make sure that MacOS X detects the presence of this display. As well, make sure that the correct source is selected on your display.

Mirrored Display

  1. Click the System Preferences menu in the Apple menu
  2. Select the Displays menu in the View menu
  3. Check Mirror Displays to show the Desktop on big screen
  4. Open the Web page in your preferred browser

Dedicated Display

  1. Click the System Preferences menu in the Apple menu
  2. Select the Displays menu in the View menu
  3. Uncheck Mirror Displays for extended desktops
  4. Drag the newly-created screen to the top of your existing screen and make sure that your existing screen is kept as the primary screen. This is a way to help you remember you are setting up and using a “big screen”.
  5. Open the Web page in your preferred browser and drag it to the external display.

Another example of Android’s pro-competition prowess–the Web browser

Article

Three cheers for Android browser competition | Webware – CNET

My Comments

In the early days of the Internet browser, there were competing Web browsers but this was choked by Microsoft integrating Internet Explorer in to the Windows distribution. This raised various anti-trust and competitive-trade issues especially in Europe where the European Commission handed down an order requiring Microsoft to allow users to deploy competing Internet browsers on the Windows 7 computers.

As far as the mobile (smartphone and tablet) computing platforms are concerned, only the Android platform allows for competing Web browsers to be deployed on smartphones and tablets. The iOS, Blackberry, Windows Phone and Windows 8 RT (AMD deployment) only work well with the browsers supplied by the platforms’ owners and this has become of concern to the free open-source software community who want the availability of Mozilla, Opera and similar browsers on the mobile patform.

This augments the last article which I wrote about the Android platform supporting a pro-competition culture in various ways such as media management, support for removable storage and removable batteries in devices; and a customisable user experience. What was covered here could be used as a way of defending the use of Android devices on a competitive-trade issue and some people who have a progressive mindset could stand for this platform due to its support of app and media stores that can underpin progressive trade ideas like free speech and nurturing the actual content creators.

Do you view or download that picture that you received in your Webmail

A common situation for Webmail users is that when the receive an email with one or more picture attachements in it, they are faced with an option to view or download the image. This is a situation that can perplex some novice computer users when they face these situations.

Viewing an image

When you select the “View” option for that image, you see the image using your Web browser. This can work well with some Web browsers but not with others and can be annoying if the browser that you are using either shows “actual size” only or while the photo is loading.

In some cases, some browsers such as Internet Explorer can provide a user interface for panning and zooming on digital pictures that can be frustrating and unintuitive to some users. It can be good enough if you are viewing small images or viewing an image “at a glance” with a properly-behaving browser.

Downloading an image

When you select the “Download” option, the image will be copied to your computer’s local storage and you are then presented the option to “open” the image or “save” it somewhere else.

If you “open” it, you use your operating system’s default image handler which, for most desktop environments, would be a dedicated image viewer or your image management program.  Some users may find this program’s interface more intuitive because it shows the image at best resolution on the screen yet allows them to use the image handler’s zoom and pan controls to view the detail.

You also have the option to “save” the image to somewhere of your choosing on your computer’s file system to “take it further”. This can be useful for saving it to a USB memory key so you can have it printed by your favourite digital photofinisher or to show on that digital picture frame or TV. Similarly, you could “save” it to your image library as something to “come back to” later; or to view using your DLNA-capable smart TV or video player.

What do you do?

Whether to view or download that image in your Webmail can depend on what you want to do with the image.

If you want to take the image further, it is best to “download” the image and use the “save” option. On the other hand, you can just “view” the image if you are comfortable with how your Web browser shows images or “download” if you find that the image viewer or image management program’s viewing interface does the job better for you.

Next generation HTTP afoot

Article

Engineers rebuild HTTP as a faster Web foundation | Deep Tech – CNET News

My Comments

HTTP has been the standard transport protocol since the dawn of the World Wide Web and effectively became the backbone for most file transfer and streaming activities of the modern Internet.

But there is a desire in the Internet industry to bring this standard to 2.0 and bring some major improvements to this standard to cater for today’s Internet reality.

Data multiplexing between client and server

One key capability is to implement the SPDY protocol which supports multiplexing of data between the Web server and the Web browser. This is to provide for faster and efficient data throughput by shifting the data using one “channel”; as well as providing support for managing quality-of-service.

This may involve the deployment of audio and video material under a high quality-of-service while text data and software downloads can pass through on an “as-needed” basis.

Inherent end-to-end encryption support

The SPDY protocol that is to underpin HTTP 2.0 also provides support for end-to-end transport-layer encryption. But Microsoft wanted this feature to be optional so it is implemented according to the needs, such as a blog not needing encryption whereas an Internet banking or device management Web page would need this level of encryption.

But I would also like to support in this feature the ability not just to encrypt data but to authenticate the same data using a digital signature. Here, it could permit users to be sure that the Web site they are visiting or the file they are downloading is authentic and would be especially of importance with field-updated BIOS and firmware deployments, as I raised in my commentary about a lawsuit involving HP concerning this practice and its security ramifications.

Caching support at network level

Another feature that is being proposed is to provide for network-level caching of HTTP data. This is intended to provide for environments like mobile networks where it could be desirable to cache data in the service network rather than on the user’s mobile device; rather than introducing proxy servers to provide this kind of caching.

It will also allow mobile and embedded devices to avoid the requirement to have Web caches for quick loading of Web pages. Of course this will not be needed for those Web pages that have regularly-updated data such as Web dashboards, Web mail or similar applications.

Other issues

It also is worth investigating whether the HTTP 2.0 standard could support applications like client-server email delivery or advanced document authoring such as version control.

Of course this development will take a long time to achieve and will require some form of HTTP 1.x backward compatibility so there isn’t the loss of continuity through an upgrade cycle.

A suggestion to make Black Friday the day to update the software on your parents’ computer

Article

Forget Shopping, Friday Is Update Your Parents’ Browser Day! – Alexis Madrigal – Technology – The Atlantic

My comments

You are celebrating Thanksgiving at your parents house but you notice that the old desktop computer that is their computer (and ending up as the family computer) is running Windows XP and Internet Explorer 6. But they see it as their “comfort zone” even though newer versions of Windows and Internet Explorer have been released.

This newspaper article has been suggesting that you update your parents’ computer with the latest version of the Web browser they are using for their operating system. This is because most of the Web sites are being re-engineered to work with newer Web browsers rather than the likes of Internet Explorer 6.

It could be done as part of keeping the computer in good order by doing other software and driver updates. You may even think of updating their computer to Windows 7 if it is running relatively-new hardware and use this package as a Christmas gift idea.

But the main issue with this kind of software update is that you may need to spend a lot of time teaching them the ropes of the new software with the new user interface elements. This may involve long telephone calls or regular house visits to walk them through parts of the user interface that they may find very difficult, as I have experienced with teaching people different computer skills.

Don’t forget that the Browser Choice Screen is your one-stop Web browser port-of-call

Previous Coverage – HomeNetworking01.info

Understanding The Browser Choice Screen (EN, FR)

Web site

Browser Choice Screen – http://browserchoice.eu

My Comments

Previously, I have covered the Browser Choice Screen, which was par of Microsoft’s anti-trust settlement with the European Commission concerning Internet Explorer. This was to be for consumer and small-business Windows setups in the European Union where people were to be offered a choice of Web browser for their operating environment.

But I still see this menu Web page as a “one-stop” port-of-call for people anywhere in the world who want to install new Web browsers or repair a damaged Web-browser installation. This resource came in handy when I was repairing a houseguest’s computer that was damaged by a “system-repair” Trojan Horse. Here, I could know where to go to collect the installation files for the Firefox Web browser that I was to repair so I can restore their Web environment.

If you are creating a system-repair toolkit on a USB memory key, you may visit this resource to download installation packages for the Web browsers to that memory key. Or you can create a shortcut file to this site and store it on the memory key b

The World Wide Web–now 20 years old

Articles

World Wide Web turns 20, finally shakes that acne problem | Engadget

The Web Is 20 Years Old Today | TechCrunch

My Comments

What happened in computing before the Web

Since the home computer came on the scene in the 1970s, there were previous efforts to present information on these computers in a navigable form. This was achieved through the use of dedicated computer programs that were written for this task. These programs became important when the modem, which facilitated computer-to-computer communications over the telephone, came on the scene through 1980.

The main examples of these were the bulletin-board systems and “videotex / viewdata” systems which used the computer as a terminal. They typically provided a forum functionality and an information display which allowed people to bring up pages of information. But they were often difficult to operate unless you were a diehard computer nerd.

Apple was one of many companies who tried to popularise the concept of hyperlinking information where one could click on an item of information and be led to another related item of information. They did this with a program called “HyperCard” which allowed the user to link between various “cards” of information, whether in the same deck or another deck.

There were even attempts to provide indexable information for computer systems, including networked computers by using indexing software like “Isys”. These programs crawled collections of word-processing documents, spreadsheets and the like and created an index which could be searchable and the results viewed in an elementary form.

The establishment of the Web

After 1991, various universities worked towards establishing two standards that were critical to the establishment of the Web. These were “HTTP” (HyperText Transport Protocol), an efficient file-transfer protocol which allowed text to be delivered as a stream suitable for hyperlinking; and “HTML” which was a way of marking up text files to permit formatting or hyperlinking of information.

These worked hand in glove with the Internet and there was a clear advantage that one could link to information using a standard “Uniform Resource Locator” or “URL”. This link could point to file on any computer in the world on the Internet. All it required was the use of a program called a “Web Browser” and the first of these was “Lynx” which worked with text-based terminals. With this one, users had to enter a number pointing to the desired link they wanted to follow.

But, as the Internet became popular, there was the rise of the graphical Web browser which was in the form of Netscape Navigator. This became more intense with Windows 95 having integrated Internet functionality and Microsoft releasing Internet Explorer for this platform.

The Web as an integral part of computing

This led the World Wide Web to become the Internet’s killer application in a similar vein to how pre-recorded video movies being available for hire through video stores became the video cassette recorder’s killer application in the 1980s. We now started to talk of home pages and of “surfing the Web” or “surfing the Net” as an activity.

The Web has also provided support for a universal interface for every sort of computer-driven activity, whether browsing and searching for information, managing one’s email or doing one’s banking and shopping online. It had then led to the boom-bust cycle that was known as the “dot-com” era where companies could set up behind a Web page with a “dot-com” name and make money out of the domain names or the goods and services they could sell online.

As the Web matured, the ability to provide snazzier presentation on the Web sites allowed media companies to work on snazzier home pages, which ended up becoming “portals” that featured news and other information. These became the jump points for people to start their Web-browsing sessions from and they ended up also offering task-specific features like Web-based mail and messaging.

It also led on to the growth of the “Social Web” which is driven by the end user. This is in the form of Web logs or “blogs” which are effectively micro-journals; or social networks like Facebook where one can interlink with other like-minded people.

Even the way the Web is viewed has changed from since it first started. Previously, it was viewed on a regular desktop or laptop computer. Now the last five years has seen the Web being viewed on mobile phones, especially smartphones like the Apple iPhone; tablet computers like the Apple iPad and now the television screen with the new generation of “smart TVs” and video peripherals like Blu-Ray players or games consoles.

Conclusion

The World Wide Web has become one of the major cornerstones for the connected lifestyle by popularising access to online information and commerce, and simply popularising the Internet iteself.

Happy 20th Birthday World Wide Web

Could this e-government initiative be upsetting the applecart in Europe as far as the Browser Choice initiative is concerned?

Article

E-Government-Offensive im Microsoft-Browser | news.ORF.at (Austria – German language)

My comments and brief interpretation

Judging from my basic understanding of the German language together with use of Google’s machine translation, I had “got the gist” of this situation which would be considered hostile to the European Commission’s agenda concerning Microsoft’s Internet Explorer browser.

What I was reading here was that the federal government in Austria were placing heavy emphasis on Internet Explorer 8 as part of their “e-government” initiative. This was including a downloadable toolbar add-in amongst obvious page-optimisation for this browser.

Most likely, I would suspect that, like most large organisations, the Austrian government uses Internet Explorer 8 as part of their standard operating environment and they expect that most users in that country may have stuck with IE8 even during the “Browser Choice Screen” switchover. One could say that this government could get away with this practice because many public and private organisations supply iPhone client apps to make their “front-end” useable on an iPhone which may be platform-specific.

What I would like to see with this is that if the government sites become less useful or unable to fulfil their function because of the preference for a particular browser is concerned, then the sites should be organised to at least fulfil their function no matter the desktop-computer user agent.