USB storage device
As you use a computer, you will have to get in to the habit of removing or ejecting external or removeable media safely and in a proper way rather than just unplugging the device or pulling out the card.
What is this about safely removing or ejecting removeable storage?
Mainframe and similar large computer setups required the operating system to logically mount a tape or disk pack after the system operator installed the medium in the appropriate drive. This procedure makes the files on the medium available to the operating system and computer programs
USB hard disks are more critical with this procedure
Then when the medium was finished with, the system operator had to logically unmount the disk or tape which forced all files to he written back to the medium and the operating system to deem the files on the medium to be unavailable. This procedure was also simplified when the tape and disk-pack drives used electromechanical readiness detection like sensing when a lid or door was closed or a tape was past the heads to let the host computer know that they had media on board and were ready to work with it. It would then require the operator to logically mount the medium and make it available to the system’s programs, typically by typing a special “mount” command.
Desktop operating systems like MS-DOS did away with this to simplify the operating procedures for most people especially as they were used just by one user compared to the previous mainframe systems that were used by multiple concurrent users. It also allowed the use of low-cost disk and tape systems on these computers.
Here, these operating systems immediately wrote back all file changes to the disk when a file was created, modified or deleted. As well, if a program was after a file, it would perform a directory search to determine if the file was there on that disk and the operating system didn’t cache the removeable medium’s directory structure in to the host’s memory. In a lot of cases, the act of closing the disk drive’s door or inserting a 3.5” floppy disk cause the operating system to start reading the disk’s directory in to memory.
But the Apple Macintosh maintained a similar operating requirement to the larger computer systems where you had to logically remove a floppy disk or CD from the system typically by dragging the disk’s icon to the Trash before the computer ejected the disk. This was facilitated with these computers having floppy drives that implemented electromechanical load-eject mechanisms and no hardware “eject” button ever since the platform was created.
This was carried through with Zip drives and other similar removeable-media drives that used any form of electromechanical load-eject mechanisms. The presence of an eject button on these drives typically worked as a way of telling the operating system about an intent to remove the medium so it is logically unmounted and was also implemented with newer iterations of the MS-DOS / Windows operating system along with driver programs for earlier iterations of that operating system.
Similarly, those of you who have used the MiniDisc format, especially with an MD deck or a music system that has an integrated MD recorder, may notice this taking place when you are recording to these discs. What will happen with these decks is that a message will flash up on the unit’s display screen that it is writing all the changes to the disk when you press the eject button or power off the unit before the disk is available or the unit switches off. This makes sure that all of the recording and editing activity is properly committed to the disk and is intact.
Why was there a need to tell the operating system that you were intending to remove the medium
If removeable media is removed by surprise, there can be problems with the quality of the data that is written to the medium because the operating system and applications think that certain files on the medium are available to be worked with.
This can lead to corrupted files because all the changes to the file being worked on haven’t been written to the medium completely. There are also issues with the files being locked by programs that are writing back the necessary changes so that other programs can’t interfere with this process, and if a program hasn’t released these locks or committed all of the changes, the files may not be available for other programs to work with. In the worst cases, your computer can go in to a headspin if it is working with a file that exists one minute and doesn’t exist the next.
How do you safely remove USB removeable media?
Eject option in Windows Explorer
With a computer, you make sure that you have closed the files you are working on if you were using a program to work with them. Then you perform a safe-removal procedure that is dependent on your operating system.
Macintosh users simply drag the icon representing the removeable storage to the Trash icon at the bottom right of the Desktop screen. Then there will be a message to say that it is safe to remove the medium.
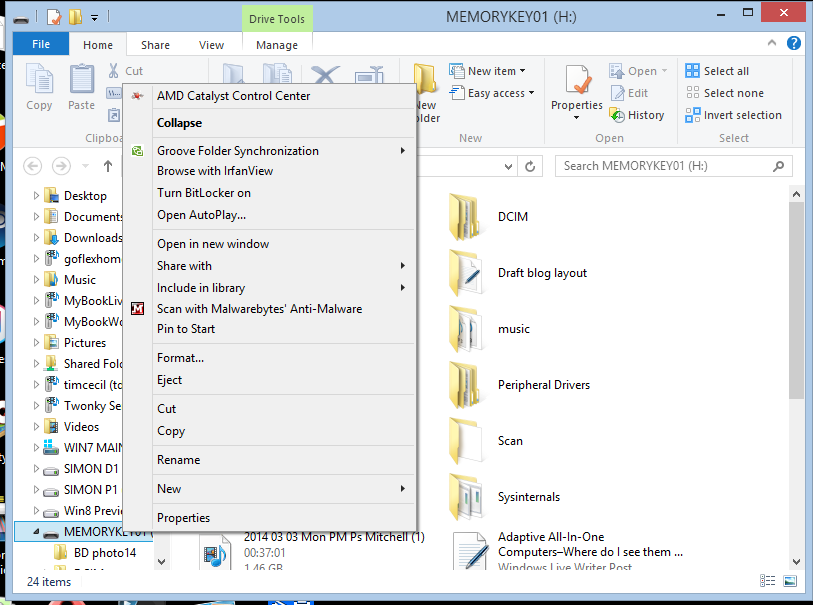
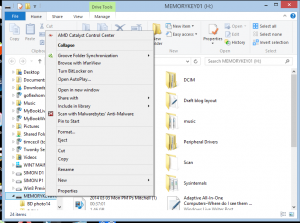
Windows users can do this in two ways. They can open Windows Explorer (File Explorer) or My Computer and right-click on the removeable storage which will be represented as its own drive letter. They then select the “Eject” option to begin safely removing the storage device.
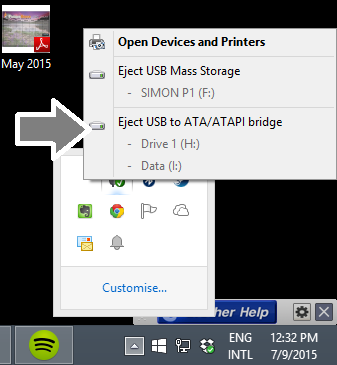
Safely Remove Hardware icon in Notification area
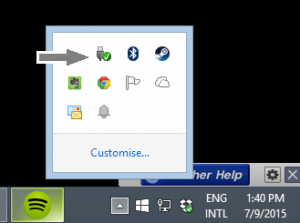
The other method requires you to click on the Notification Area on the Taskbar and right-click on the “Safely Remove Hardware And Eject Media” icon. Here, you are presented with a list of USB storage devices that are connected to your computer. Click on the one you want to remove to begin safely removing it. In some cases, a physical device may represent two or more logical volumes (drive letters) because it has been partitioned as such. Here, you select the physical device’s name to safely remove that device.
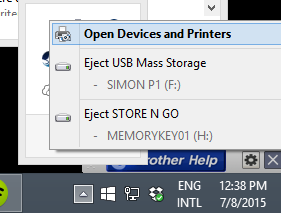
Devices available to remove
USB-based removeable-media adaptors like floppy-disk drives, Zip drives and memory-card readers have the ability to safely remove a particular medium or the whole device. Here, you can click on the medium to remove the card or disk or click on the physical device name to remove the device before you unplug it.
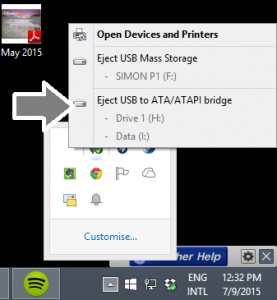
Two logical devices in one physical device – the one that is written clearly is the one to remove
This is more important with those devices that handle multiple media types like some multi-slot memory-card readers or devices that have a combination of fixed and removeable storage options like some digital cameras and camcorders that have internal storage along with an SD or microSD card slot. In the latter situation, these devices would have fixed storage greyed out while the removeable storage is written in black.
I have prepared a PDF reference sheet about the procedure needed to safely remove your removeable media from your Windows computer. Download and print this and keep it by your computer if you or others need to know how to do this properly.
Android users would go to the Storage menu and select the “Unmount SD Card” option for the SD card or “Unmount Mass Storage” for storage devices connected to their mobile devices via USB “On The Go” connectivity.
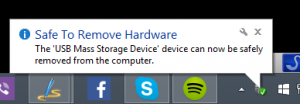
It is safe to remove
For other devices like A/V devices that write to an SD card or USB memory key, you would have to go to the device’s menu and select the “Unmount”, “Remove” or, more likely, “Eject” option. This process would be analogous to ejecting a tape, CD or MiniDisc so you can work with another medium.
Of course, powering off the equipment properly such as selecting a logical shutdown option would prepare any media or removeable devices attached to the equipment for safe removal.
Conclusion
Once you know how to properly and safely remove media or detach USB storage devices from your computer or similar device, you can avoid situations which can place your computer’s reliability or the data on that medium at risk.